|
|
The S-Boats
Page 1 Page 2 Page 3 Page 4
|
|
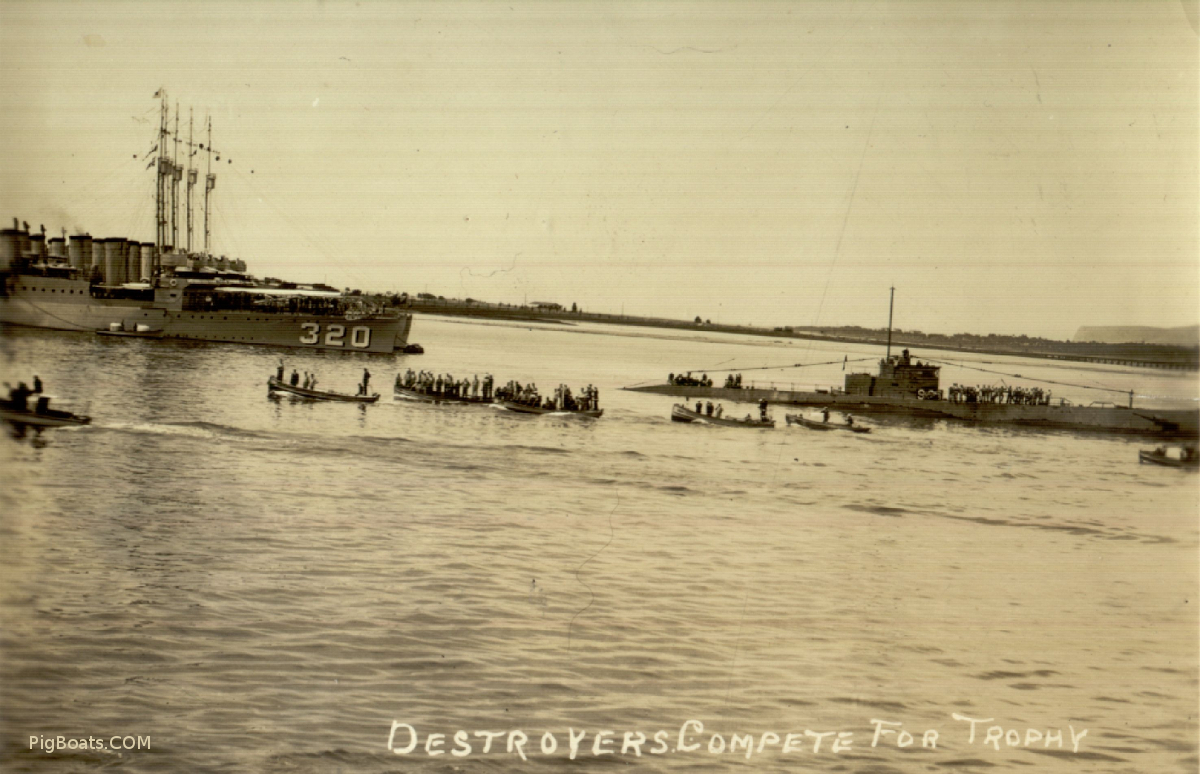
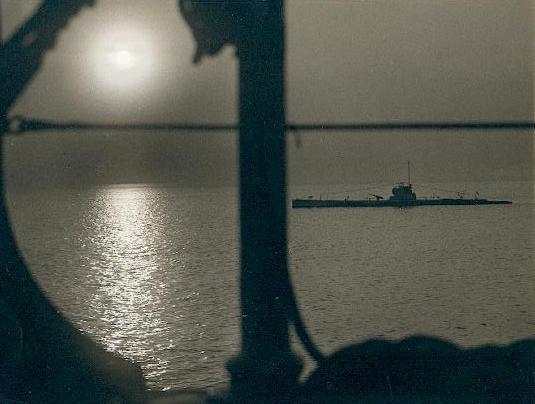
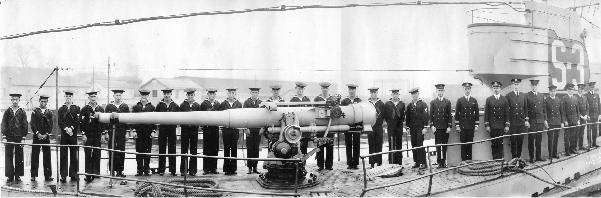
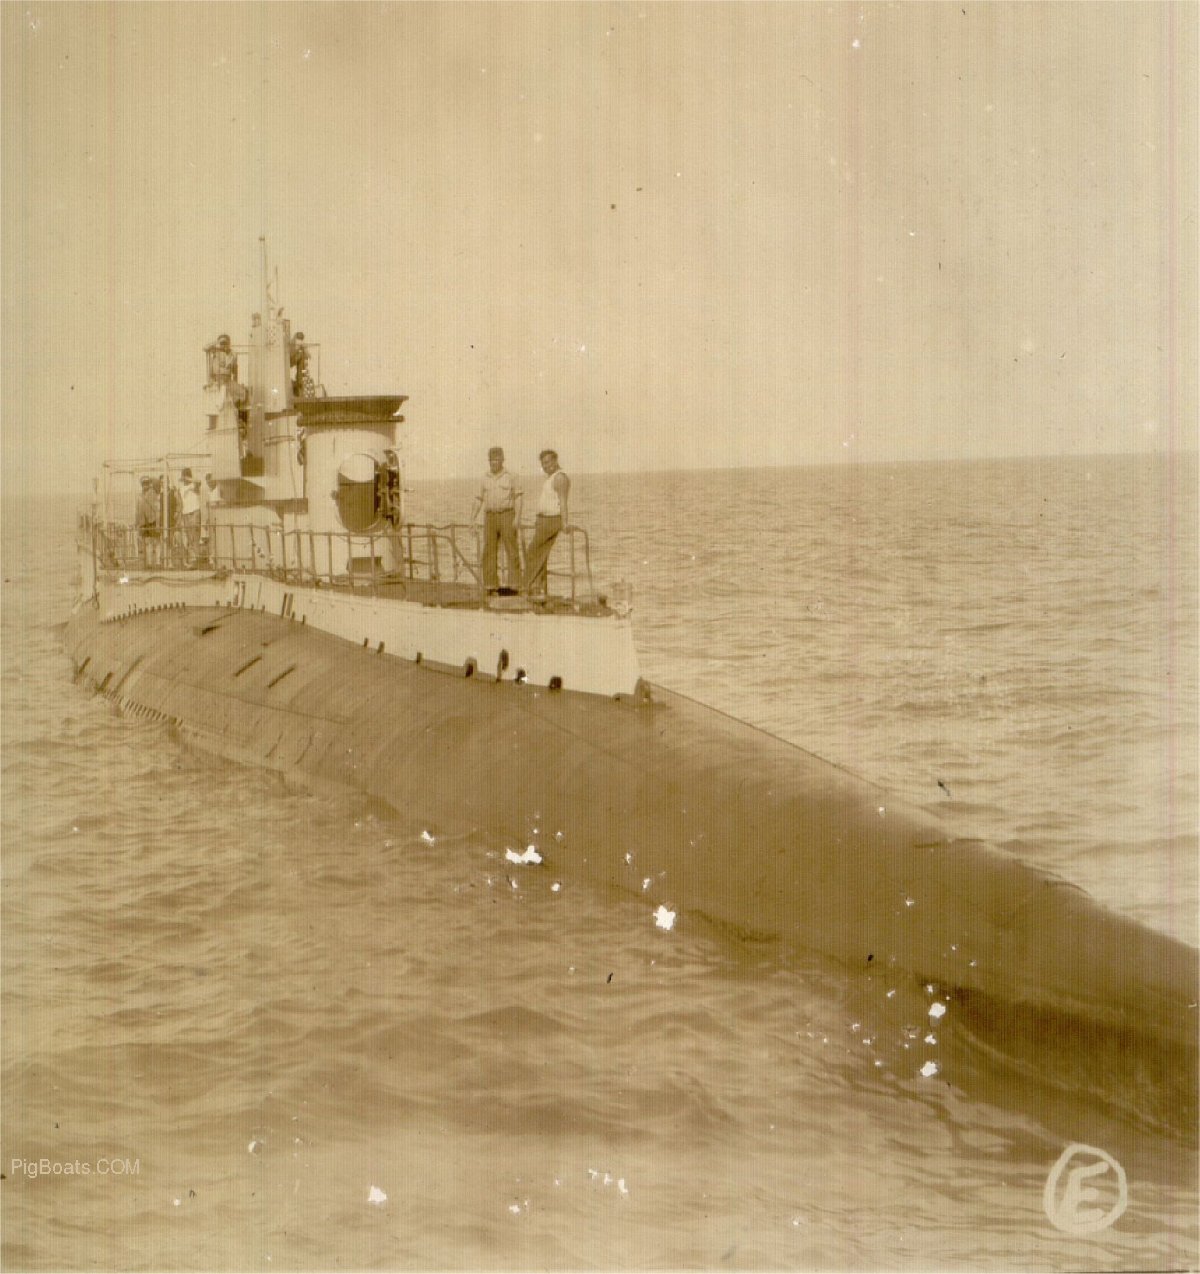
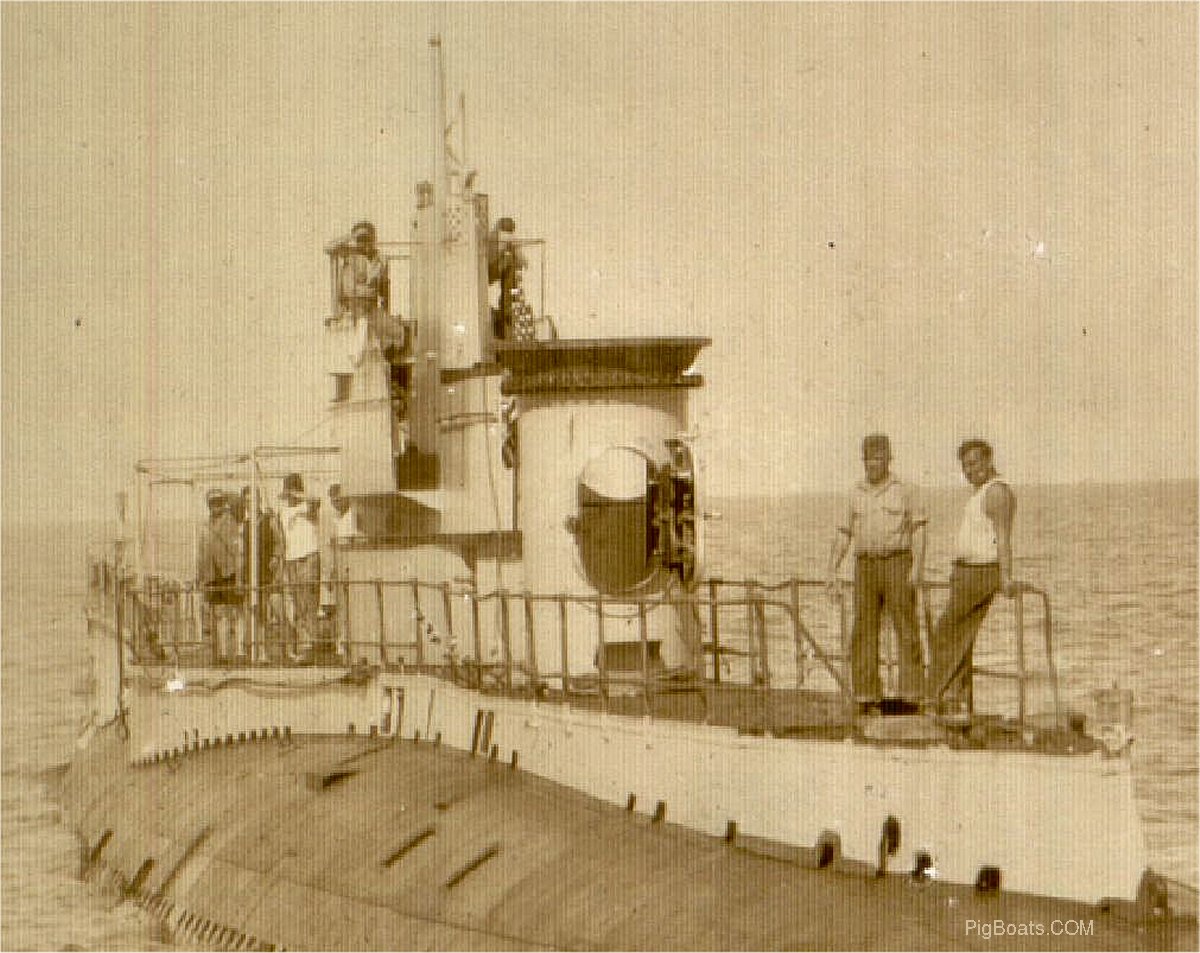
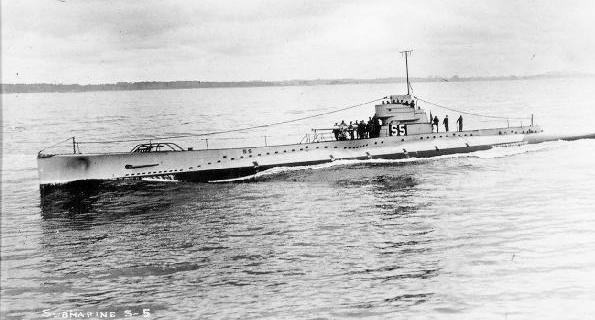
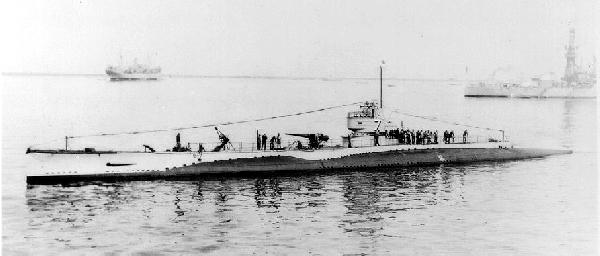
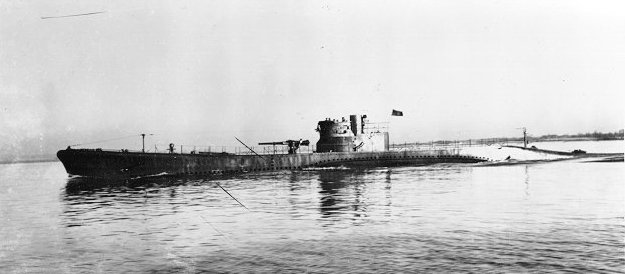
An unidentified S class submarine is witness to a whale boat race being put on by the destroyer squadron at San Diego. The only destroyer identifiable is the USS Selfridge DD 320 who was in the San Diego area in the mid to late 1920's. The location ID of San Diego has been made by Damage Control Chief David Johnston (SS/SW) with Point Loma in the right background. He has this to say about the submarine: Well the pic resolution is not good, but I think this is a 30 series boat, based on the shape of the bow plane pivot housings. They appear to be rounded which is distinctive of the 30 series. The 20 series boats had larger, angular, slab sided housings. My guess is S-35 or 36 and I would place the date in between 1928 and 1932. The aft portion of the conning tower fairwater is raised, a mod that was completed a few years after commissioning. This portion hid a ventilation air intake and an access hatch that was found to be excessively wet on the surface, thus a post commissioning mod raised it and eased the problem. Another dating point is the aft superstructure skeg. It was removed after 1932 as part of the post S-4 safety modification program. Since it is still intact in this photo that places the likely date prior to 1932. The most probable location is mid inner San Diego Bay with the low laying beach of Coronado between the point and the sub. Most likely right off National City. |
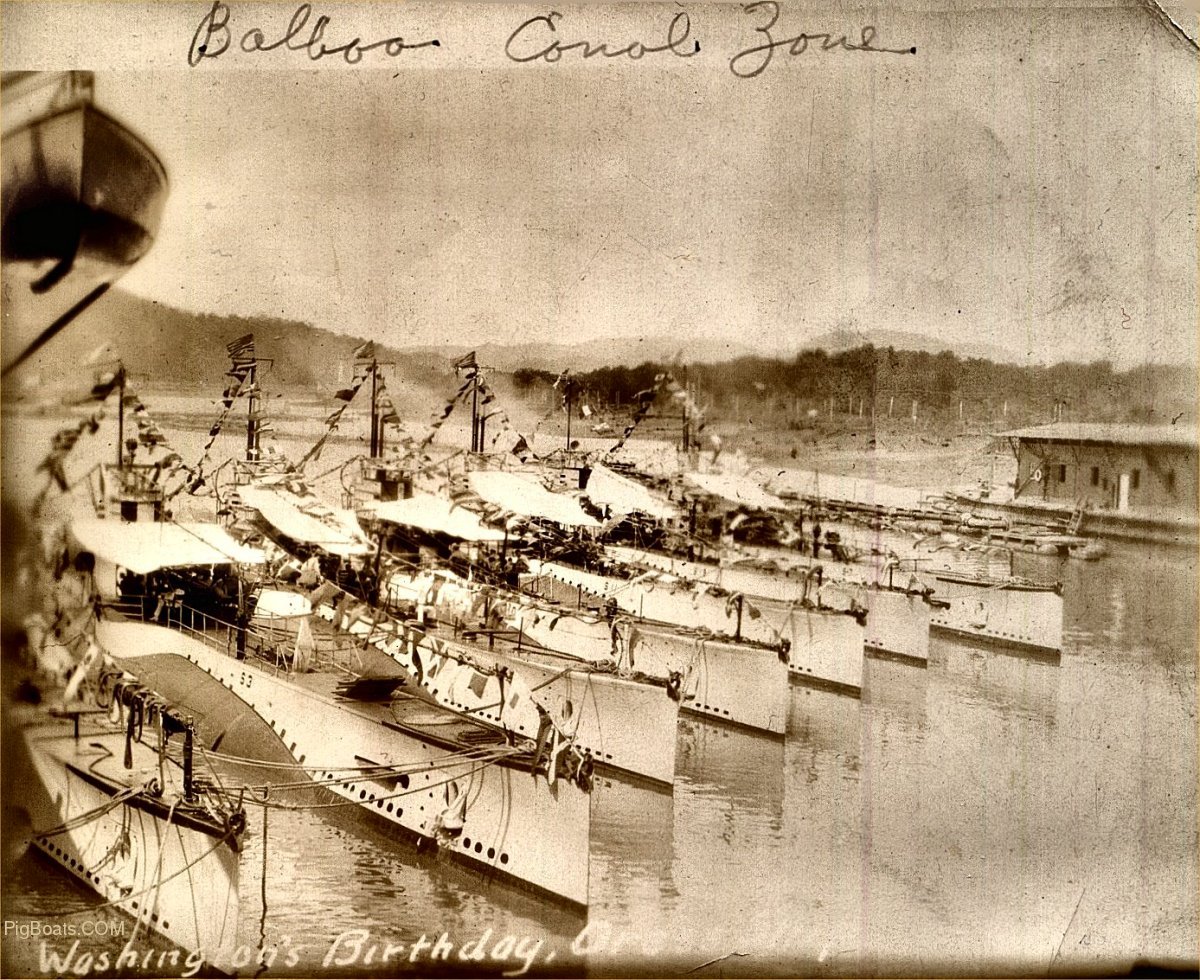
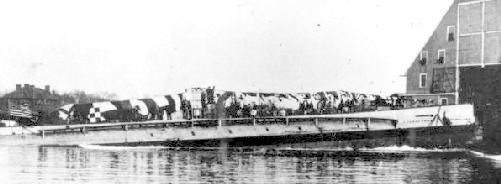
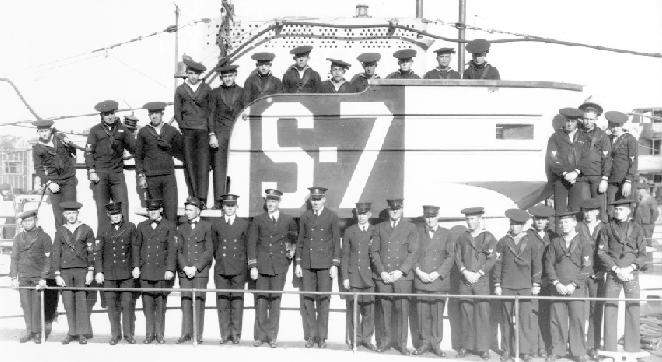
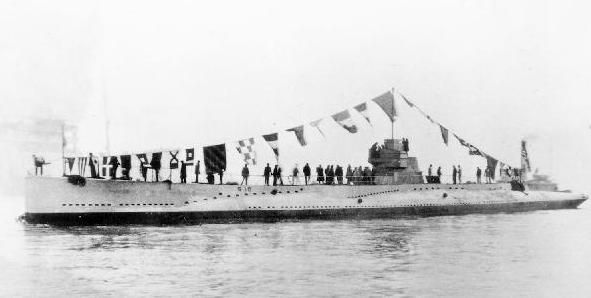
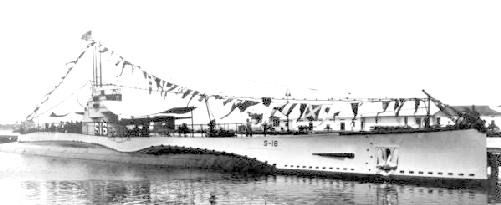
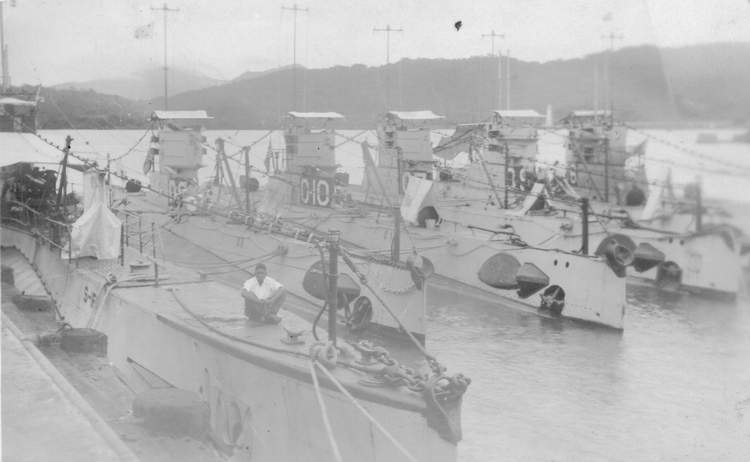
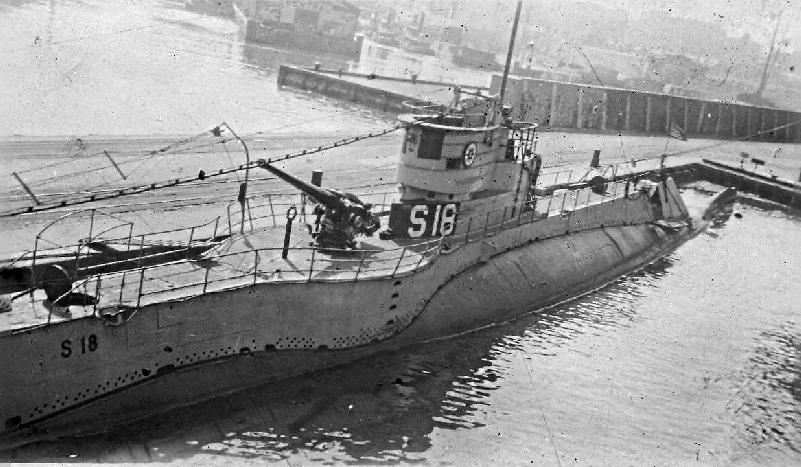
The above photo was taken at Balboa, Canal Zone, Panama circa 1924/25. The seven submarines are barely identifiable. Much of the identification to follow is extrapolation and thought to be only about 75% correct for the obscured submarines. From the left, the first submarine has nothing that can be used to say which submarine it is. The next sub to the right is clearly seen as the USS S-3, the first submarine built at Portsmouth and the first built to government designs. Note that her bow superstructure limber holes are round not rounded rectangles like the rest of the submarines. The next submarine is a quandary. The name is obscured by the flags of the S-3. The side of the conning tower does have a name painted on it but is mostly obscured by the awning. Only the top and bottom of the name is visible and this appears to be the S-13 or S-18, ID is poor. The next submarine, again has the name mostly obscured by an awning but this looks to the S-16. The submarine to the right of this one is clearly the S-11 as noted on the hull. Second boat from the right is, again is in doubt but seems to be the S-12 as noted by the side of the conning tower though something can be seen on the hull it isn't clear. The last submarine on the right is the USS S-7 as seen on the hull. The vessels are celebrating President George Washington's Birthday, February 22. All submarine have "Dressed Ship" for the occasion meaning they have displayed all their signal flags running from the bow to the stern. Note of all of this is written at the bottom of the photo though the "Dress Ship" is highly obscured and much fiddling with color and contrast was necessary to read the caption. Several submarines seem to be running a battery charge and smoke from the diesels can be seen in the air behind the subs.
Co-collaborator for PigBoats.COM, Dave Johnston, has looked this photo over and and has added this information about these submarines; "All of the boats in this photo are Government design S-boats, thus ruling out S-18. "S-3 through S-7 had bow planes above the water line with a slit in the forward superstructure to accommodate them when retracted. S-8 through S-13 and S-48 through S-51 had non-retractable bow planes below the water line and were thus out of view. There WAS NOT a slit in the forward superstructure on these boats. "S-14 through S-17 reverted back to the above water bow planes and thus the bow plane slit returned." |
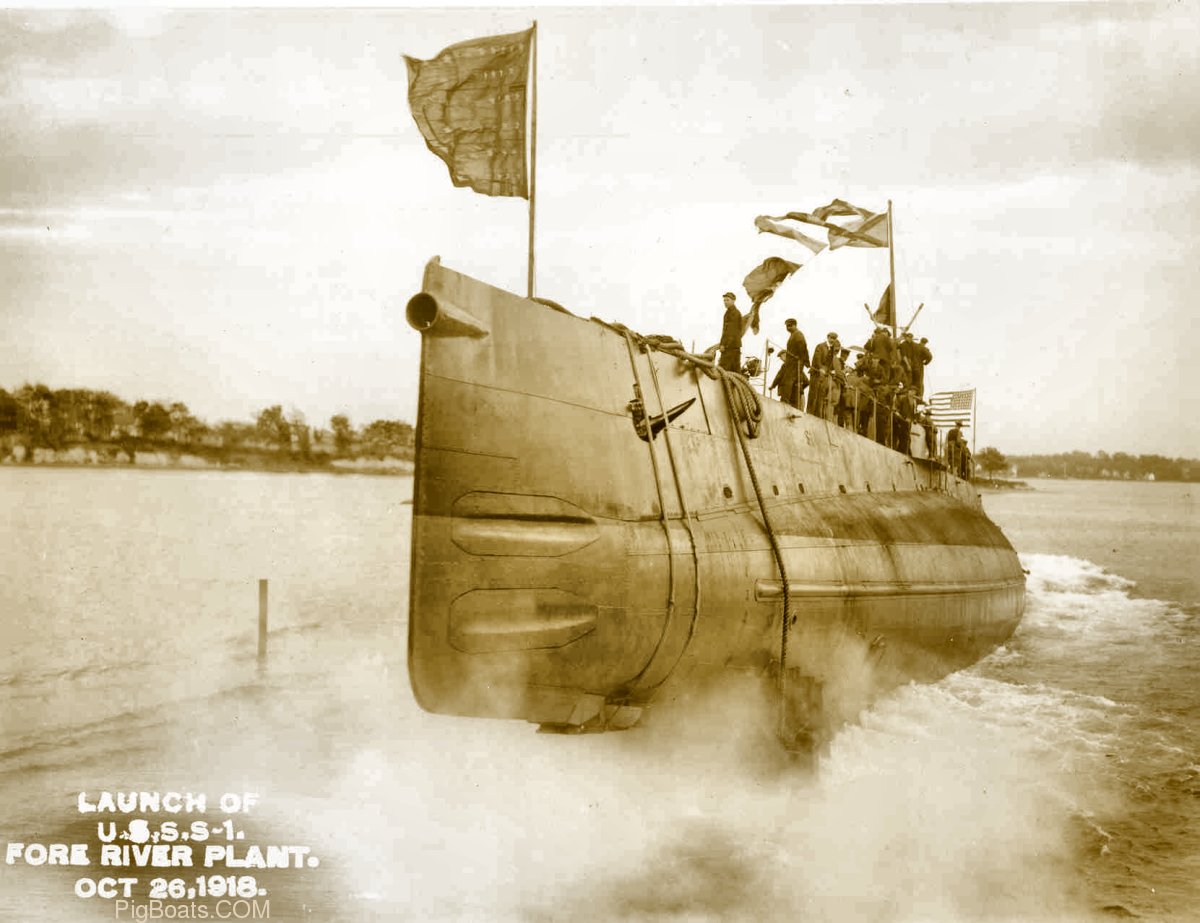
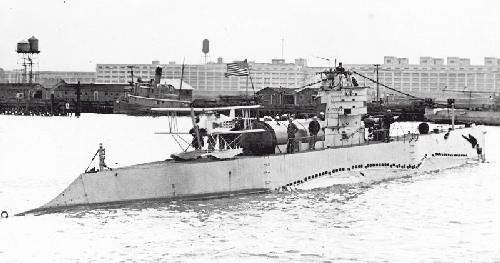
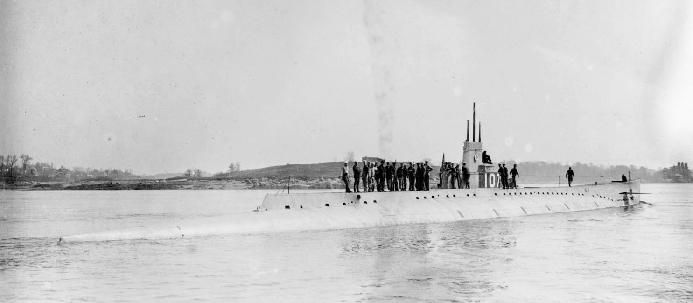
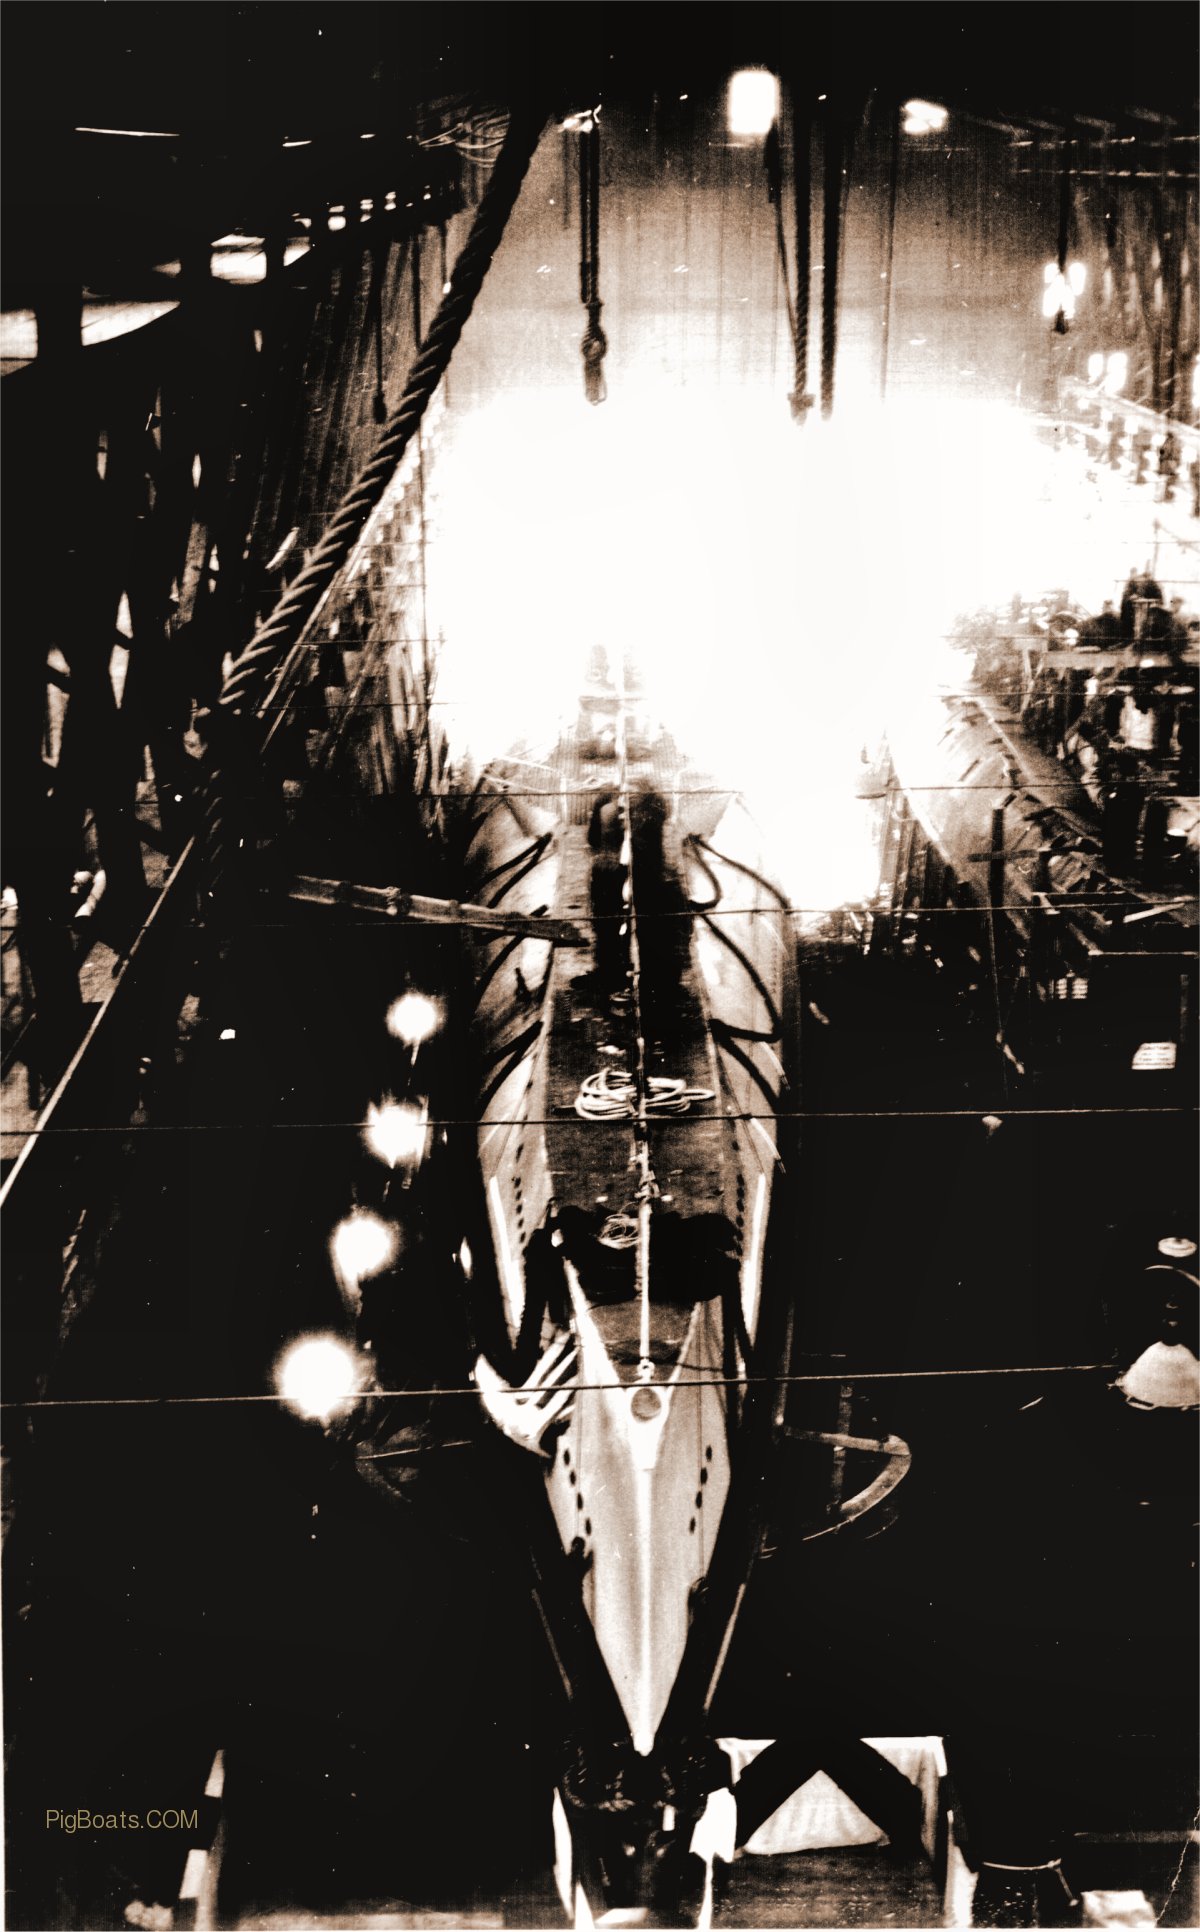
The first of a new submarine class. The USS S-1 slides down the ways at the Fore River Ship Builders on October 26, 1918. World War One was in its final throws, coming to an end 16 days later on November 11, 1918. The S-1 is missing the pivot covers over the bow planes. This being unnecessary for launching. Only a handful of signal flags were used to add a festive air to the occasion. A combination of yard workmen and a few dignitaries rode the submarine down the ways. There is no visible evidence of any Navy presence for her first taste of water. She was to end her career on July 20, 1945 in a scrap yard in Durban, Union of South Africa and final scrapping a year later in 1946. |
 |
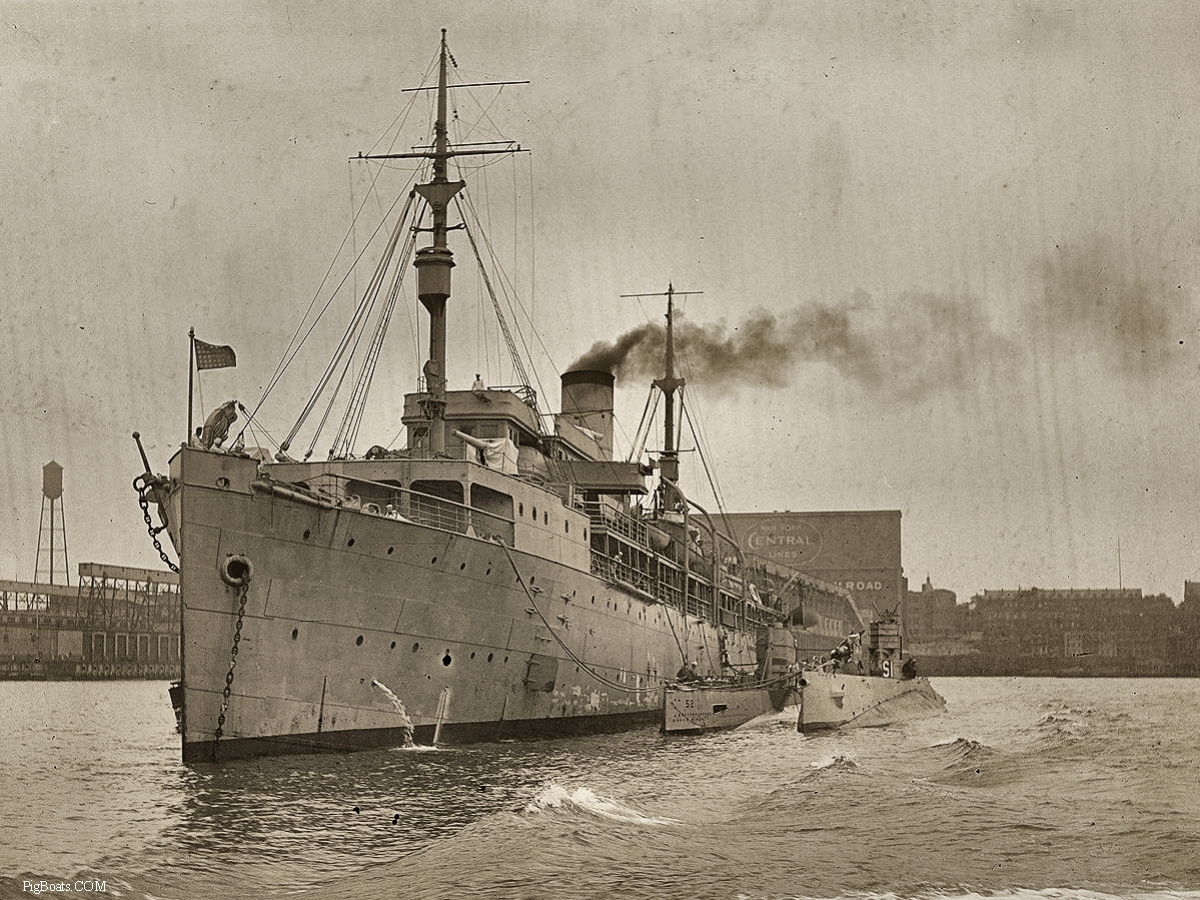
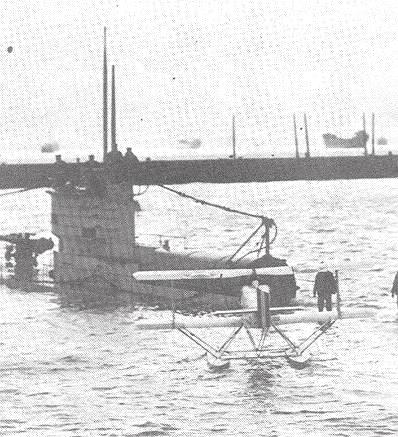
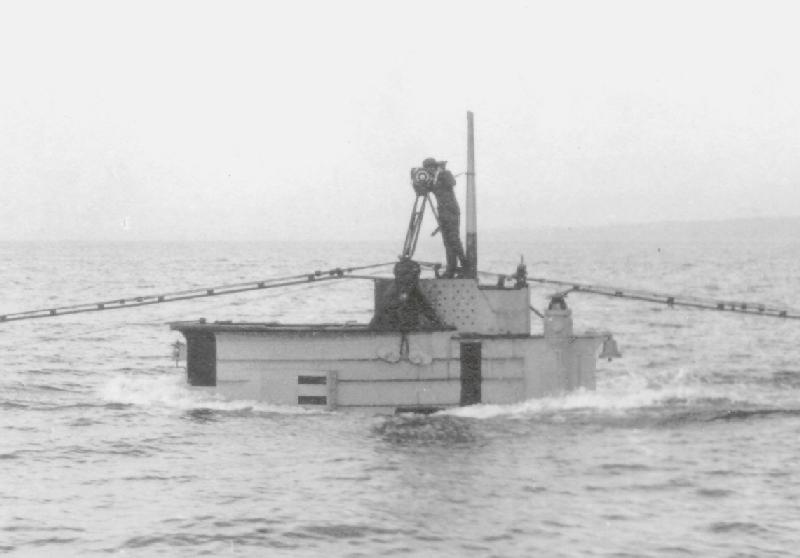
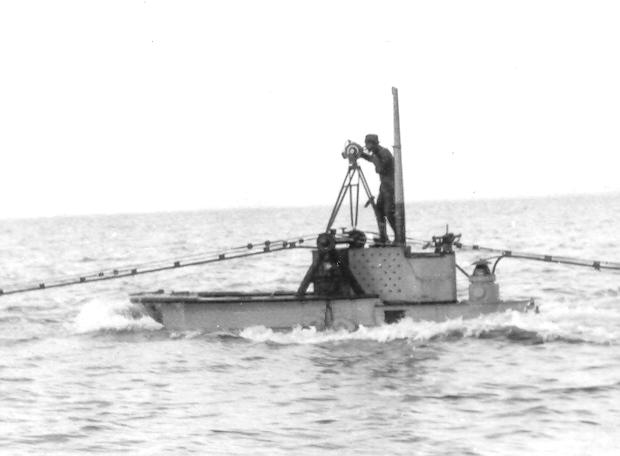
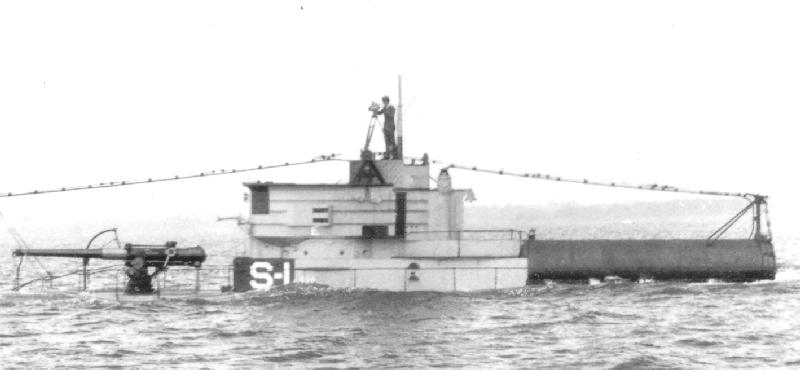
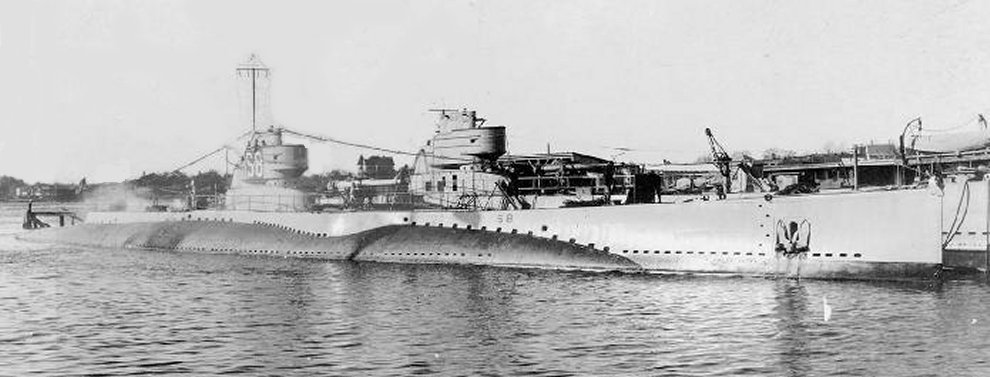
The USS S-1, USS S-2 and submarine tender USS Beaver moored at New York city. The sign on the building in the background says "New York Central Line". The time frame is pretty tight as the S-2 was modified with a large flared bow and a bow buoyancy tank soon after trials and this is missing in this photo. The S-1 was commissioned on June 5, 1920 and the S-2 on May 25, 1920 and the Beaver left July 22, 1921 for the Pacific with S-2 and others. I give the date of this photo to be late summer 1920. The S-2 left for the Pacific on July 22, 1921 with boats of Submarine Divisions 18 and 12, for what was, at that time, the longest cruise on record for American submarines. They sailed via the Panama Canal to Pearl Harbor and then on to Cavite, Luzon, in the Philippine Islands. The S-1 was part of Submarine Division 2 with subsequent operations out of New London, Connecticut, cruising the New England coast until 1923. On 2 January 1923, she shifted to SubDiv Zero, as the sole sub in that division, a division created for experimental work, and conducted winter maneuvers in the Caribbean Sea. She returned to New London in the spring to continue experimental duty. As part of a series of studies conducted by the United States Navy after World War I into the possibility of submarine-borne observation and scouting aircraft, S-1 became the experimental platform for this project late in 1923. She was altered by having a steel capsule mounted abaft the conning tower; a cylindrical pod which could house a small collapsible seaplane, the Martin MS-1. Note the officer on the top bridge of the Beaver and the crew on the bow and several other locations along her side. |
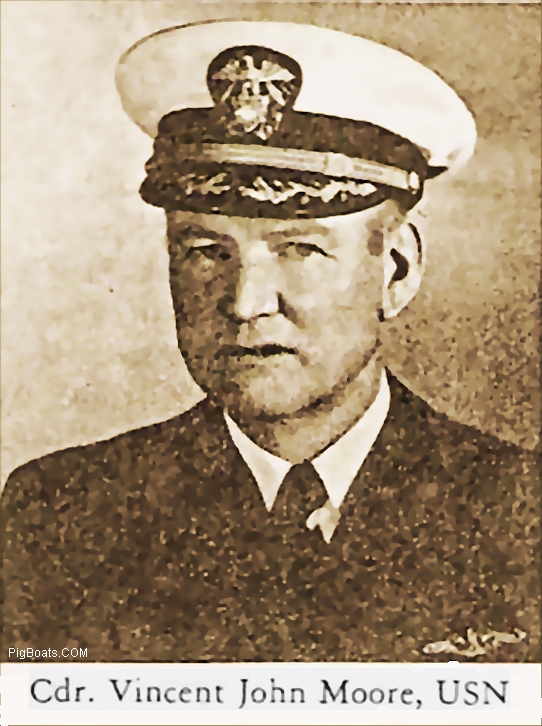 |
Cdr. Vincent John Moore was XO of the USS S-1 SS 105 in 1921. He later became the CO of the USS R-9. He was a graduate of Annapolis, Class of 1917. He served on board USS Pennsylvania when it went to Europe with President Wilson to sign treaty ending WWI. Cdr Moore retired from the Navy in 1924 due to health reasons. He was recalled to active duty in 1942 as an instructor. He passed away on Dec. 9, 1973. |
 |
 |
myimages[11]="http://archive23.pigboats.com/subs/logobg17.jpg"
 |
 |
 |
 |
 |
 |
 |
 |
 |
 |
 |
 |
 |
 |
 |
 |
 |
| July 7, 2001
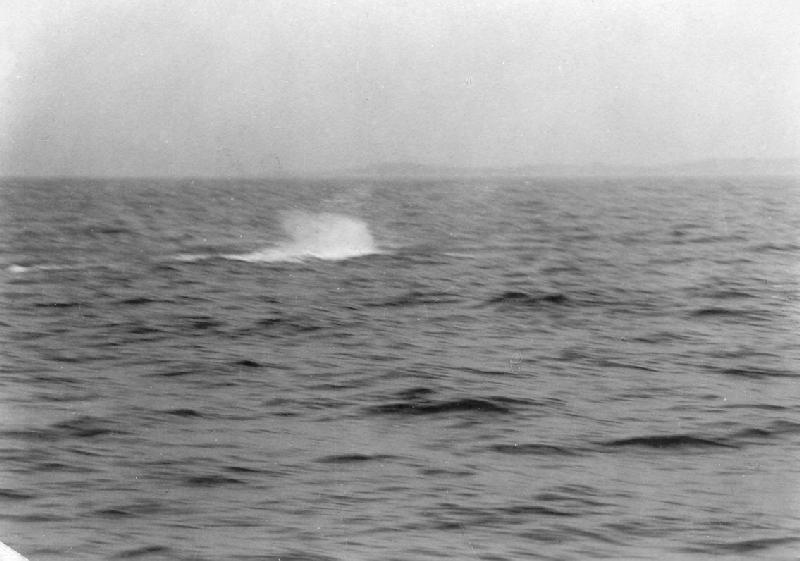
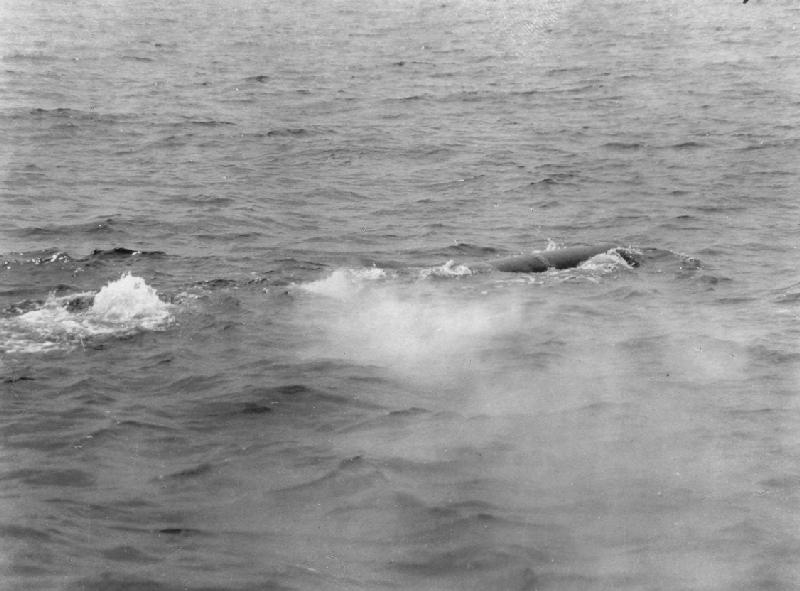
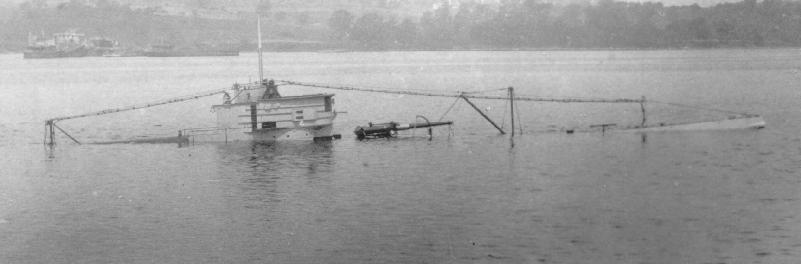
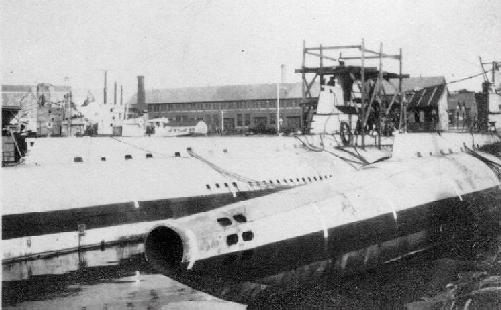
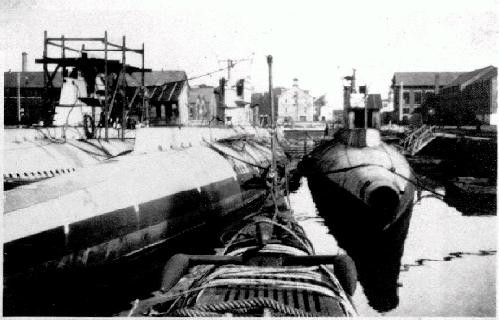
Ric, I like a challenge, so I took you up on your offer concerning the photo of the S-2 with her bow out of the water on your "Looking Glass" page. I did a little research and discovered that the bulbous tank at S-2's
bow was not original equipment. Apparently, Simon Lake was concerned about
her seakeeping qualities and decided that a bow buoyancy tank would solve
the problem. The Bureau refused to let him modify the boat during construction
so that the prototypes S-1, S-2, and S-3 could be evenly compared during
trials.
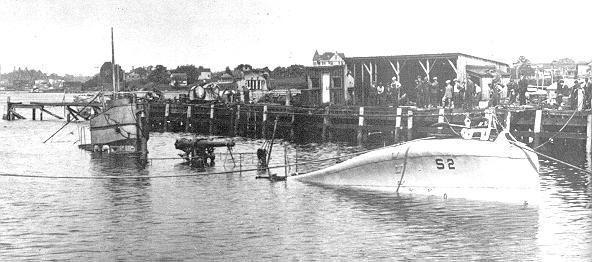
One other clue jumped out at me when looking at the photo. On the other side of the pier, just to the left of the enclosure, is the conning tower of the USS(?) U-111, a German U-boat taken over by the USN for study. After an extensive series of trials, it was decommissioned (again according to Friedman) in April, 1920. ( S-2 was commissioned May 25, 1920 ) I also could not find any reference (yet) of the S-2 ever having accidentally sunk alongside. Given these facts, I am speculating that this photo was taken shortly after the completion of the BBT mod in 1921 and this was an alongside static dive to test the tank's operation and integrity. This also jibes with the boat's large up-angle in a shallow water dive. Strangely, the only fact that doesn't fit is the U-111's presence in
the photo. If she was decommed in April, 1920, why is she still around
in 1921? Either she wasn't immediately disposed of (I haven't been able
to find a date for that yet), or one of Friedman's dates are wrong.
See ya Dave Johnston |
 |
 |
 |
 |
 |
 |
 |
 |
 |
 |
 |
 |
 |
 |
 |
 |
 |
 |
 |
 |
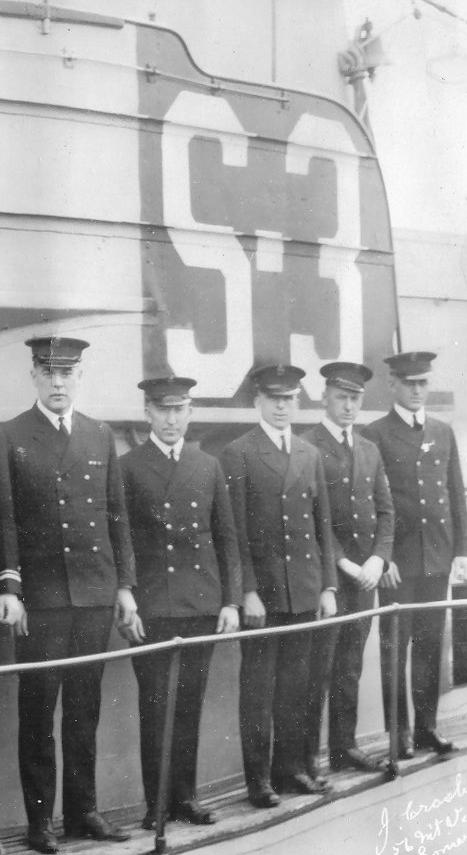 |
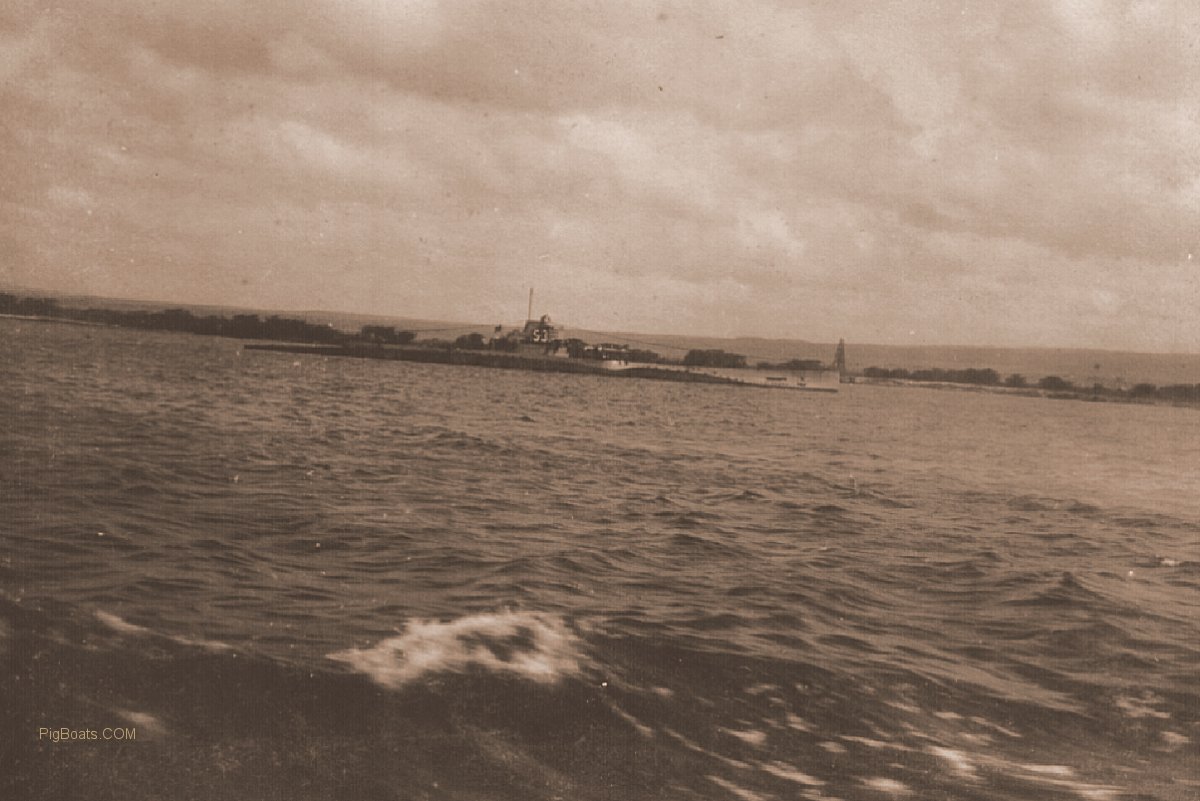
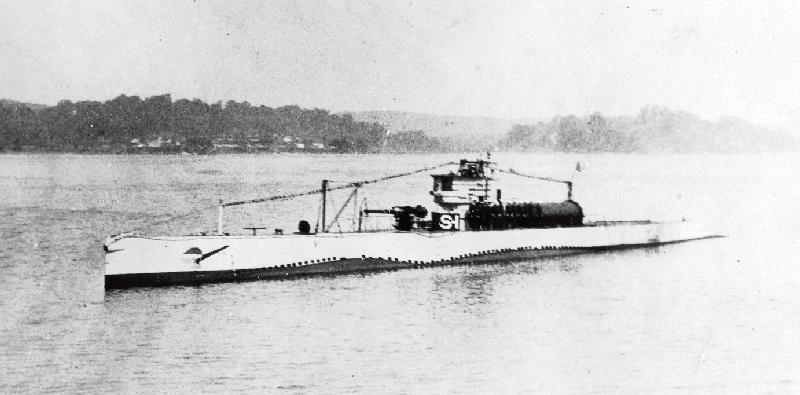
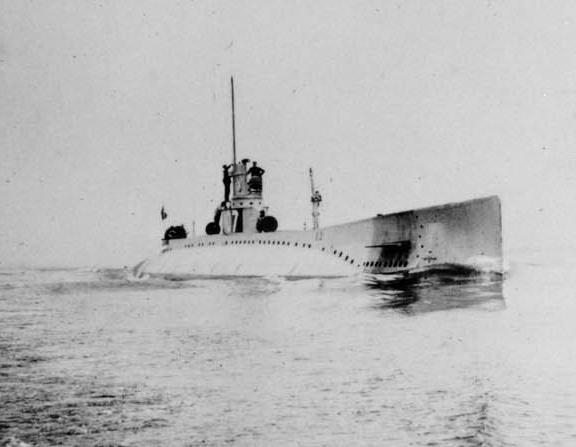
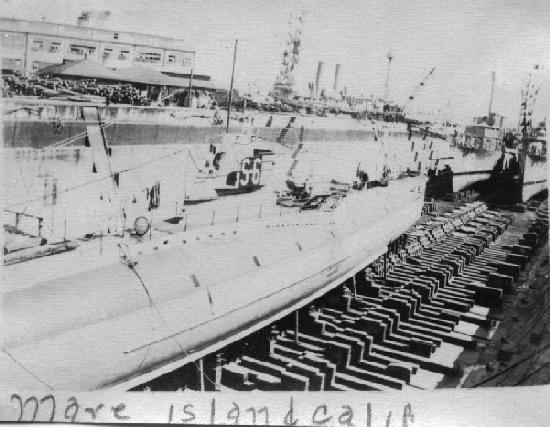
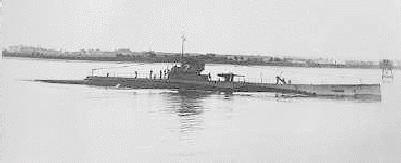
The USS S-3 left the east coast of the US with SubDiv's 12 and 18 for, at time, the longest cruise ever undertaken by US submarines to the Philippines on July 1921. The two divisions were assigned to the Asiatic Fleet as SubFlot 3 at the Cavite Naval Station. Upon reaching Pearl Harbor the S-3 was detached and reassigned to operate on the west coast from Mare Island, Calif. She departed Pearl Harbor on November 9, 1921 and sailed to the west coast where she operated until mid-July 1923. On July 17, 1923 she took departure from San Francisco Bay to retransit the Panama Canal en route to New London. This photo was taken in that short period when she was in Hawaiian waters in 1921. This photo was taken by Ray Suess, SN/1c from the deck of the USS R-14 |
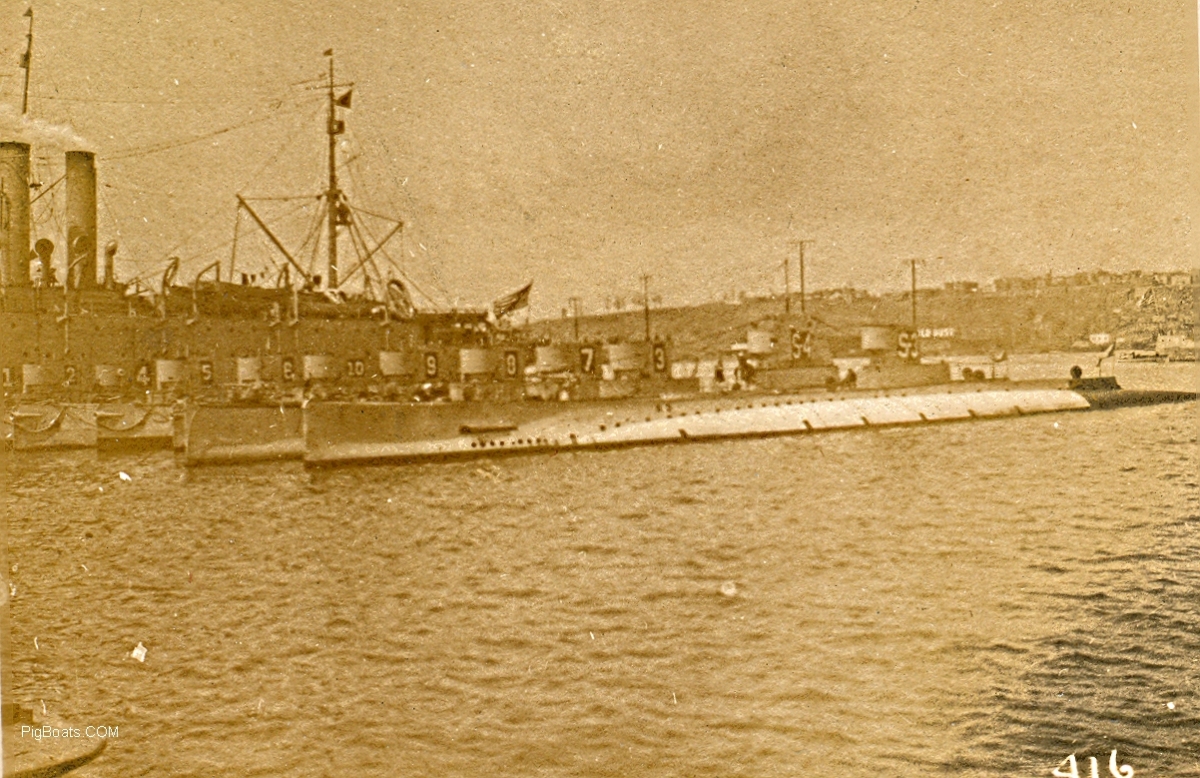
The USS S-3 moored outboard the USS S-4 and 10 R-Class submarines. All moored to the the submarine tender USS Camden. The photo was taken at the 79th Street Boat Basin at New York City on the west side of Manhattan Island. The R Boats are the 1,2,3,4,5,6,7,8,9 and10. Submarine Division 9 was en-route to the Caribbean for maneuvers. Later in late 1920 early 1921 SubDiv 9 redeployed to the Pacific but the R-9 wasn't with them. She didn't deploy to the Pacific until 1924. |
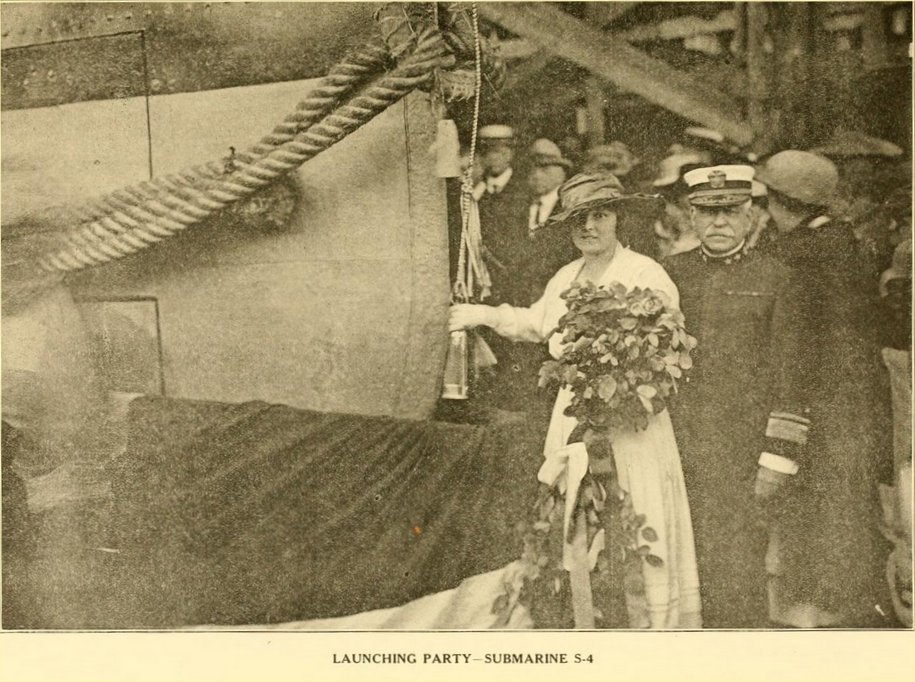
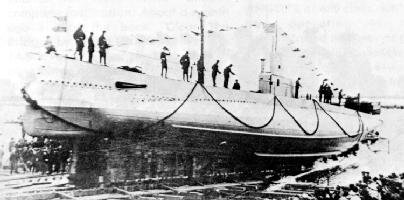
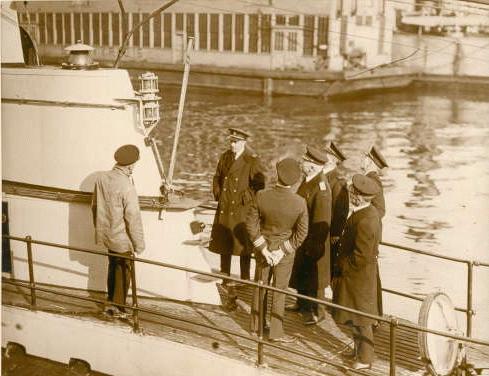
August 27, 1919, S-4 (SS-109) at the Portsmouth (N.H.) Navy Yard, about to be launched and sponsored by Mrs. Herbert S. Howard seen here with Admiral Clifford J Boush, Commandant of the Portsmouth Shipyard. Also notable at the launching was the Secretary to the Assistant Secretary of the Navy, Franklin D. Roosevelt.
|
 |
 |
 |
 |
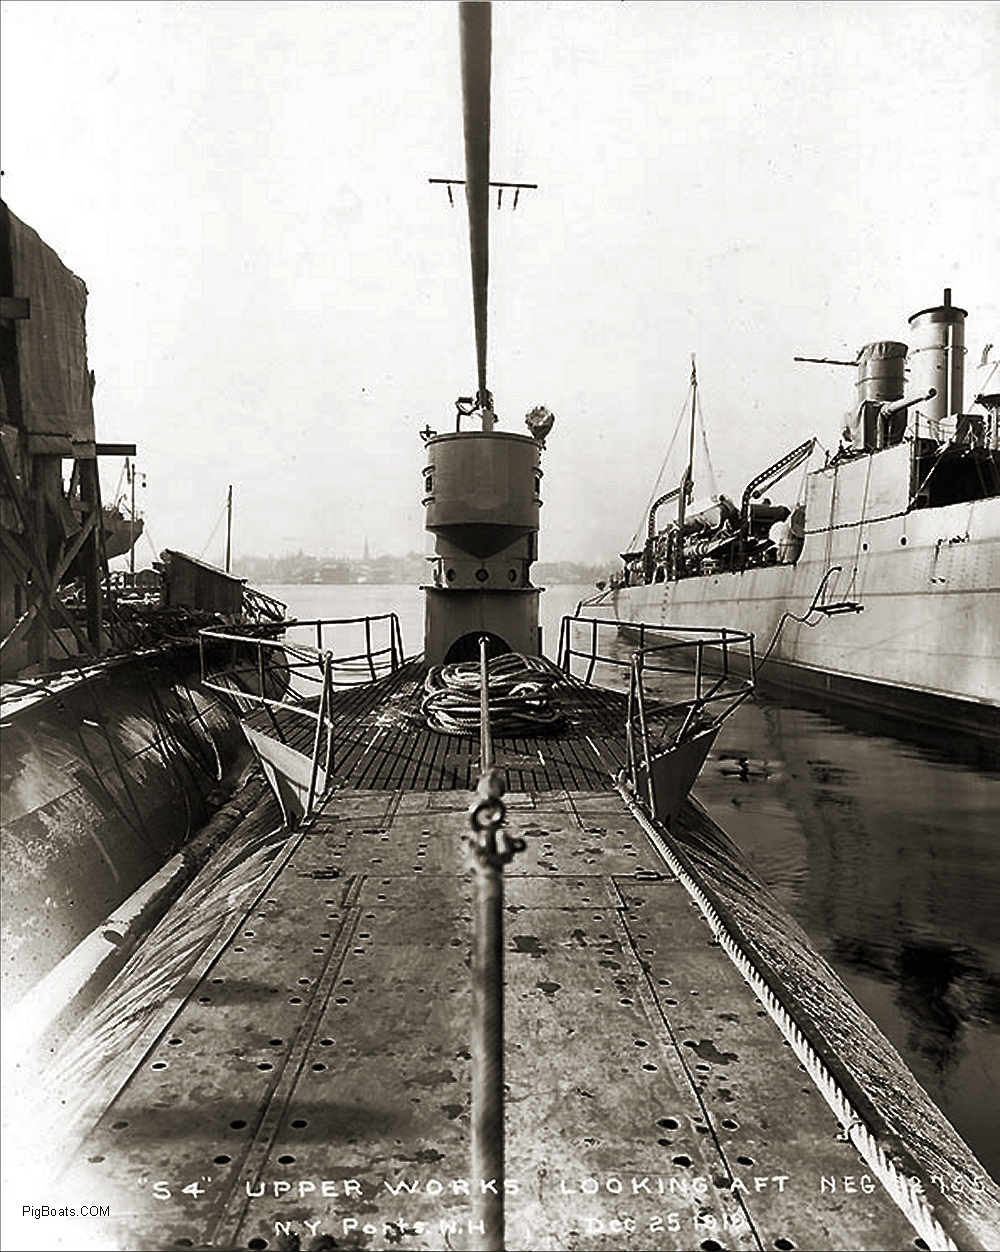
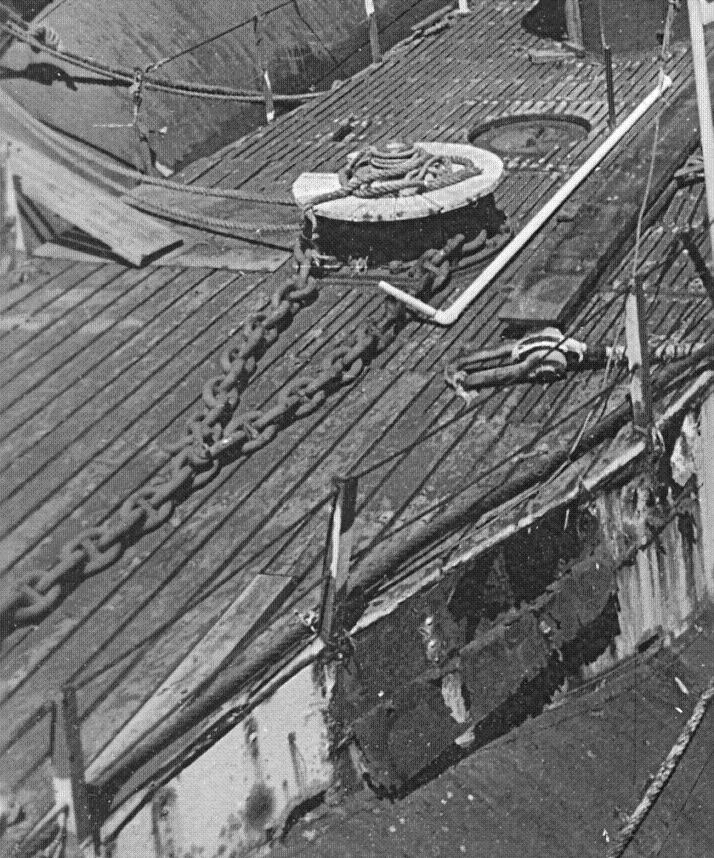
USS S-4 Exterior Photo, Christmas Day 1919, taken from the bow looking aft. Interesting to note that even though the S-4 has already been commissioned she was still in the yards being worked on. A large coil of rope lays where the 4"/50 deck gun will eventually go. On the right is the destroyer USS Israel DD 98 which is at Portsmouth for conversion to a mine layer. On the left it is thought to be the USS S-5 which was only a few months behind the S-4 in construction. Interesting to note that both were destined to sink. |
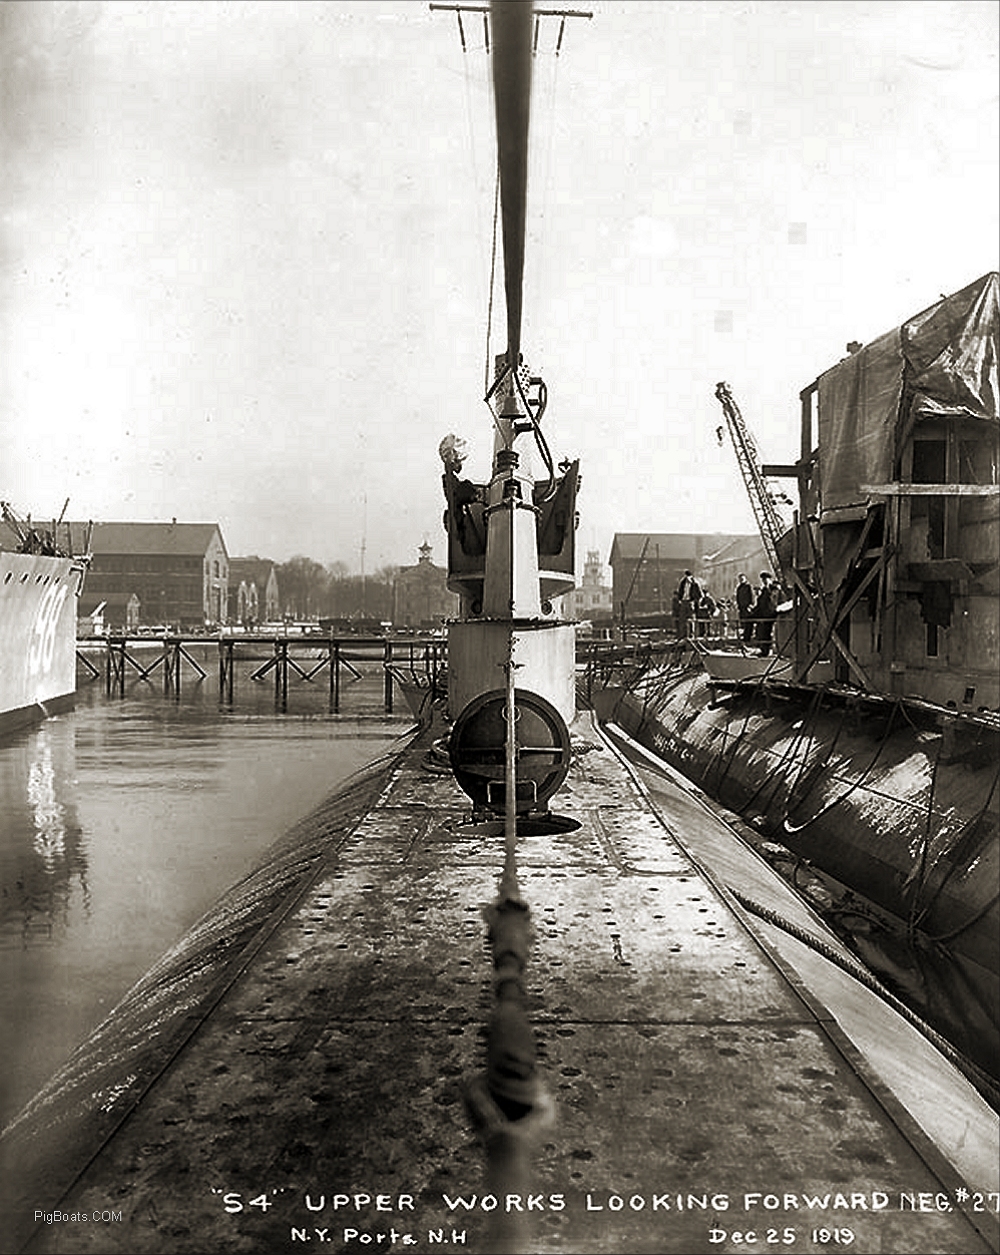
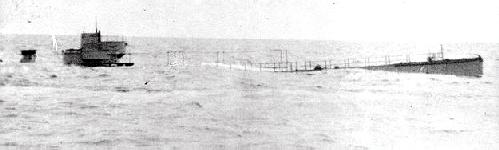
USS S-4 Exterior Photo, Christmas Day 1919, taken from the stern looking forward. On the left is the bow, with hull nember, of the destroyer USS Israel DD 98 which is at Portsmouth for conversion to a mine layer. The sub on the right is thought to be the USS S-5 which was only a few months behind the S-4 in construction process. Interesting to note that both were destined to sink. |
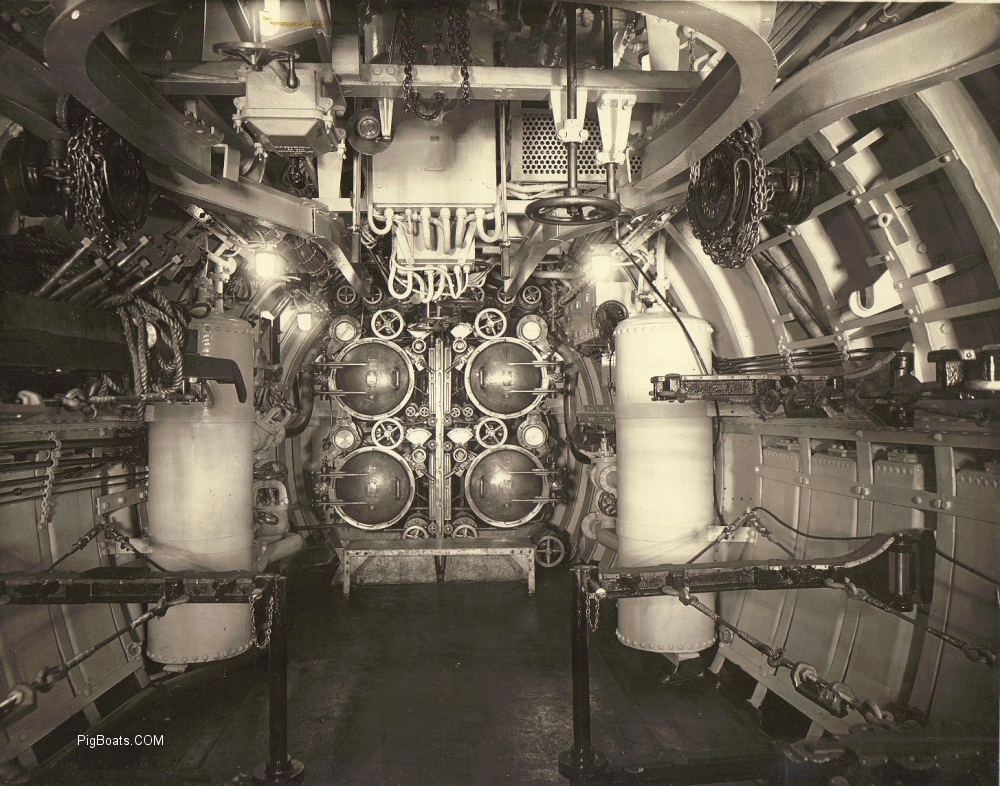
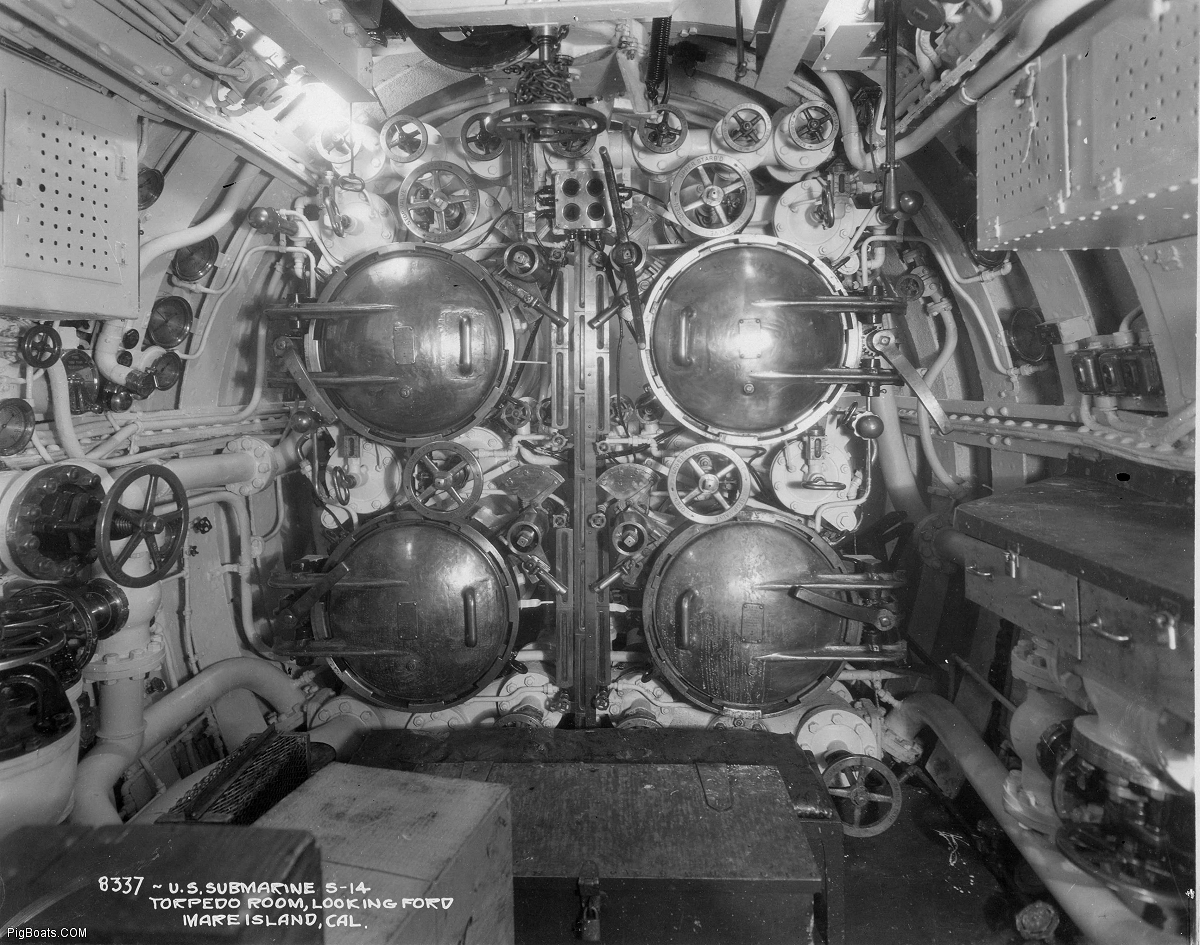
USS S-4 Interior Photo of the torpedo room. The detail of the overhead track for the chain hoists can be seen. There is a fore and aft track that leads to the port and starboard torpedo tubes. There is also a semicircular track that allows the transfer of torpedoes from side to side. The track is "gated" and can be swung into position for the use of the center track. The large vertical tanks on each side are impulse air for firing the torpedoes out of the tubes. The bracing sticking out from the hull on each side provided storage for up to ten torpedoes for reloads. The submarine carried a total of fourteen torpedoes. Four of them were in the tubes and ten in the room. Two each on each of the lower wider brackets and one each on the top shorter bracket. |
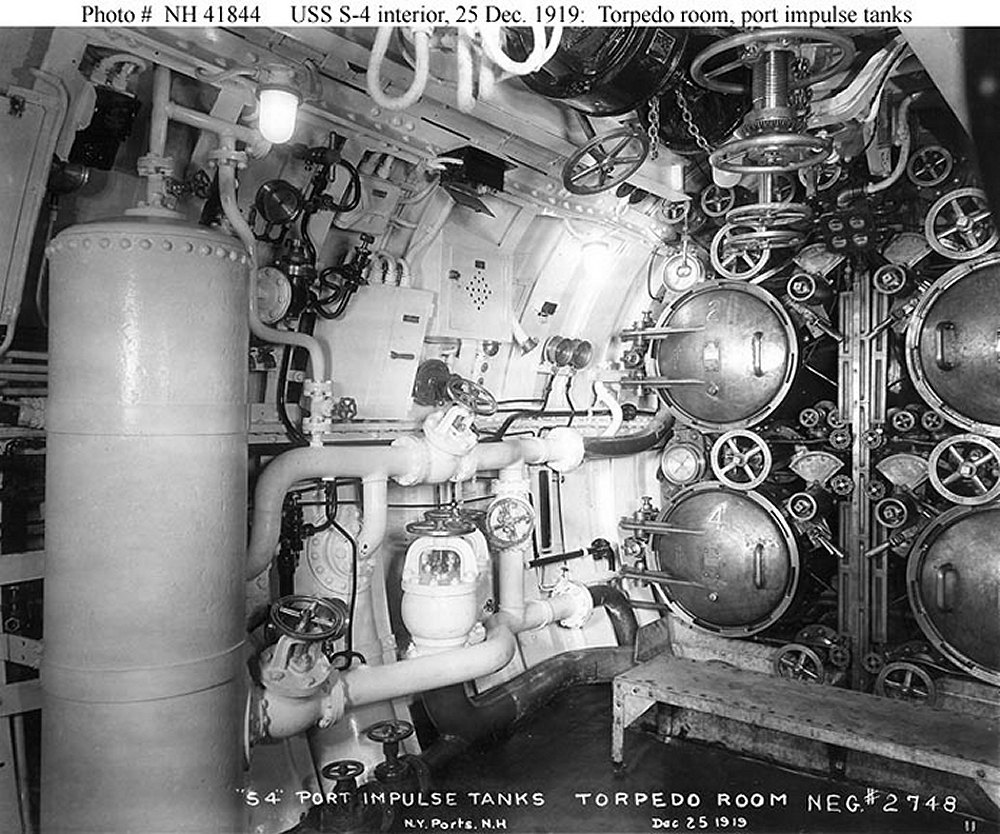
USS S-4 Interior Photo of the torpedo room showing the forward port corner of the room and the port bank of torpedo tubes and their Impulse Tank. Associated piping is seen leaving the lower part of the tank and shows the cross over for the upper and lower tubes and the high pressure air piping at the top of the tank. Note that the numbers '2' and '4' are on the torpedo tube doors. That means these are tubes # 2 & 4 . Tubes "1" & '3' are the starboard bank of tubes seen on the extreme right of the photo. |
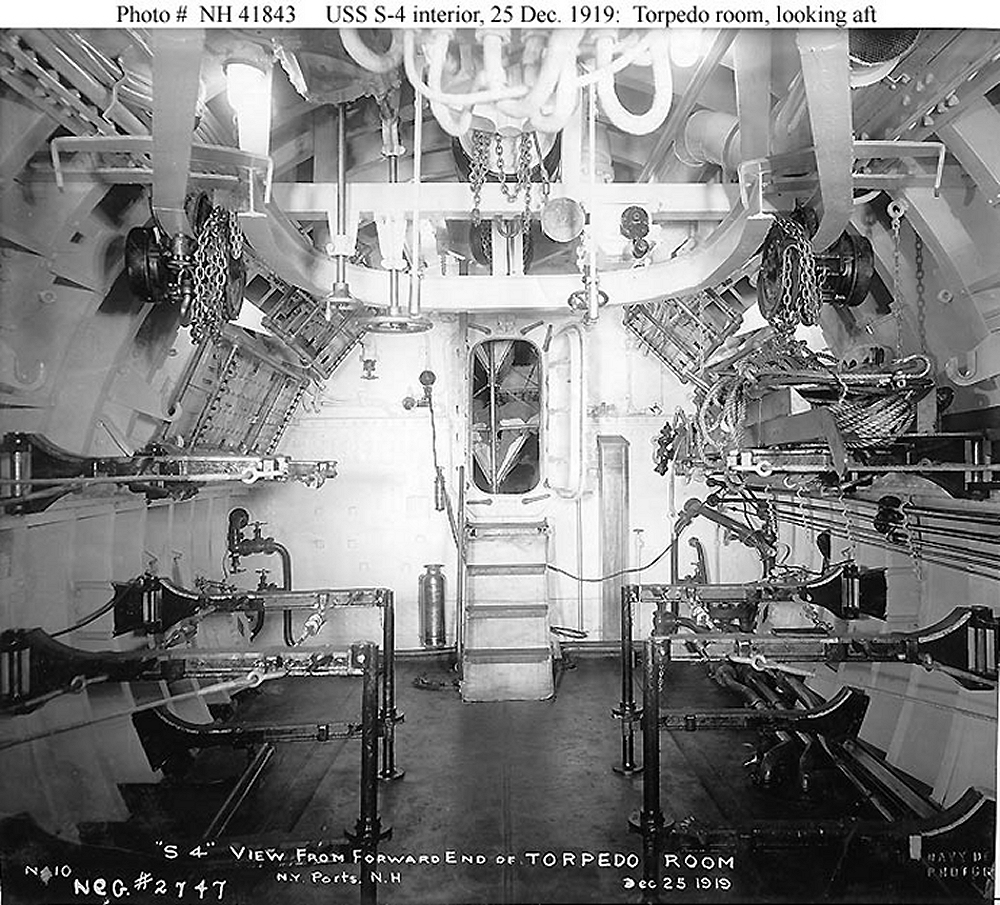
USS S-4 Interior Photo of the torpedo room. The detail of the overhead track for the chain hoists can be seen. There is a fore and aft track that leads to the port and starboard torpedo tubes. There is also a semicircular track that allows the transfer of torpedoes from side to side. The track is "gated" and can be swung into position for the use of the center track. This view looking aft shows the torpedo storage rack more clearly. The submarine carried a total of fourteen torpedoes. Four of them were in the tubes and ten in the room. Two each on each of the lower wider brackets and one each on the top shorter bracket. Bunks can be seen tilted up in the after end of the room The torpedo loading skid can be seen on the top brace on the right side of the photo. Looking through the door into the battery/berthing compartment you can see crews berthing with the bunks 'triced up'. |
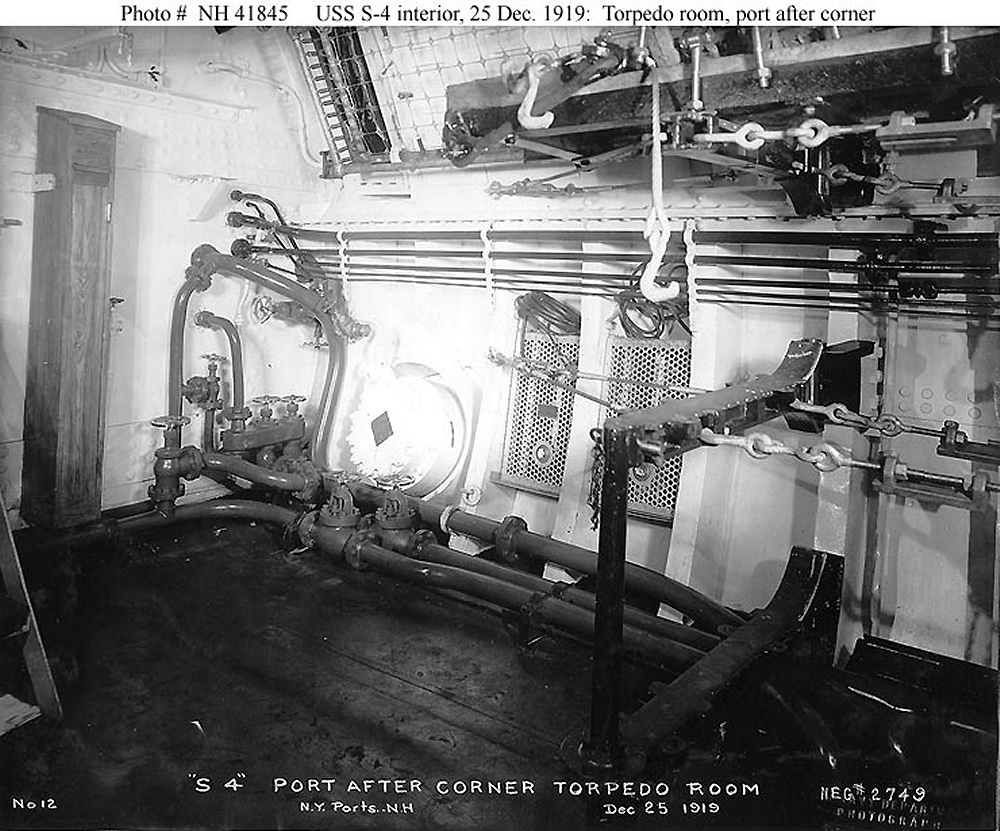
USS S-4 after port corner of the Torpedo Room. A few interesting things here. The large circular object above the large piping is the back sides of a Fessenden Oscillator, an early underwater listening and communication device. There appears to be two electric space heaters fitted between the frames just forward of the Fessenden Oscillator. The piping is for the trim and drain system and fuel oil transfer system. |
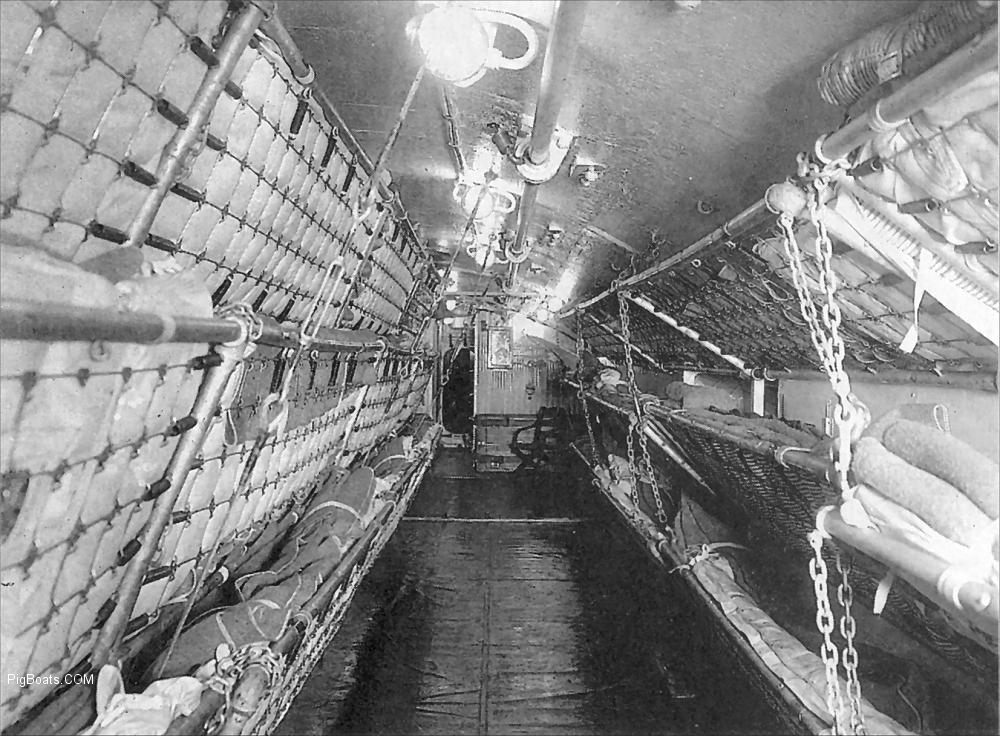
This photo of the S-4 Battery Compartment/Berthing area gives a good perspective of the compartment. The view is looking aft toward the officers berthing and the Control Room. There appears to be several tables folded up on the bulkhead at the end of the compartment. The bunks are triced up and have bedding on them so this is an actively used compartment. In later years a cover was developed that contained the mattress and bedding and helped protect these combustible materials from burning in case of a flash fire. It is called a 'Flash Cover' but are missing from this image. You can see the support cables and turnbuckles used to stabilize the bunk stanchions. They were suspended from the overhead since nothing was attached to the battery cover. If you look carefully you can see the Christmas Bell hanging forward of the top far bunk and inline with the left door frame. |
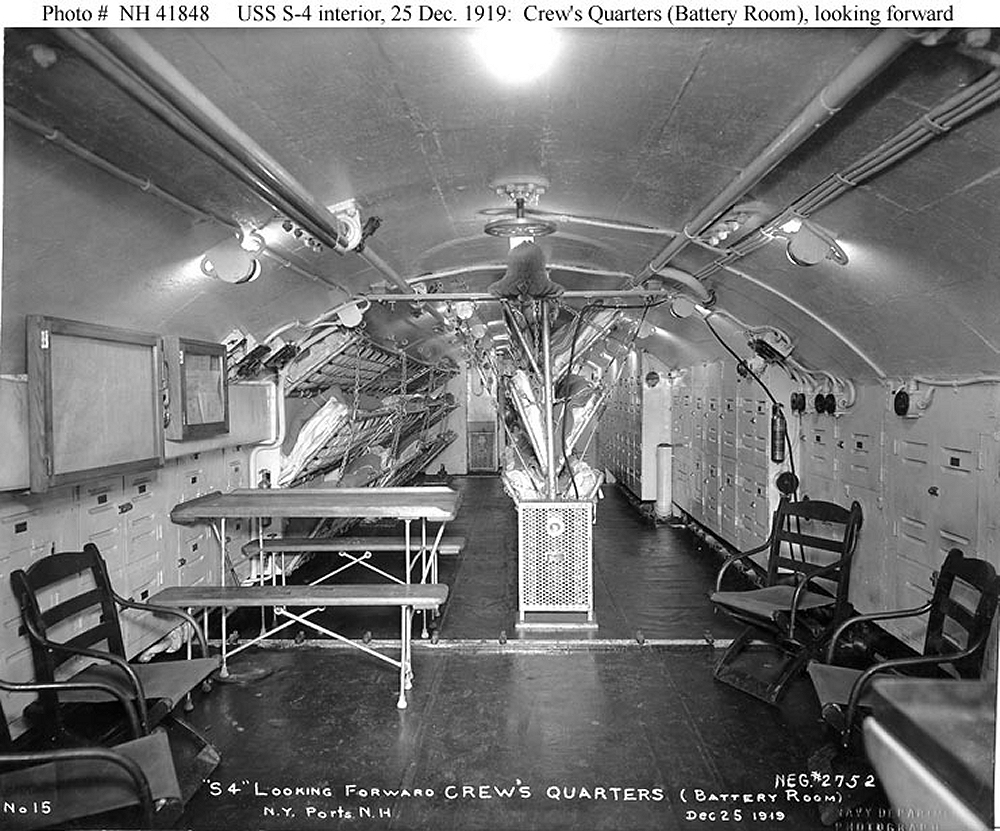
USS S-4 Photo of the Battery Compartment, the view is looking forward toward the torpedo room. Note the fancy tissue paper Christmas Bell hanging from the overhead. Photo was taken on Christmas Day 1919. The bunks are 'triced up' meaning they are tipped up and out of the way for ease of movement through the vessel and for cleaning. The bunks are either attached to the hull and supported by chains or, in the case of the center tiers of bunks, supported by the stanchion from the overhead. There are 36 bunks in this compartment, three banks of 12, 4 per row and 3 high. Personal lockers are seen on either side of the compartment. Nothing was attached to the deck since in was the cover for the battery and consisted of removable planking covered with painted and shellacked canvas for waterproofing. Even though it looks like the heater is attached to the deck that is just a wooden pad to protect the canvas from the metal legs. The heater is portable not attached to the bunk stanchion. You can see the power cord snaking up to the overhead and down to a plug-in on he right. The Bunks are all are braced by cables from the overhead to the foot of the stanchion to prevent sideways movement. A second space heater can be seen at the far end of the compartment and it looks to be bulkhead mounted. The battery was made by Gould and was a Model 35-U. It was divided into two sections of 60 cells each. The total battery had a capacity of 1240 KWH. Just forward of the space heater you can see a light colored line going across the compartment. This is the divider bulkhead between the forward and aft sections of the battery. The crew slept and ate in this compartment. The table to the left is just one of six fold up tables used for eating. When not in use they were folded up and stored at the aft end of the compartment. (see next photo) The chairs were for seating at the table as well as relaxing in. The rectangular ventilation duct work can be seen running a long the left side of the photo. I'm told that the crews only head was at the forward end of this compartment and was used by Officers and Enlisted alike. |
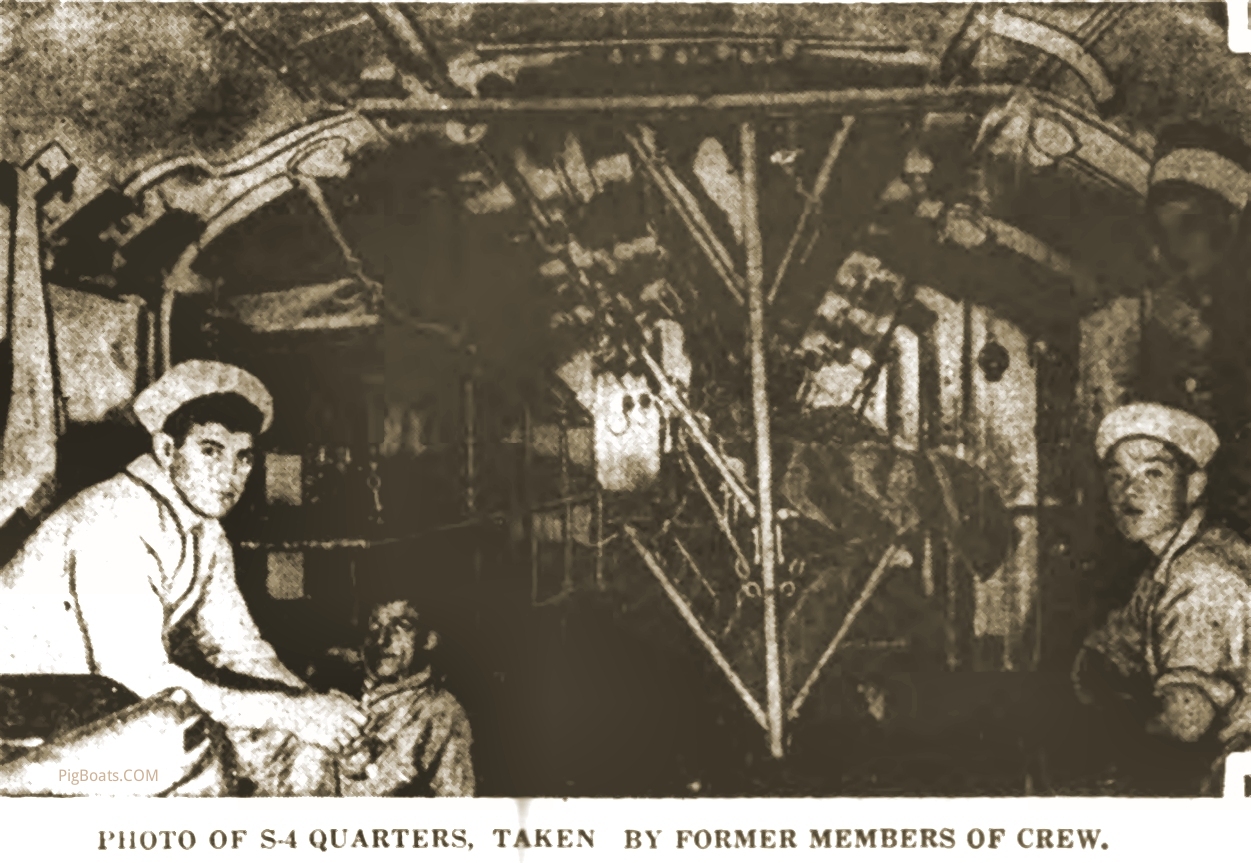
Four members of the USS S-4 crew are seen in this photo taken by one of the crew members. The men are not identified at this point. The view in this photo is almost identical to the photo seen above. If time is taken to compare the two images many identical features can be seen. The photo is undated but the chances are good that the men seen in this photo perished when the submarine was rammed and sank. This photo was printed in a contemporary newspaper and identified as taken by former members of the crew. If it could be figured out what crew had left the S-4 prior to sinking the owner of this photo might be able to be identified. |
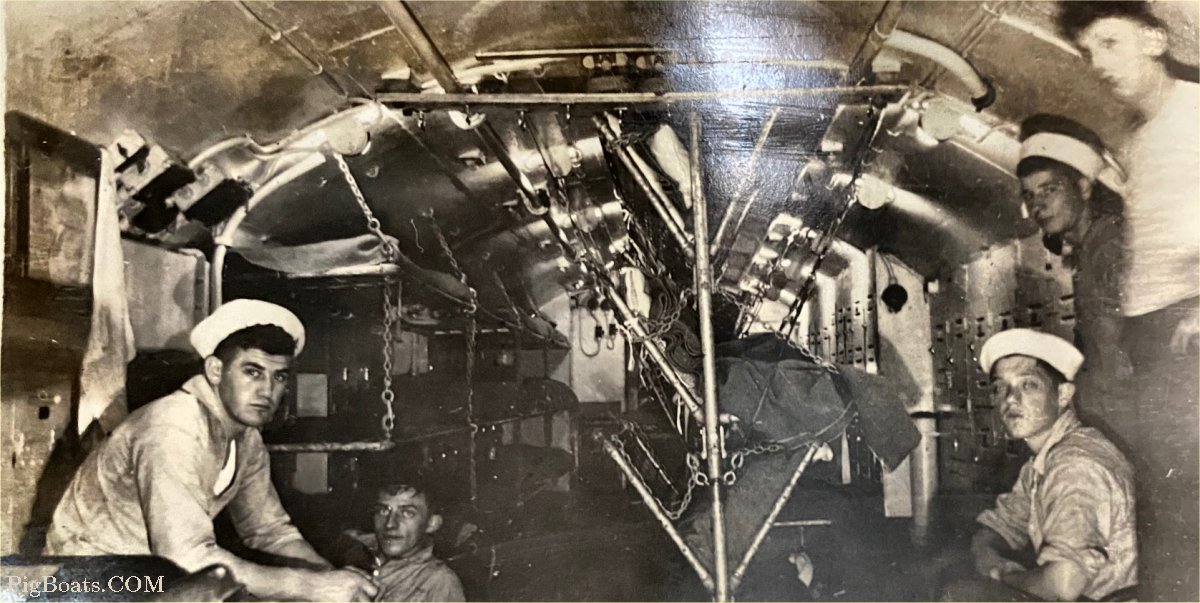
Same image as above but from an original photo and it hasn't been cropped for the newspapers. That cropping took the man, out of focus on the right, out of the photo. The men are not identified at this point. The view in this photo is almost identical to the photo seen above. If time is taken to compare the two images many identical features can be seen. The photo is undated but the chances are good that the men seen in this photo perished when the submarine was rammed and sank. Flash from contributors camera is seen at the top of the image. He did not want to be identified. |
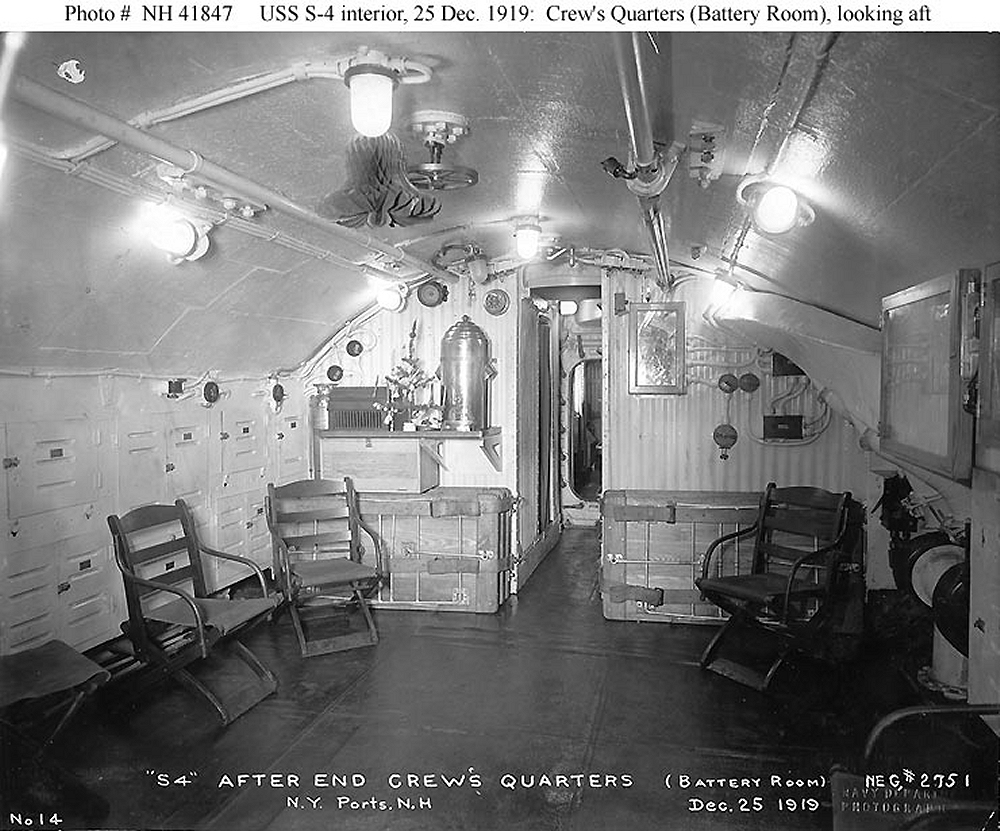
USS S-4 Photo of the Battery Compartment, the view is looking aft toward the officers berthing and the Control Room. Again, note the fancy tissue paper Christmas Bell hanging from the overhead. Photo was taken on Christmas Day 1919. There appears to be 3 tables folded up on the left side of the passageway and two on the right. Officers bunks were in the two staterooms on either side of the passageway to the Control Room. Assuming one for the Captains Stateroom the other officers must have bunked in the other one. The ever ready urn of coffee, life blood of the Navy, sits on the counter. A tiny Christmas tree sits on the counter next to it. The battery compartment ventilation fan is on the right side of the photo. |
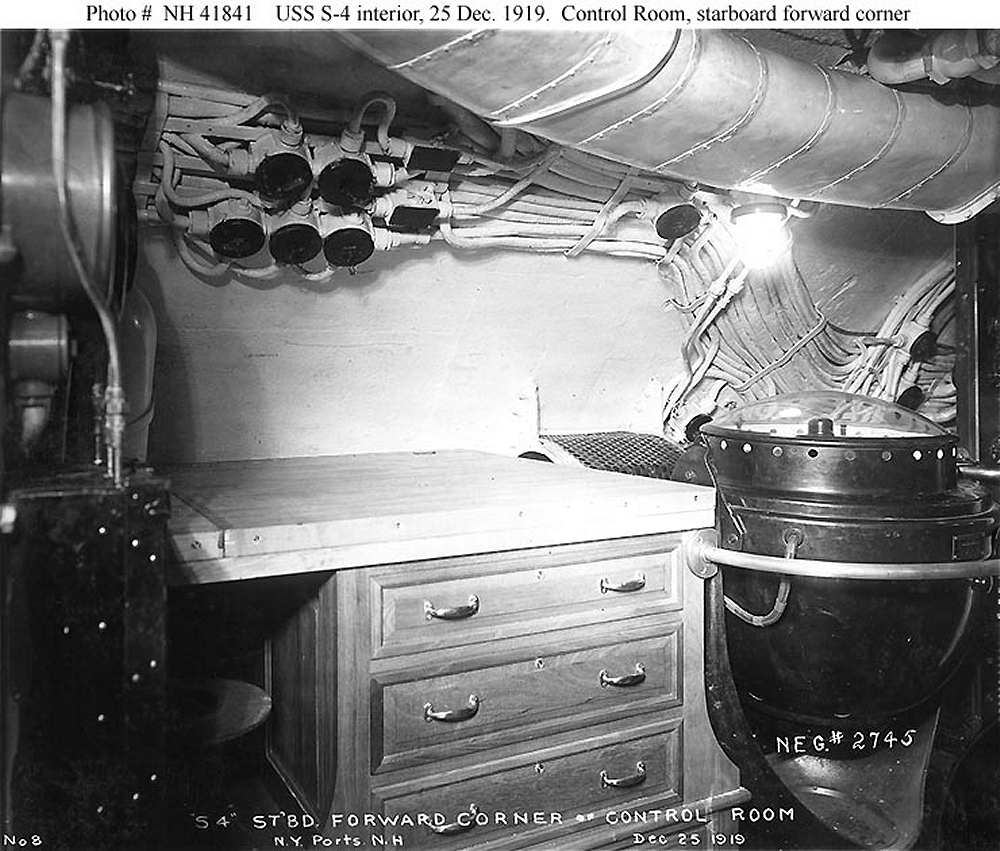
USS S-4 Navigation table and compass binnacle located in the forward Starboard corner of the Control Room. The drawers held charts and other navigation gear such as the parallel rulers and dividers and probably the Navigators sextet. |
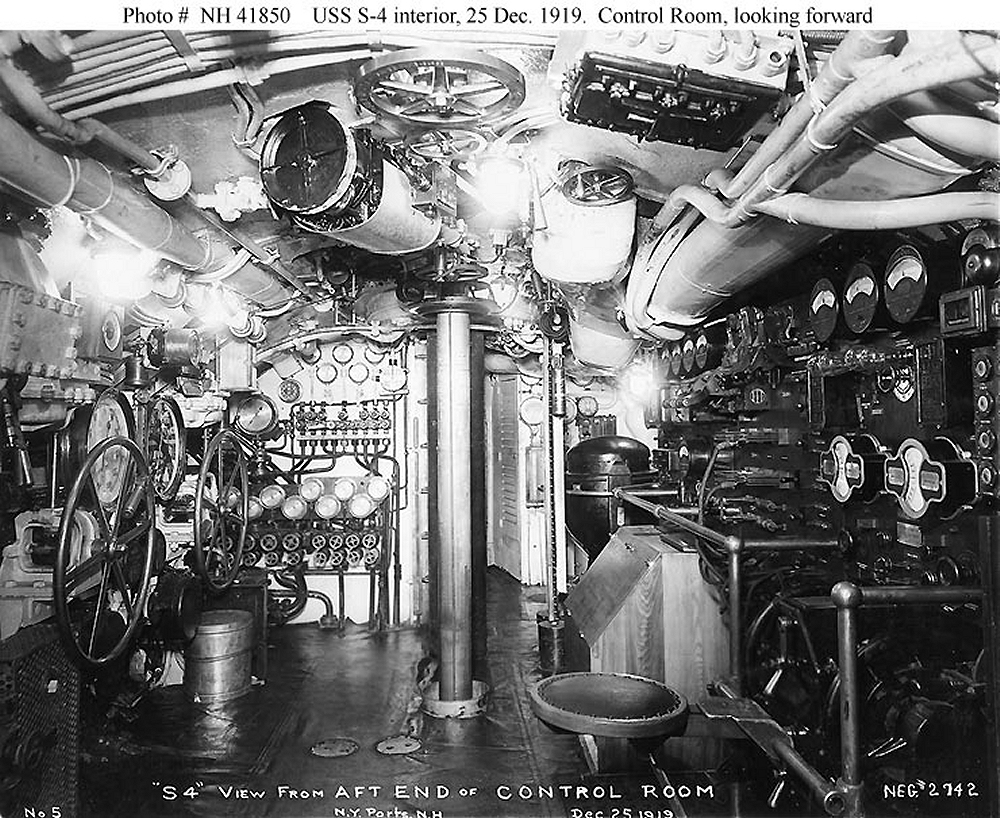
USS S-4 Photo of the Control Room looking Forward to the Crews Berthing. The compass binnacle can be seen fwd of the electrical panels on the right. Next to that ts the chart table used for navigation. In the center of the room is the periscope in its lowered position. On the left are the bow and stern planes control wheels. The Air Manifold is on the fwd bulkhead. Steering was performed in the tiny conning tower using electrical switches or from the bridge, while on the surface, using a control box on a long cable passed up from the conning tower. The electrical panels on the right are part of what later would be moved aft to an area known as the 'Maneuvering Room'. The electrical power to the motors was controlled from here. It also was here the current from the generator put a charge back into the battery during a battery charge. The "Controllerman" or "DC Electrician' sat at his station on the seat provided and operated the 'Sticks' as needed to carry out the propulsion requirements of the submarine. The large motor in the center of the overhead is thought to be for raising and lowering the telescoping radio mast. The location is correct based on the observed drawings of this class submarine. |
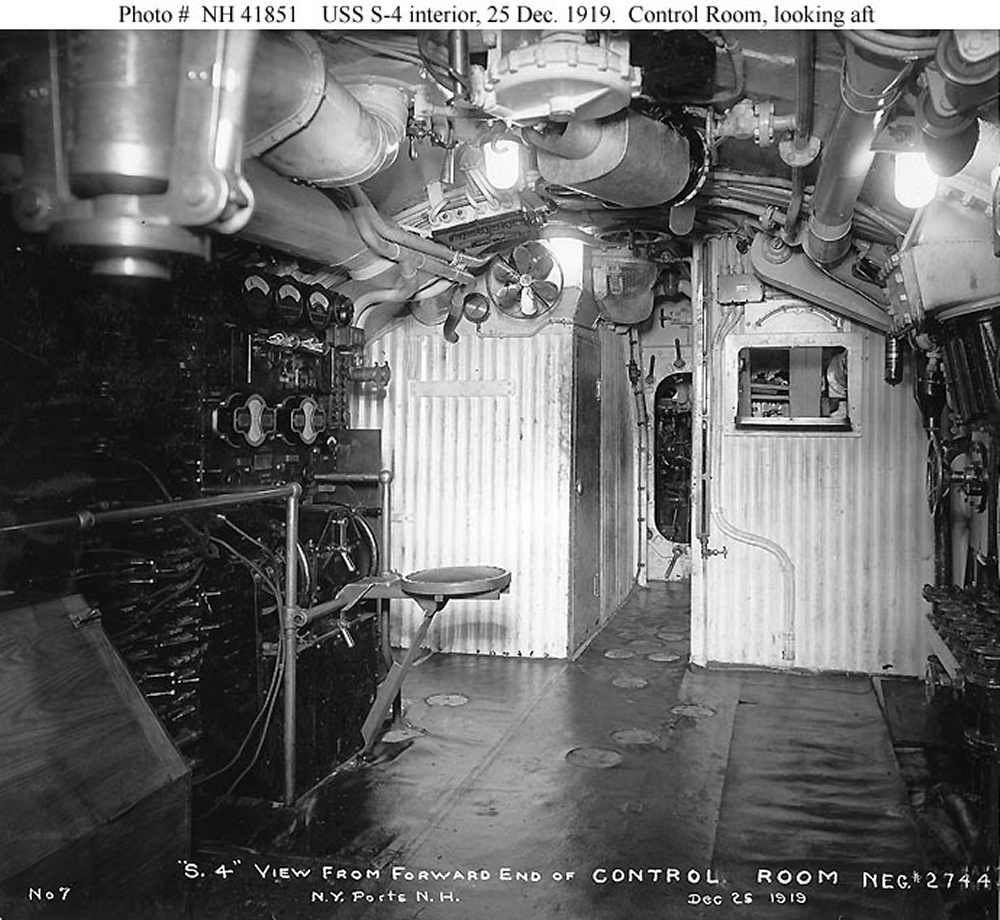
USS S-4 Photo of the Control Room looking aft towards the Engine Room. The electrical panels on the left are part of what later would be moved aft to an area known as the 'Maneuvering Room'. The electrical power to the motors was controlled from here. It also was here the current from the generator put a charge back into the battery during a battery charge. The "Controllerman" or "DC Electrician' sat at his station on the seat provided and operated the 'Sticks' as needed to carry out the propulsion requirements of the submarine. The two rooms with the corrugated sheet metal bulkheads are the Radio Room on the left and what most likely is the Galley on the right. Through the door you can see the Starboard diesel engine. The Trim Manifold is on the right side of the photo. The rheostat for controlling the trim pump is seen at the center of the photo edge. |
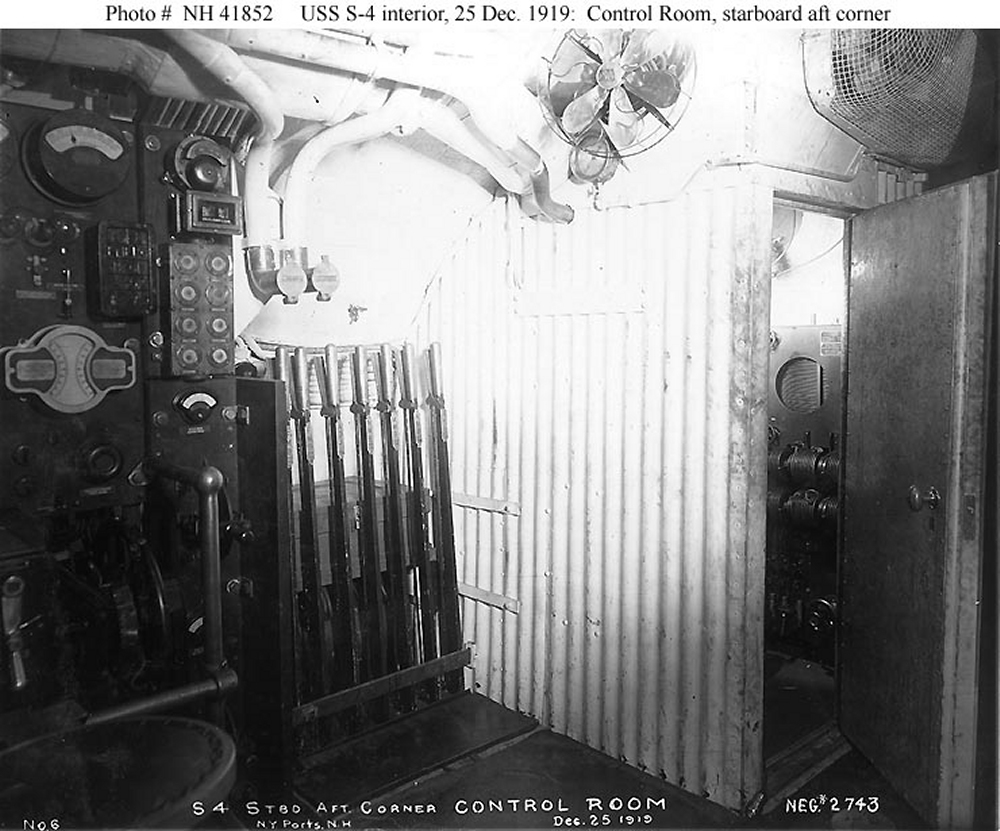
USS S-4 Photo of the after starboard corner of the Control Room. These are the handles to open and close the Kingston Valves or the main Ballast Tank Vents The Kingstons were located under Control on the outside of the hull for admitting water to or from the ballast tanks. Speaking tubes can be seen just above them. One for talking aft the other for talking forward. The electrical panels on the left are part of the Maneuvering area handling the electrical power to the motors. The door to the Radio Room is open and a small portion of the Radio and its associated equipment can be seen. You can see that the door is quite thick so the room is probably well sound insulated so the radioman can have no problems hearing the signals. |
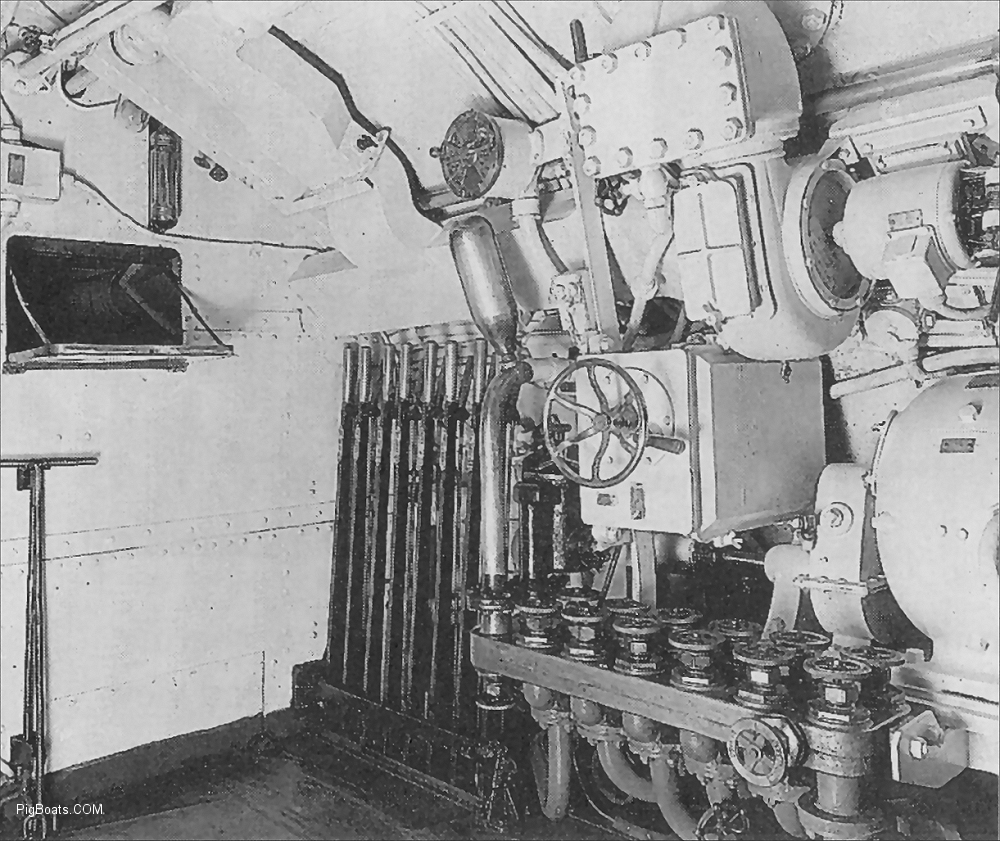
This a photo taken on the USS S-5 but it shows the after port corner of a Control Room of the same class. These are the handles to open and close the Kingston Valves or the Main Ballast Tank Vents. The Kingstons were located under Control on the outside of the hull for admitting water to or from the ballast tanks. Vents let air escape from the ballast tanks so water can fill them to allow the sub to dive. Seen next to the Kingston levers is the Trim Manifold used for moving water around the sub for ballasting and also used to pump the bilges. An engine order telegraph like device can be seen up towards the overhead. I do not know what the bottle looking device is unless it is to trap air caught in the pumping system. Seen on the bulkhead to the left is the drop down serving window from the ships Galley. |

USS S-4 Photo from the forward end of the Engine Room looking aft to the door to the Motor Room. The ladder to the Engine Room deck hatch can be seen in the foreground. It was movable and probably was stowed out of the way or maybe even folded up into the overhead to make passage through the boat easier. The two 700 HP NELSECO 4-cycle diesel engines are seen filling the room either side of the center walkway. |
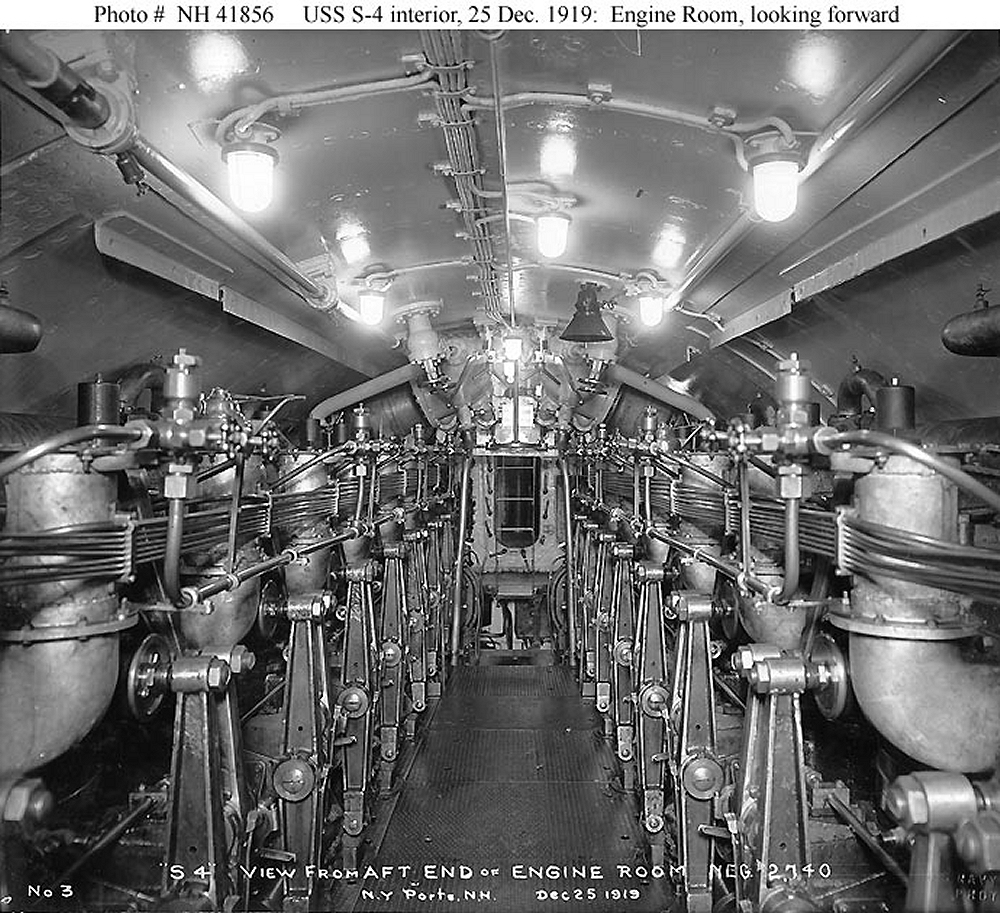
USS S-4 Photo from the aft end of the Engine Room looking forward to the door to the Control Room. The ladder to the Engine Room deck hatch can be seen in the background. The external rocker arms for opening and closing the valves to admit fuel and air and expel exhaust can be seen clearly on the sides of the NELSECO diesels. Far from being a dark and dingy place the engine room is well lite and clean. |
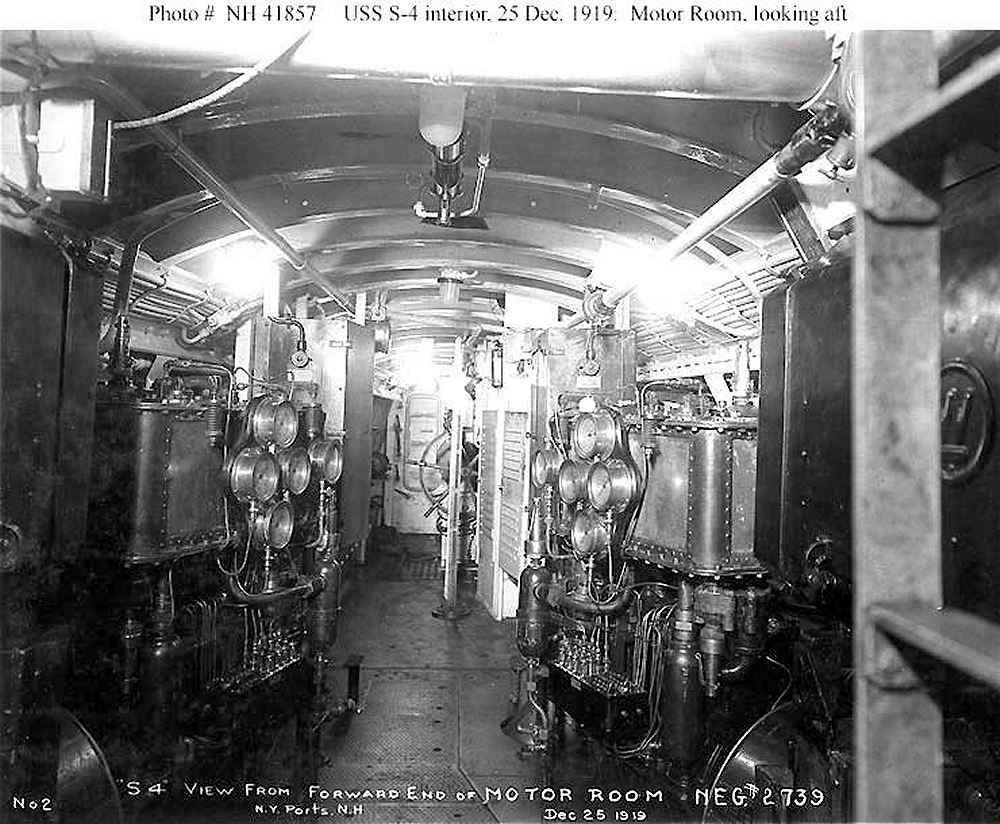
USS S-4 Photo of the Motor Room taken from the forward end looking aft toward the Tiller Room. This where the 600 horse power Westinghouse motors were placed. To the right you can see the Westinghouse Logo embossed on a piece of equipment. At the far end of the Motor Room you can see the secondary steering station wheel. The ladder leads up to a deck hatch. In the overhead behind the ladder you can see the mechanical steering rod linkage heading aft to the Tiller Room. |
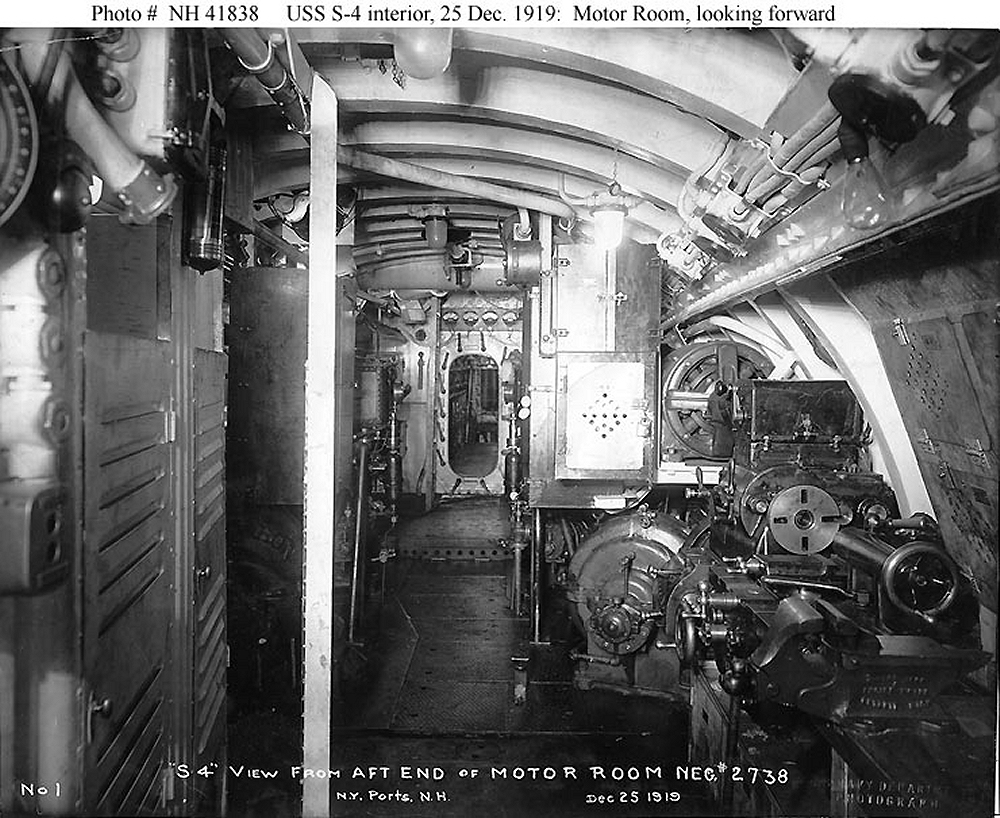
USS S-4 Photo of the Motor Room taken from the aft end looking forward toward the Engine Room. This where the 600 horse power Westinghouse motors were placed. To the right you can see a lathe and vice. Repairs to equipment and machinery could be made using this work area and new parts could be fabricated by a skilled machinist. Forward of the lathe can be seen a couple of 'MG' sets (Motor Generators) for turning DC power into AC power. This class of submarine were the first to have mechanical refrigeration, among other things, for keeping food from spoiling so many different voltages of electricity were needed to meet the new electrical needs of the submarine. The silvery vertical stripe seen off to the left in the foreground is the back side of a sight glass probably showing the fluid level of the aft trim tank, In the photo above you can see the front of this . It bisects the ships wheel. |
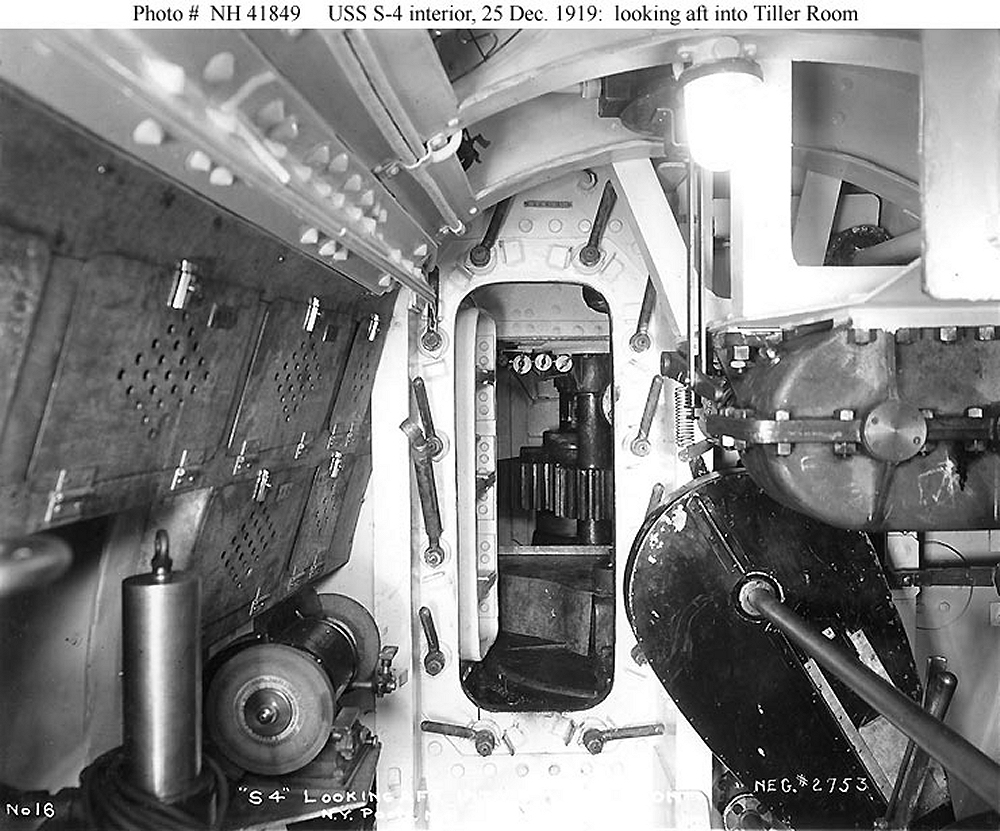
USS S-4 Photo through the Tiller Room door of the gearing for the ships rudder and stern planes. To the left you can see a bench grinder. Part of the machine shop in that part of the submarine to do repairs underway. To the right of the light in the overhead, seen through the rectangular opening, is the mechanical steering rod penetrating the bulkhead. This runs from the Control Room to be able to steer the sub by direct turning of the wheel if electrical power was lost. On the USS S-5 the Tiller Room is where the crew cut a part of the hull away to effect an escape from the sunken submarine. |
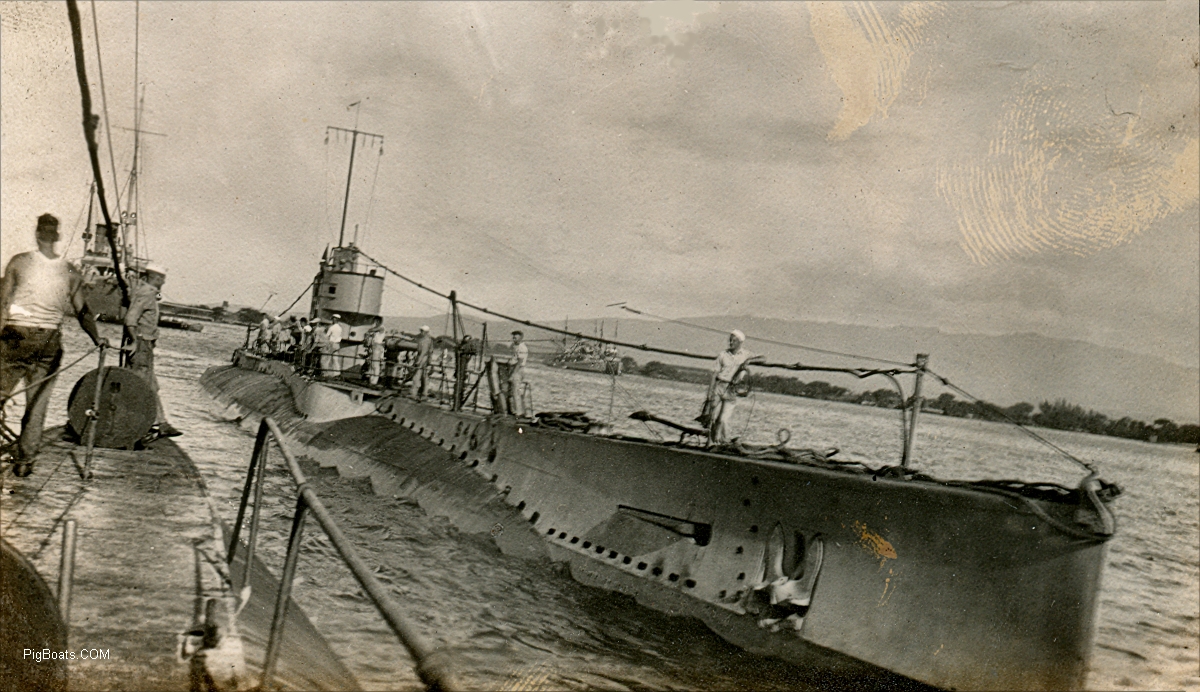
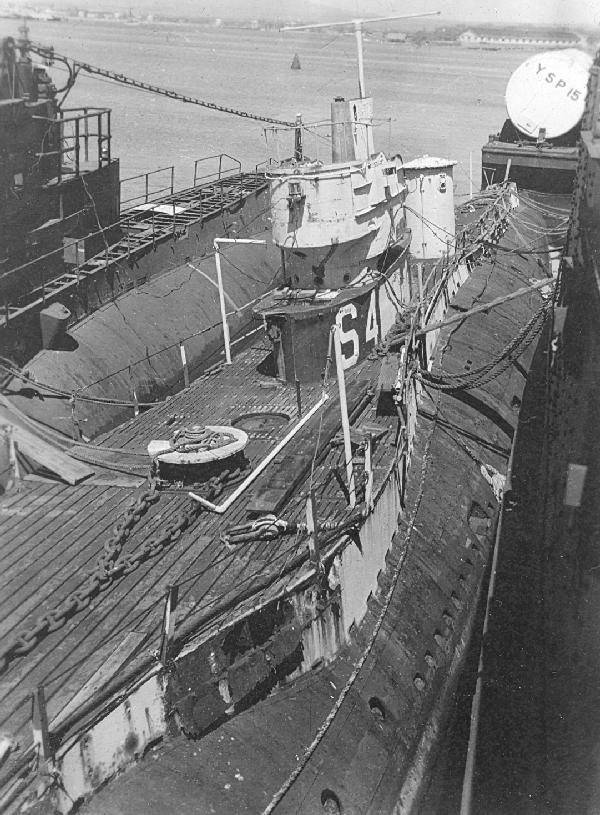
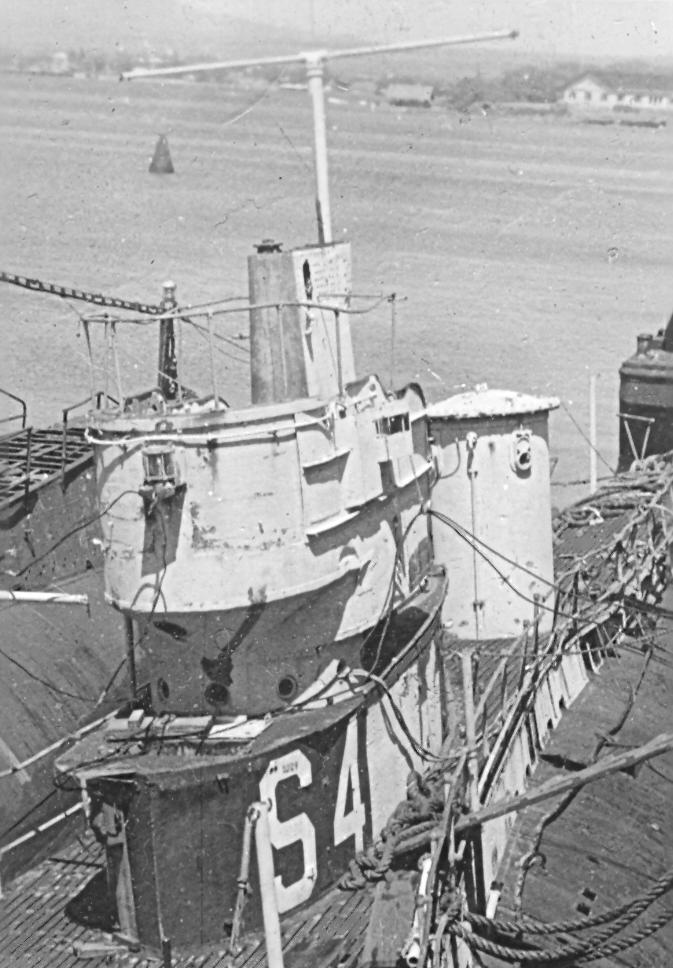
USS S-4 mooring up to another submarine in Pearl Harbor, Territory of Hawaii circa May 15, 1921. She was reported to be making active operations at Pearl Harbor on that date being referenced in the logbook of the USS Celtic, a refrigerated stores ship. The Celtic reported passing the S-4 exiting Pearl Harbor as the Celtic was making to enter the harbor on that date. Several Auxiliary Mine Warfare vessels can be seen in the background. One is most likely to be the USS Lapwing, AM-1, engaged in mine sweeping operations in Hawaiian waters from January 1921 until she decommissioned April 11, 1922. The other is most likely the USS Oriole, AM-7, who was also decommissioned in 1922 on May 3rd. Both were decommissioned due to the Washington Treaty B terms. The S-4 sailed with SubDiv 12, and SubDiv 18 from Portsmouth, NH for Cavitie in the Philippines on November 18, 1920 and arrived, via the Panama Canal, at Pearl Harbor on April 15, 1921. They departed Pearl Harbor on November 3, 1921 for Cavite, arriving December 1, 1921. |
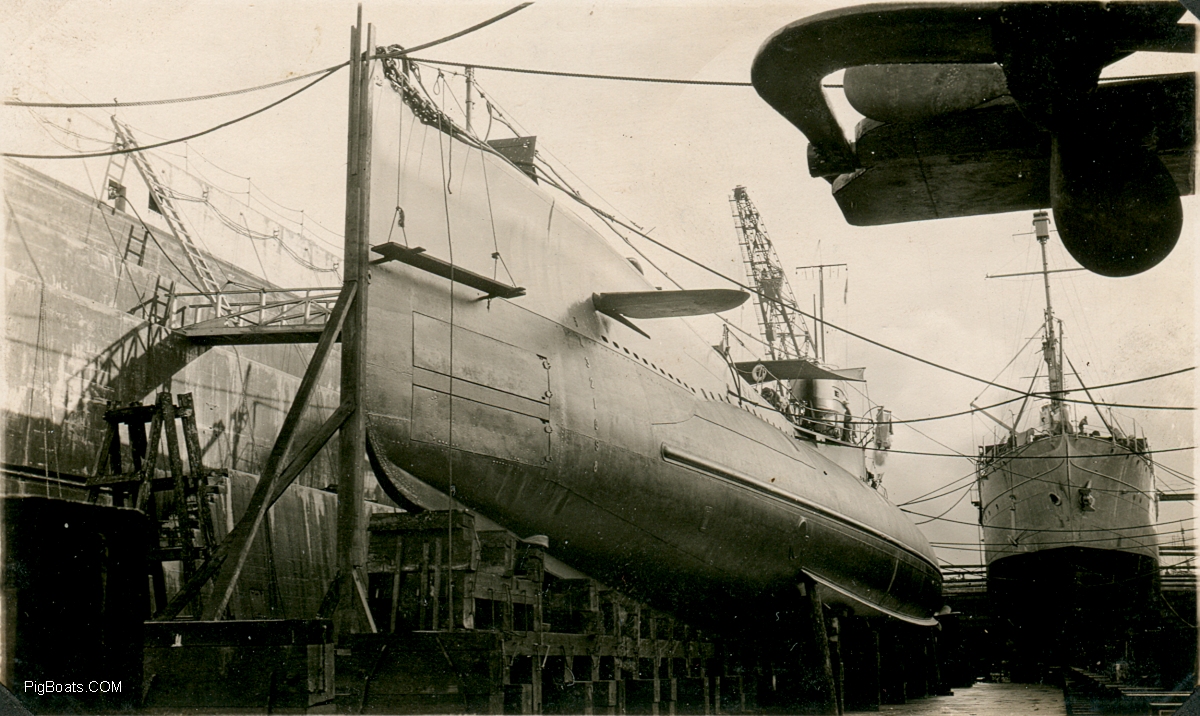
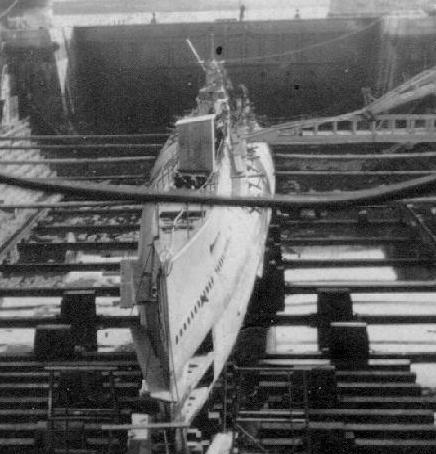
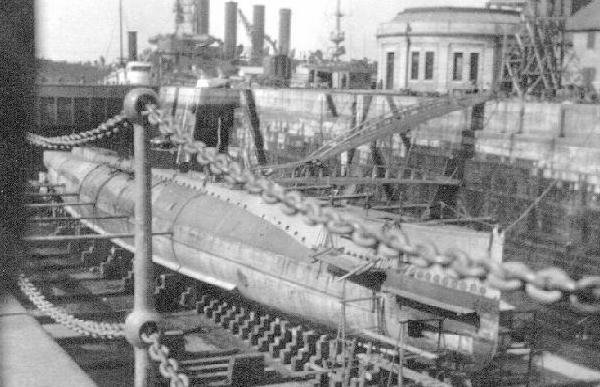
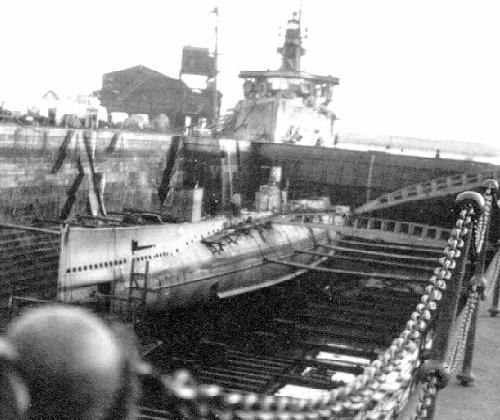
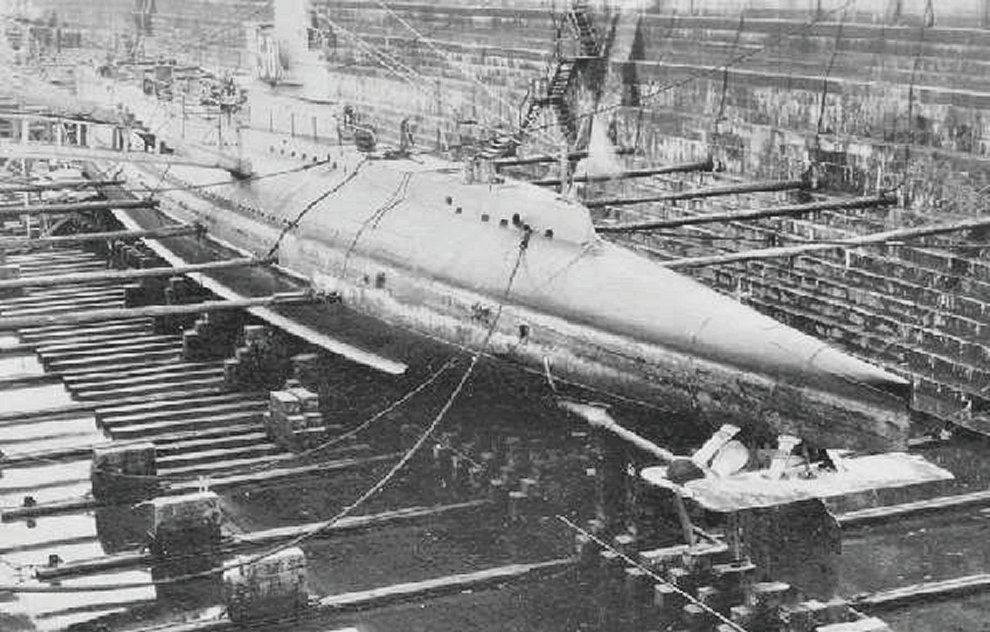
USS S-4 in dry dock in Hawaii circa May - October 1921. The S-4 sailed with SubDiv 12, and SubDiv 18 from Portsmouth, NH for Cavitie in the Philippines on November 18, 1920 and arrived, via the Panama Canal, at Pearl Harbor on April 15, 1921. They departed Pearl Harbor on November 3, 1921 for Cavite, arriving December 1, 1921. She is shown here along with the tender USS Alert AS-4 and at least one more submarine. Her stern planes are visible in the upper right. There are most likely two more submarines in the dock with them but are not shown. The Alert was decommissioned at Mare Island on March 9, 1922. |
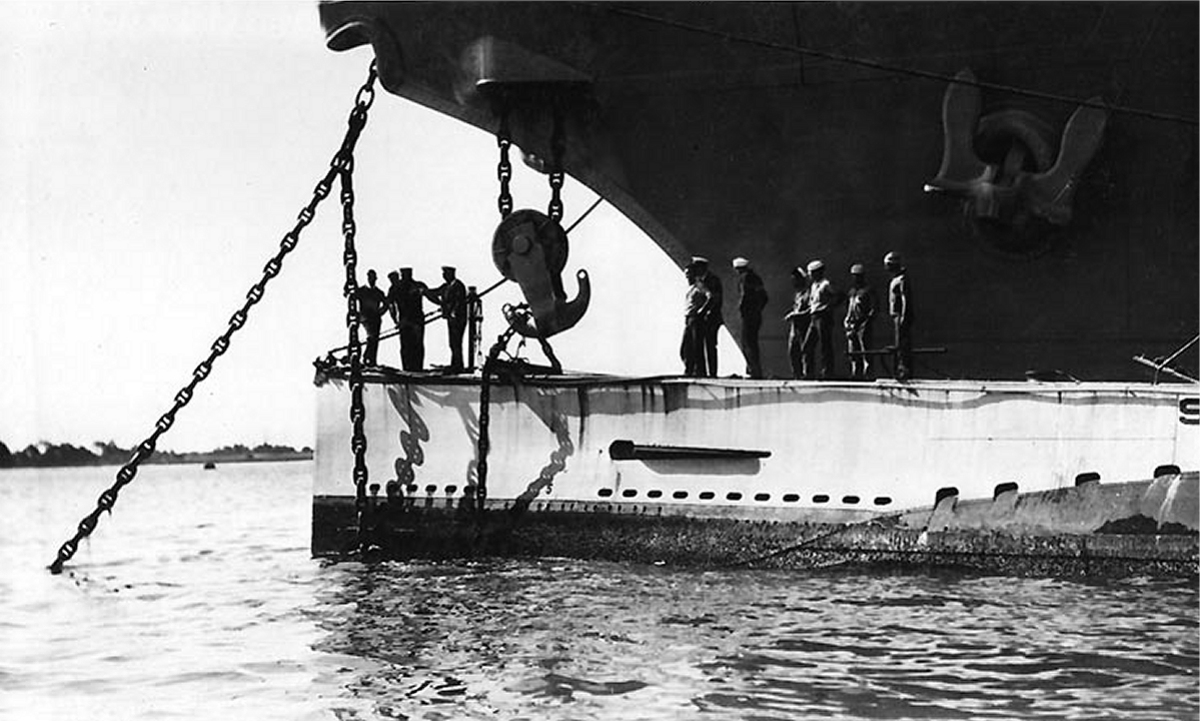
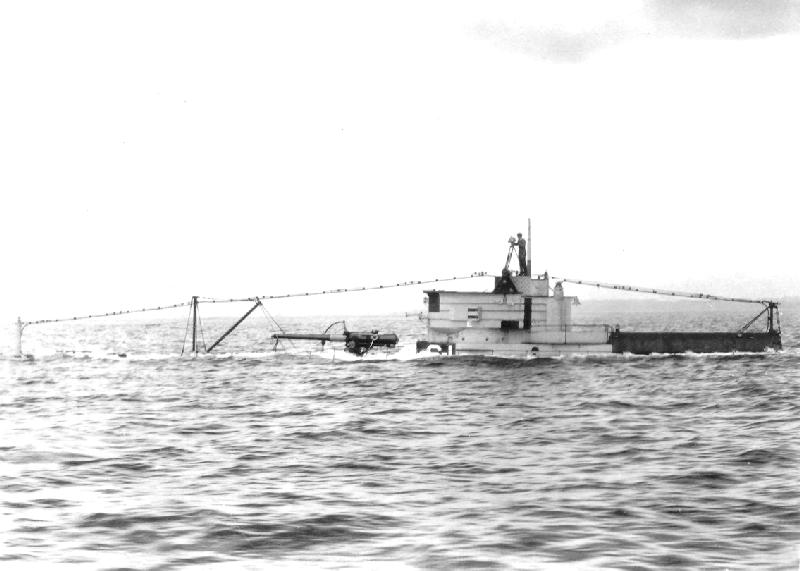
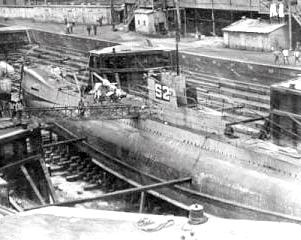
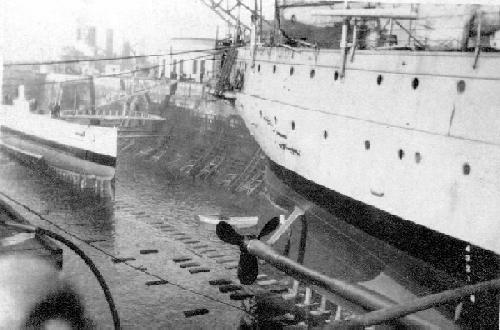
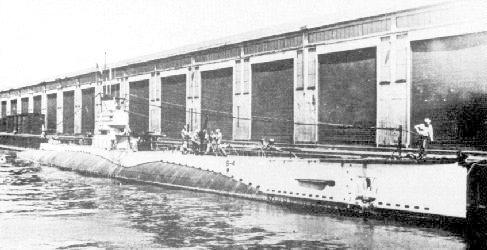
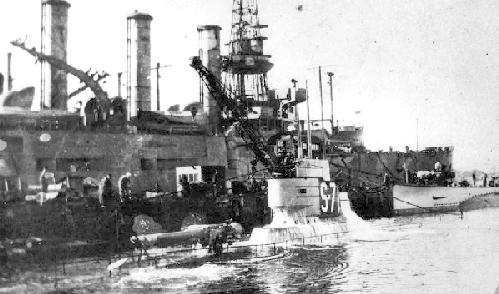
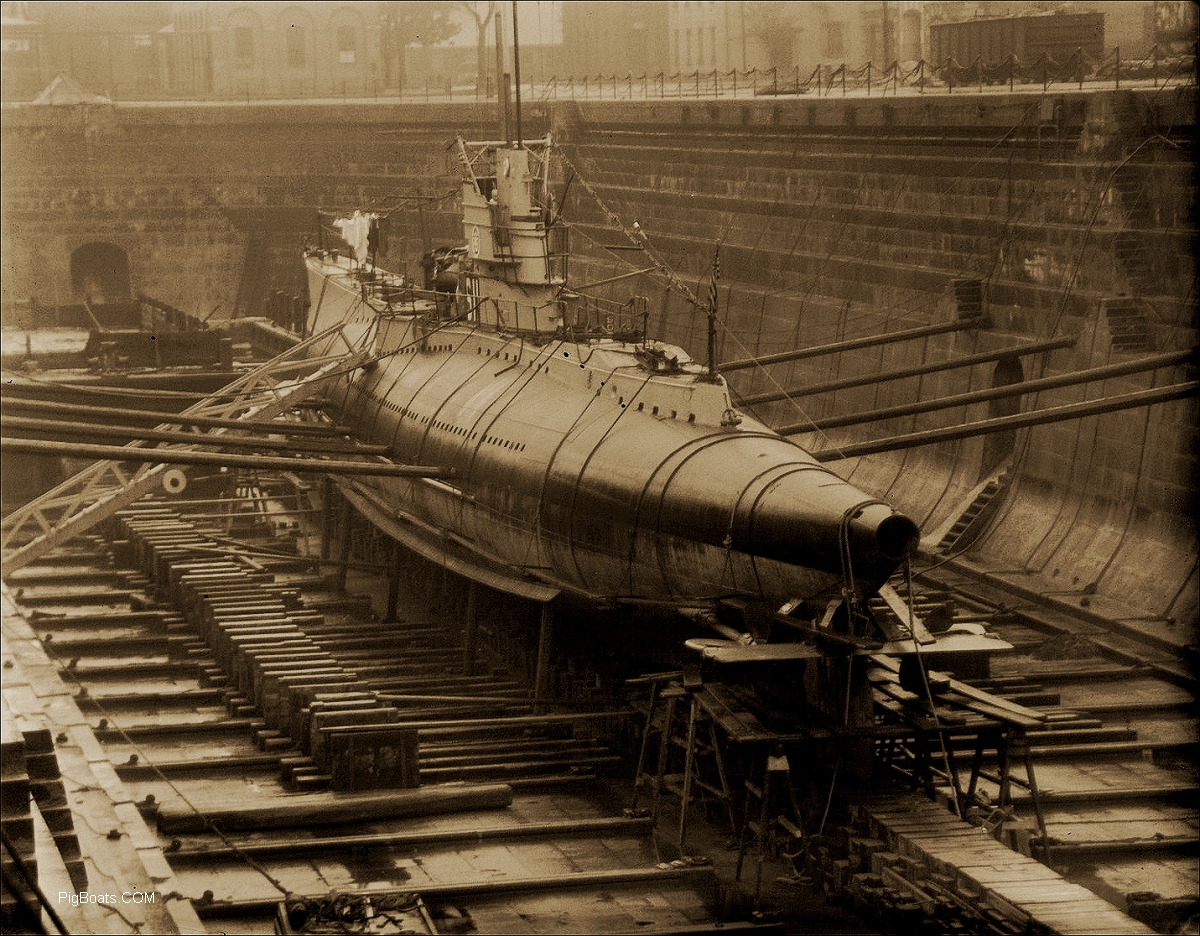
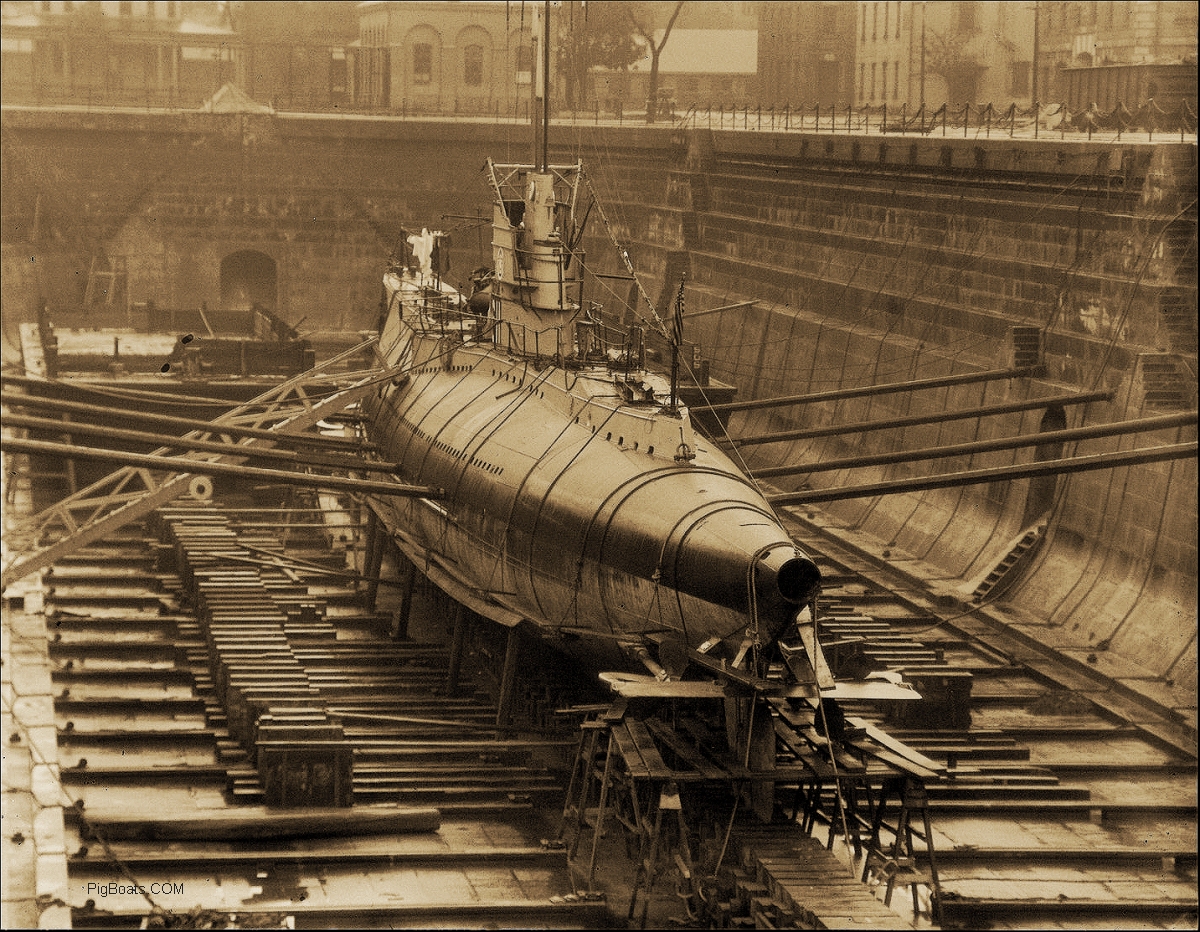
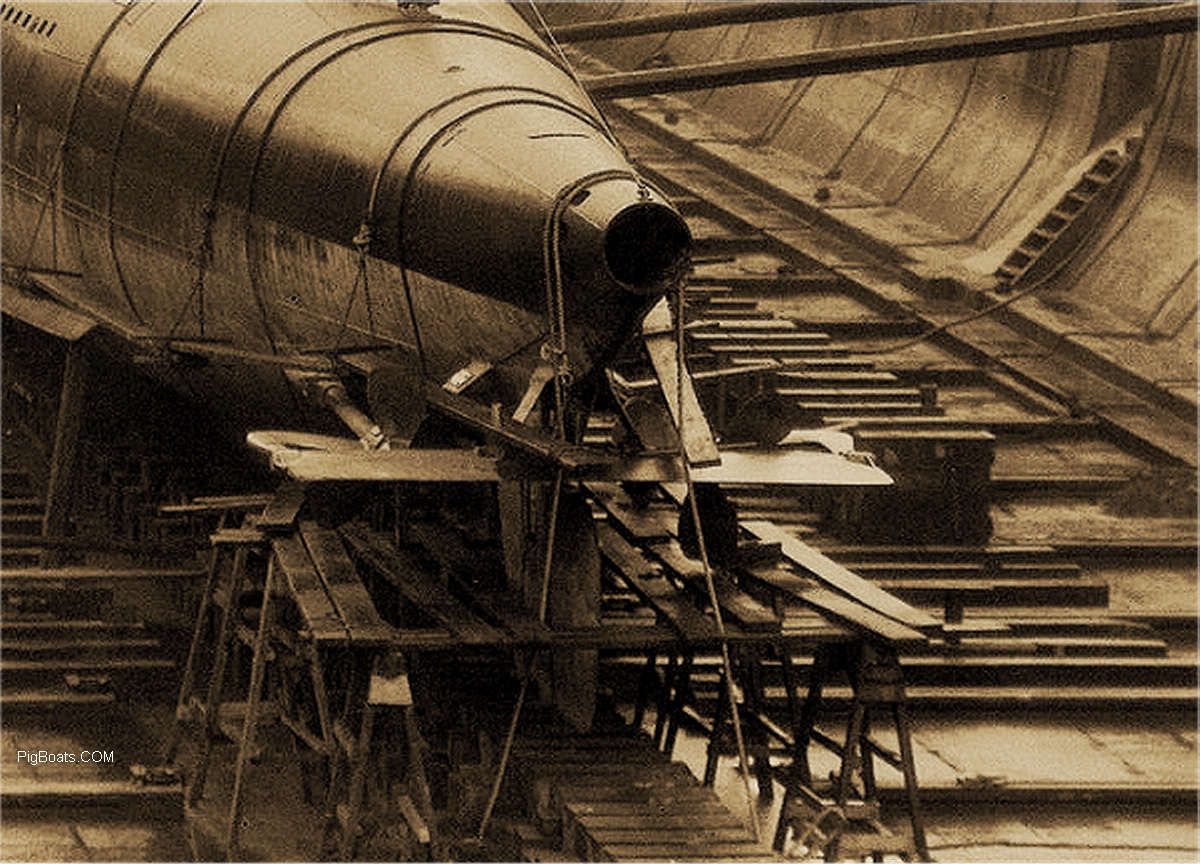
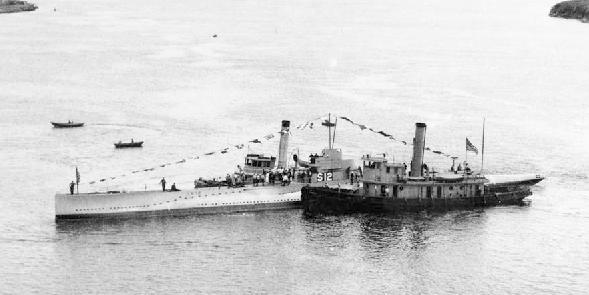
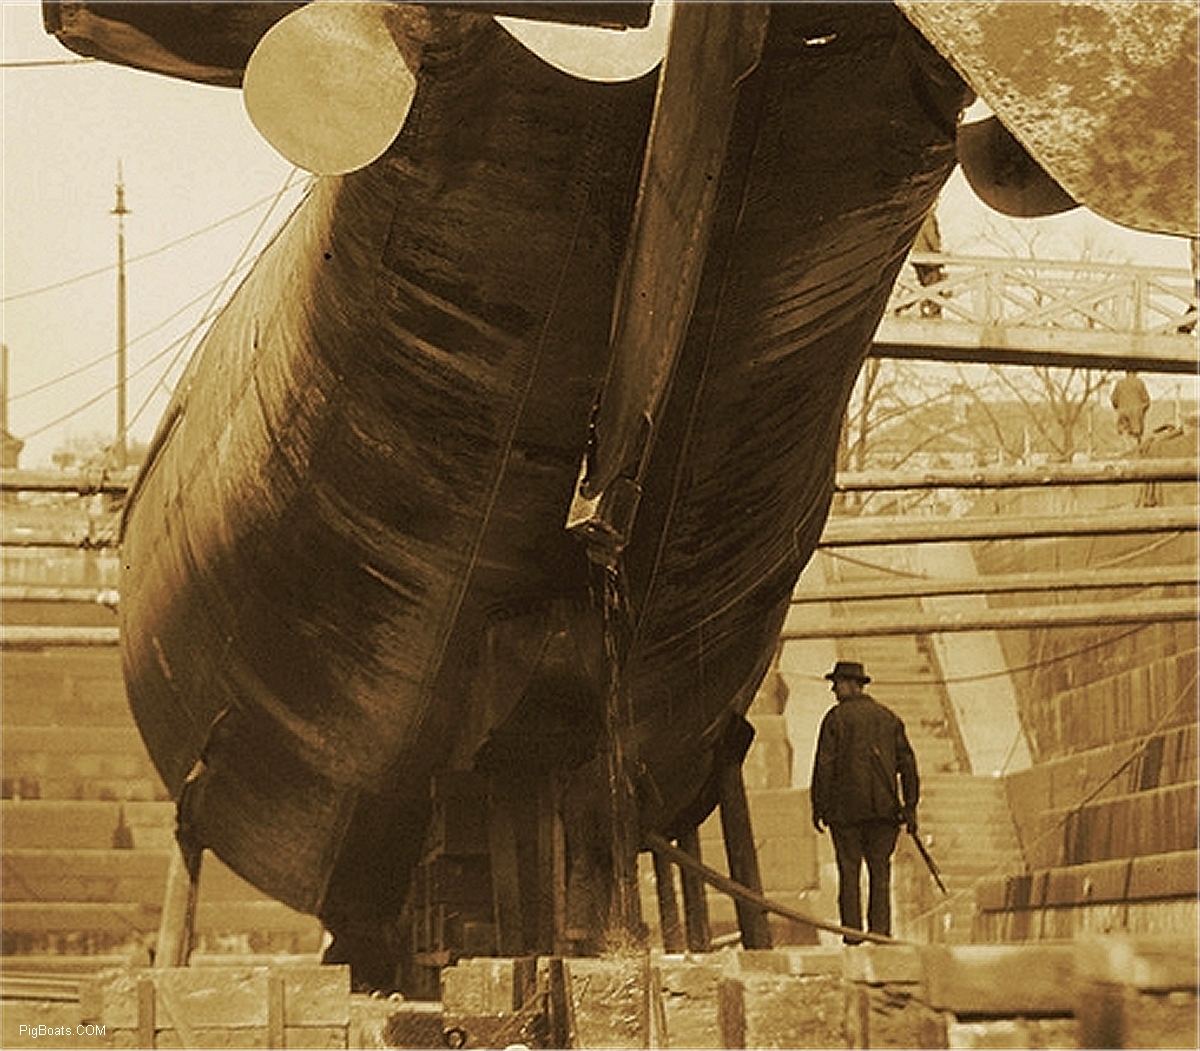
USS S-4 along side the submarine tender USS Holland for routine work. A chain has been run under the bow of the S-4 and using a purpose built hoisting system built into the clipper bow of the Holland, the bow is being raised for maintiance work most probably on the torpedo tube shutter doors or tube outer doors. In this circa 1926/27 photo you can see that the bow has already been raised about three to four feet judging by the marine growth seen on the hull. Location is either San Diego or Panama, the S-4 was in both locations with the Holland prior to her move to the east coast. |
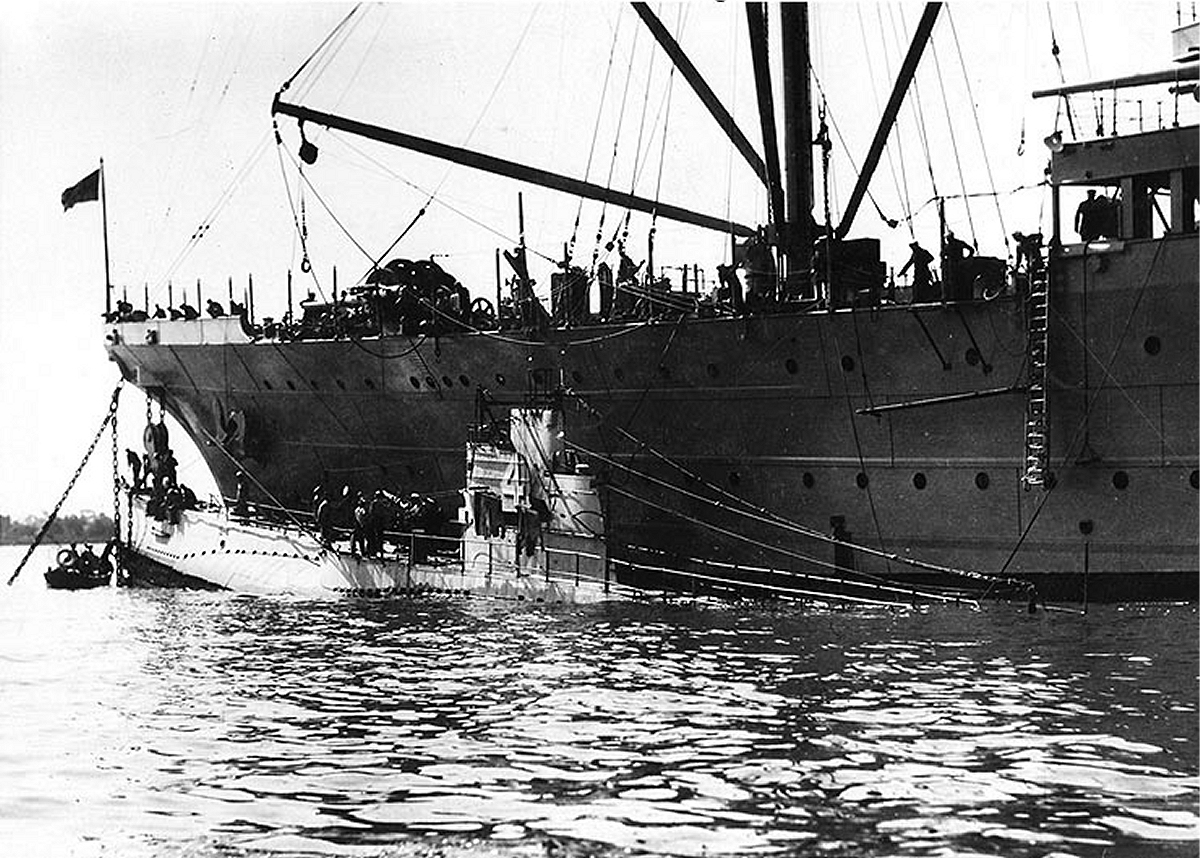
USS S-4 along side the submarine tender USS Holland for routine work. A chain has been run under the bow of the S-4 and using a purpose built hoisting system built into the clipper bow of the Holland, the bow is being raised for maintiance work most probably on the torpedo tube shutter doors or tube outer doors. circa 1926/27. Location is either San Diego or Panama, the S-4 was in both locations with the Holland prior to her move to the east coast. Most likely, to make lifting the bow easier, the aft group of ballast tanks may have been partly flooded putting an angle on the sub. Though the forward trim tank pumped empty and the aft trim filled would also make this lifting easier. Just lifting the bow would contribute somewhat to the stern being forced under as seen here. What procedure used on this day is not certain. |
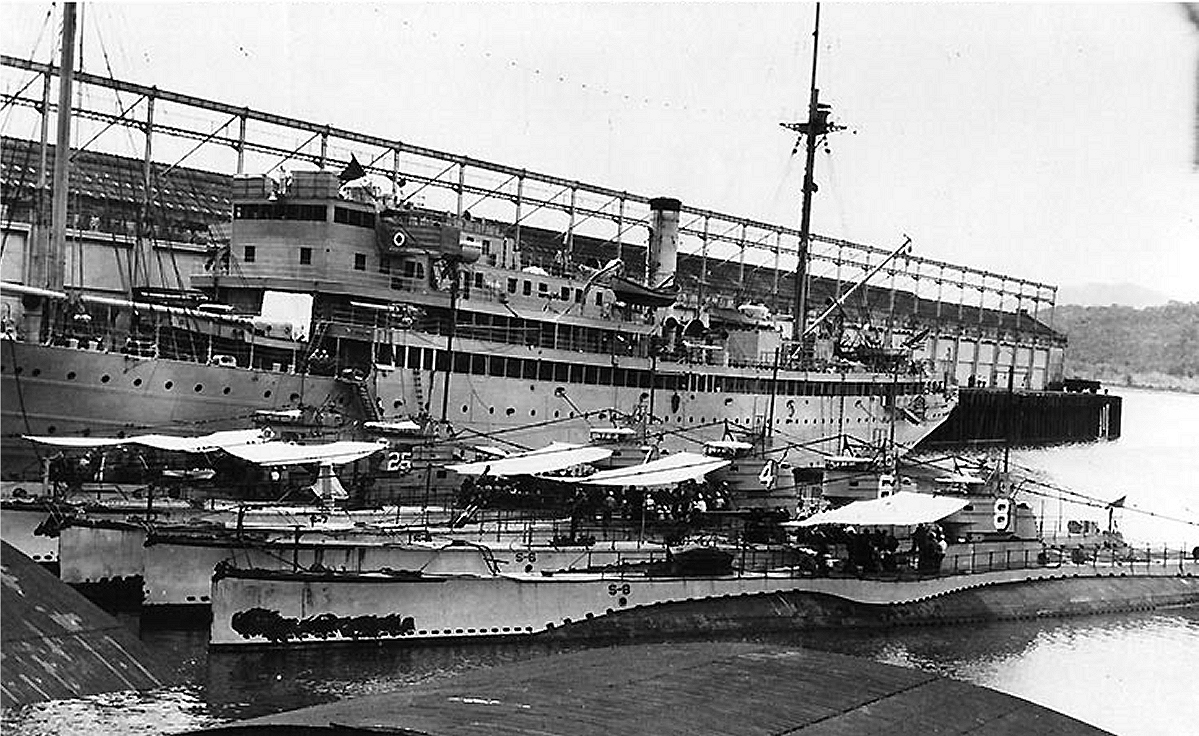
USS S-4 along with sister subs 6, 7, 8, 25 and one unknown moored to the USS Holland in this circa 1926 photo. Location may be Panama. |

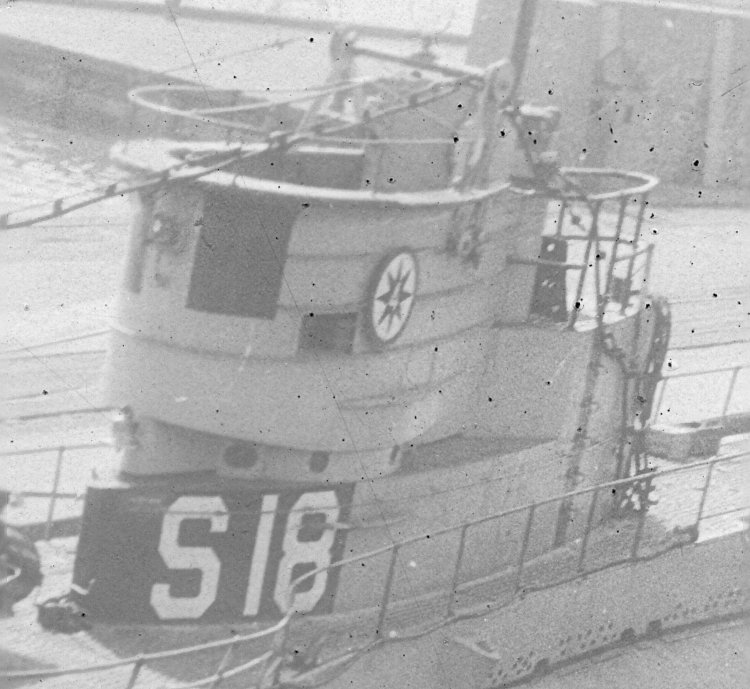
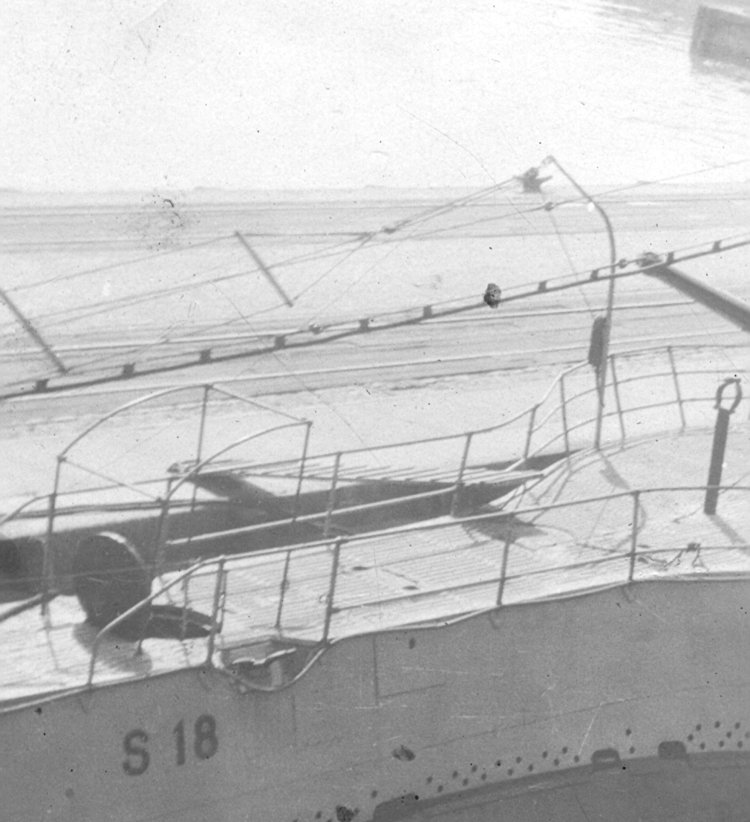
This combined image from two photos show a total of 10 S class submarine at Coco Solo, Panama circa March / April 1927. We know this date since it was the only time the S-4 could have operated in these waters before she was rammed and sunk. The ships anchored in the background are waiting for their scheduled transit times through the Panama Canal. In the top portion of the photo are all Portsmouth Naval Shipyard built submarines. Left to Right are the USS S-4 The USS S-8, then the USS S-6 and lastly the boat is most likely the USS S-9 as she was the only vessel that meets the visuals of this boat in the photo that was in Panama in 1927. You can see another raft of nested submarine behind these boats. On the bottom section of the image are 6 Electric Boats design submarines. The USS S-19 is outboard to the left followed by what may be the USS S-18. Next are the USS S-27 and the USS S-1, The S-1 was the only S class to have that configuration of limber holes. The last submarine we can identify is the USS S-22. The sub on the right is still being researched at this time. A small skiff is moored to the bow of the S-19. Thanks to Dave Johnston for much of this information. |
 |
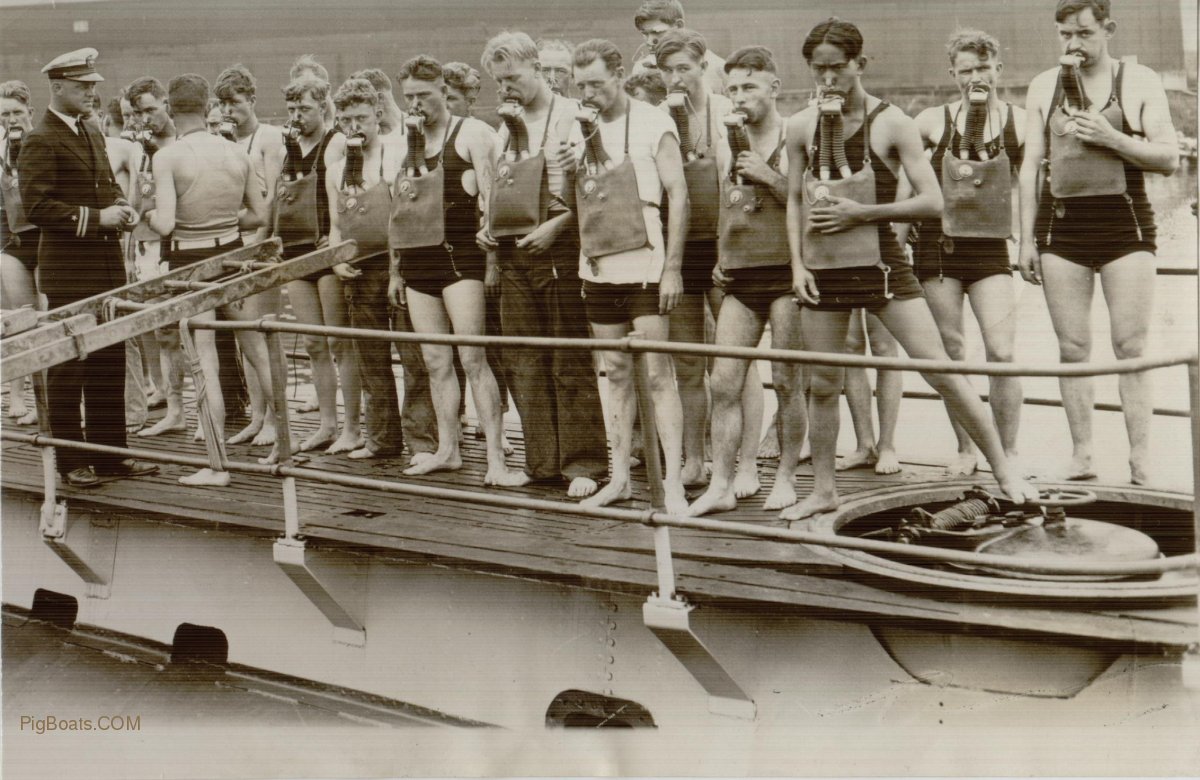
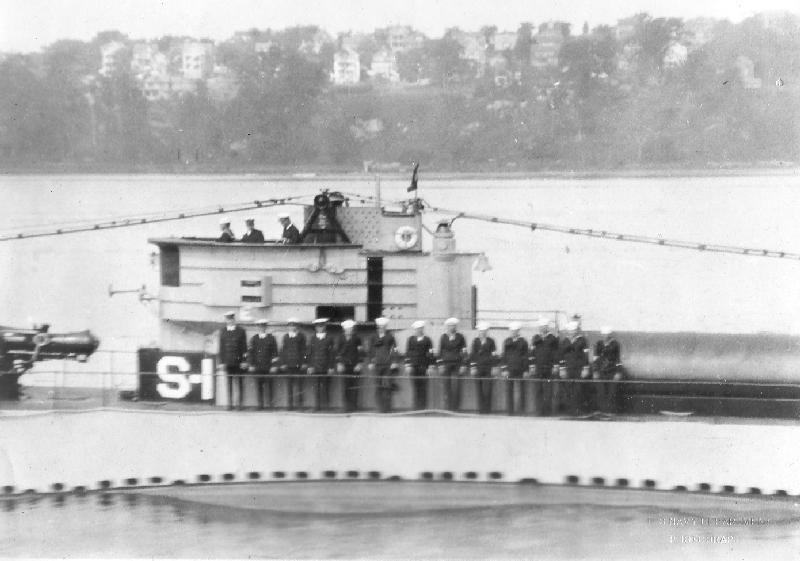
Students from the US Navy Submarine School in New London are assembled on the deck of the recently salvaged USS S-4, now used as a training boat. They are learning the use of the Momsen Lung escape device under the tutelage of co-inventor Lieutenant Charles B. "Swede" Momsen. Photo is dated September 1929 and was used in a newspaper story. Swede Momsen was assigned to the Submarine Base in 1929 instructing men in the lung's use after conducting extensive experiments himself and with Chief Gunner's Mate Clarence L. Tibbals and Frank M. Hobson, a civilian navy employee, in the development of the device. The sinking of the S-51 and later the S-4, (which had six men alive in the bow torpedo room for 3 days), deeply effected Momsen. Being a submariner himself he knew very well what this meant. If a sunken submarine could not be immediately raised to the surface, death was the only alternative to a trapped crew. With the loss of these crews, he was driven to find some way for the sailors to escape from a sunken submarine. With the aid of the two men named above the Submarine Escape Lung was perfected. The newspapers began calling it the Momsen Lung despite the Navy's best efforts to correct them. The Momsen Lung remained in service until 1962 when it was replaced by the Steinke Hood. |
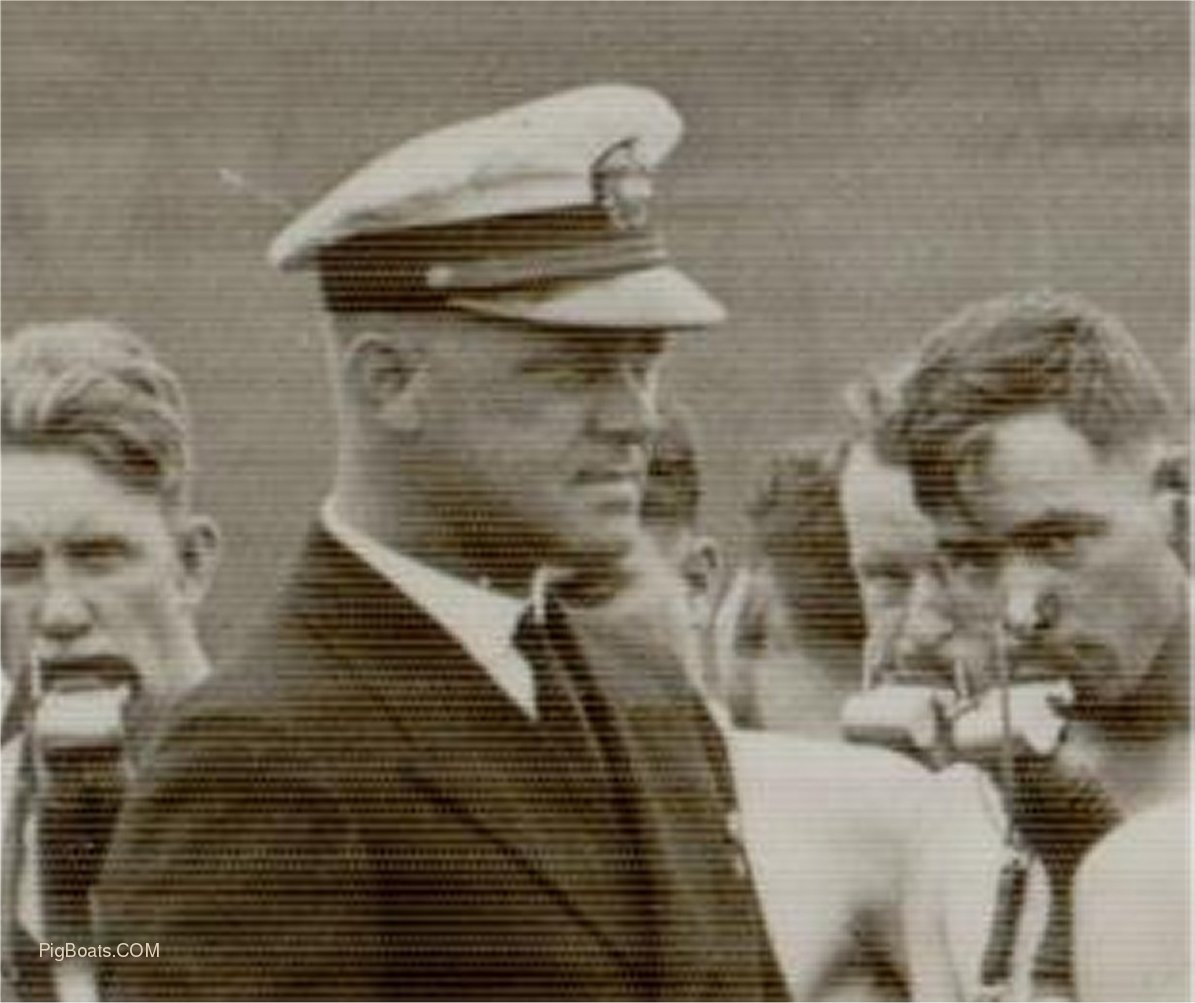
Lieutenant Charles "Swede" Momson in a detail from the above photo September 1929. |
The USS S-4 seen here in post salvage use. After her salvage and refurbishment she was used to train sailors how to salvage sunk submarines. She was purposely sunk and recovered many times training divers in the skills they would be called upon to effect an actual salvage. This would all come into use when the USS Squalus sank in 1939. The tower structure seen in this photo was used to also train divers and other sailors how to effect an escape from a sunk vessel. According to submarine historians Jim Christley and Dave Johnston this was one half of the former airplane hanger from the USS S-1. The other half was used in the development of the McCann Salvage Bell. Jim Christley says about this; "The thing is an adapter and lockout chamber combined. In the adapter mode as seen here it is used to experiment with the rescue chamber. In the lockout chamber mode it has a hatch bolted to the top so it works like the one on diesel boats with the top hatch and side door." Dave Johnston says: "All escape trunks on USN boats from the fleet boats up through the post war diesel fast attacks have a door in the side. This is done so that a bubble of air is trapped at the top of the trunk during the escape process. This enables the group of escapees to keep their head out of the water as each of them exits the boat one at a time. Once the trunk is equalized to the surrounding water pressure the side door is opened to facilitate the escape, but the lip between the top of the trunk and the top of the side door retains the air bubble. Once the last of the group exits the boat, the remaining crew inside the torpedo room shuts the side door hydraulically, pumps down the trunk, and equalizes it with the interior pressure, thus enabling the lower hatch to be opened and a new group of escapees to enter the trunk. Take a look at the deck area around the escape trunks on the fleet boats. There is always a cutout in the deck immediately adjacent to the trunk. This allows the escapee to clear the deck once they duck out of the opened side door. It also allows routine access to the trunk for access to the boat while it is in port. On my old Darter EB combined the angled torpedo loading hatch (which was a separate structure on the fleet boats), with the escape trunk, replacing the side door, and escapes would have been made out of the torpedo loading hatch. Notice how the top of the trunk is flaired out slightly. In the case of a McCann chamber rescue, this creates a seating surface for the chamber to seal onto. Of course the side door would stay closed in this case because the trunk would stay dry the whole time. The S-4's trunk was experimental in nature and was larger than the ones installed in later boats, but is was essentially the same. Imagine a slightly smaller version of this trunk buried down inside the superstructure of the much larger fleet boats and you will get the picture." |
Close-up detail of the S-4 and escape trainer |
 |
 |
 |
 |
 |
 |
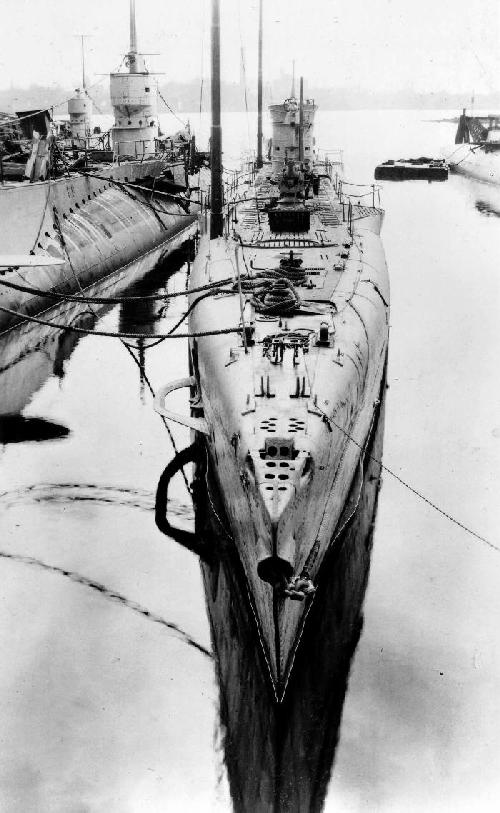 |
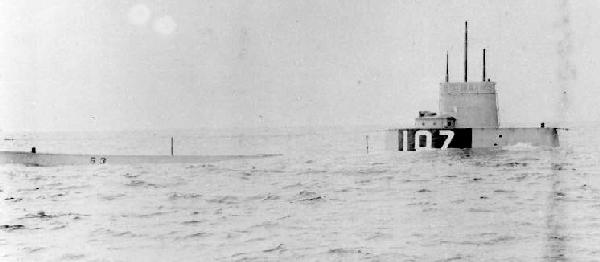
S-6 (left) with captured German U-111 in center of the photo. The photo is indistinct but it appears that the US sub on the far left of the photo is the S-3, one of the two subs the U-111 toured the east coast with on a bond drive to raise money for off setting war debts. The retractable radio antenna's can be seen on the starboard side of the U-111. Milne Special Collections, University of New Hampshire Library, Durham, N.H. |
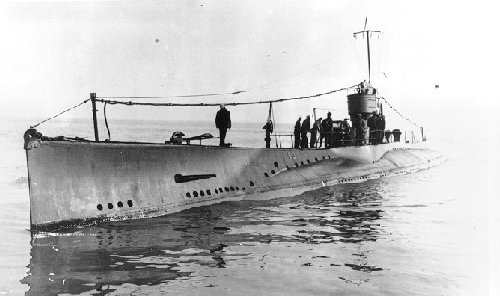
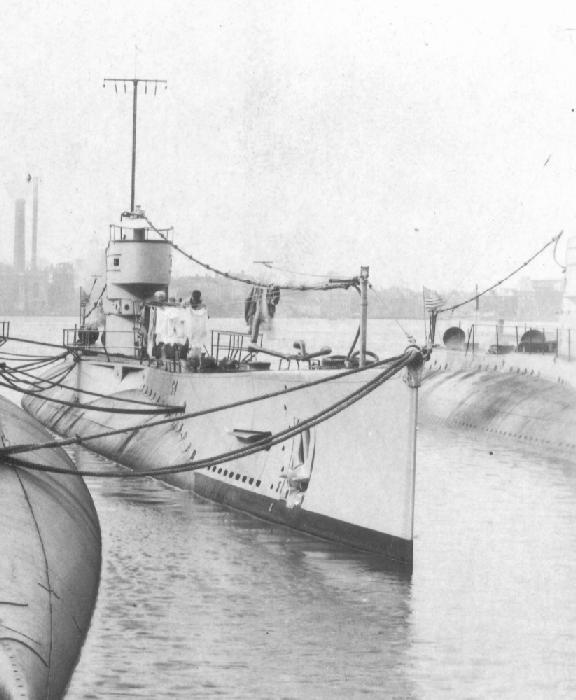
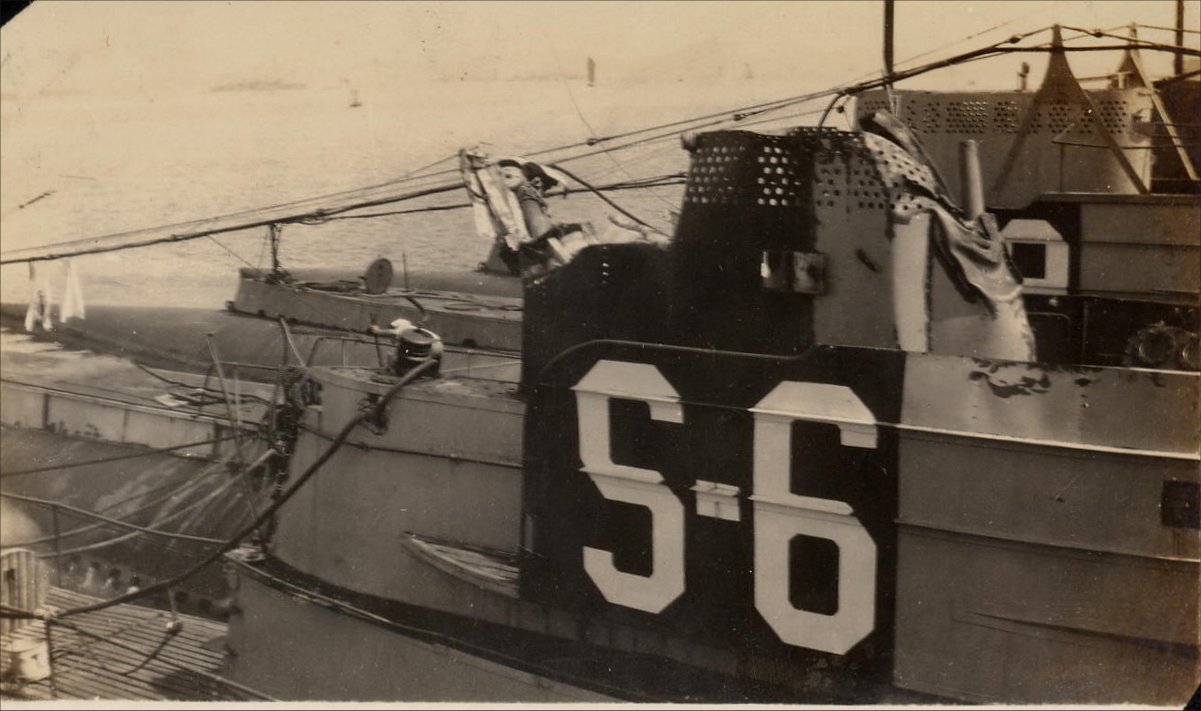
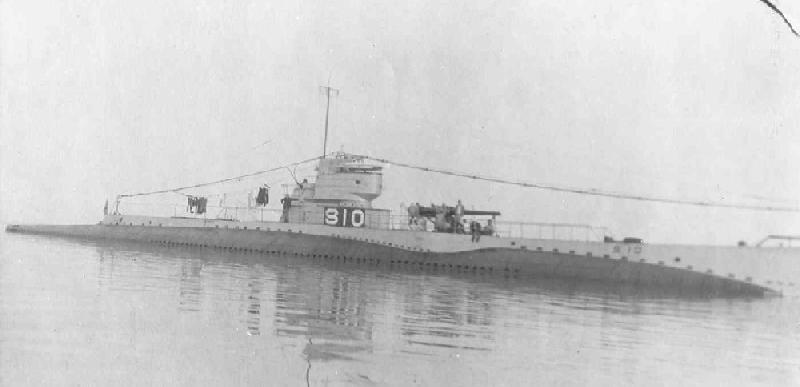
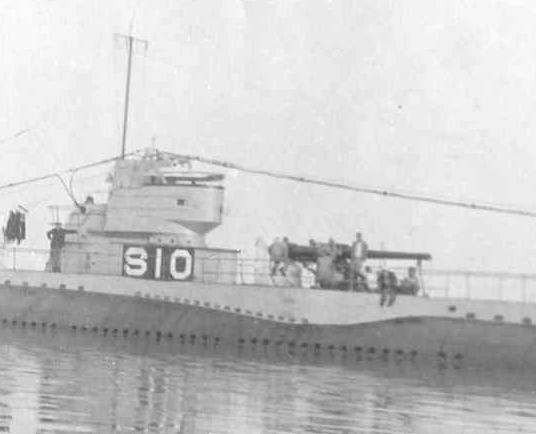
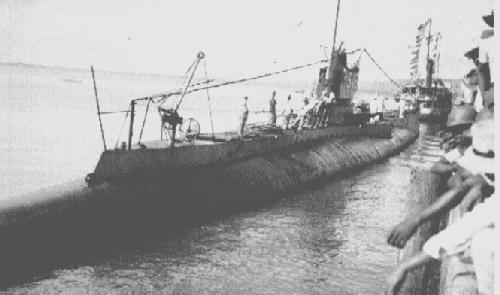
| The USS S-6 seen here moored to an unidentified tender and at an unidentified location circa 1920's. Four crew are on deck three forward and one aft. Two large sacks which may be anything from produce to garbage sit at the front of the conning tower fair water. |
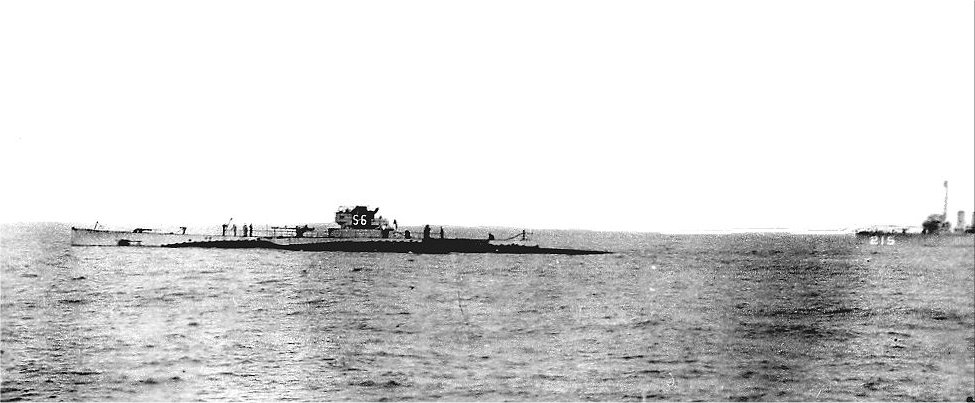
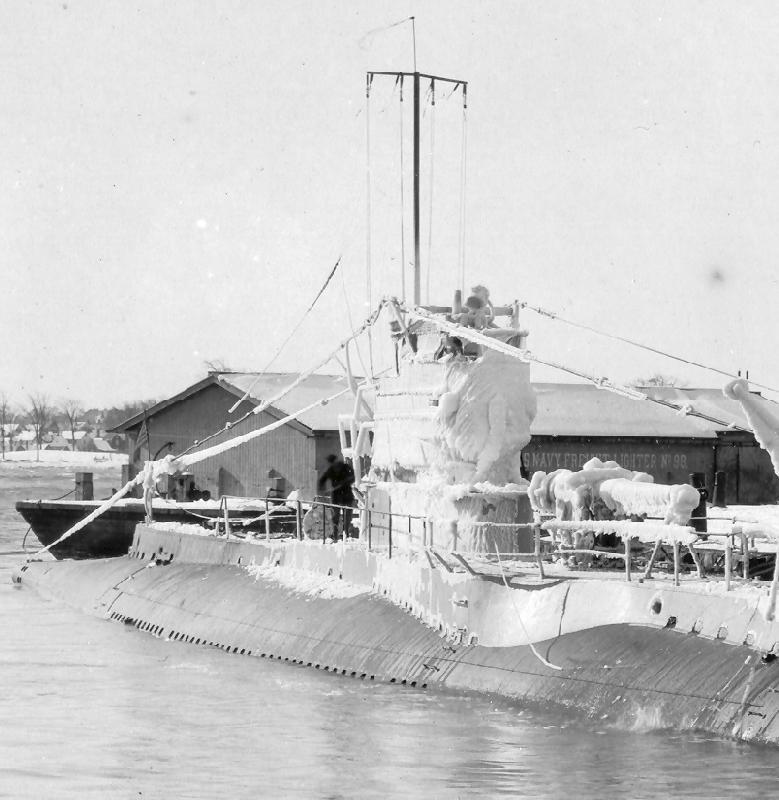
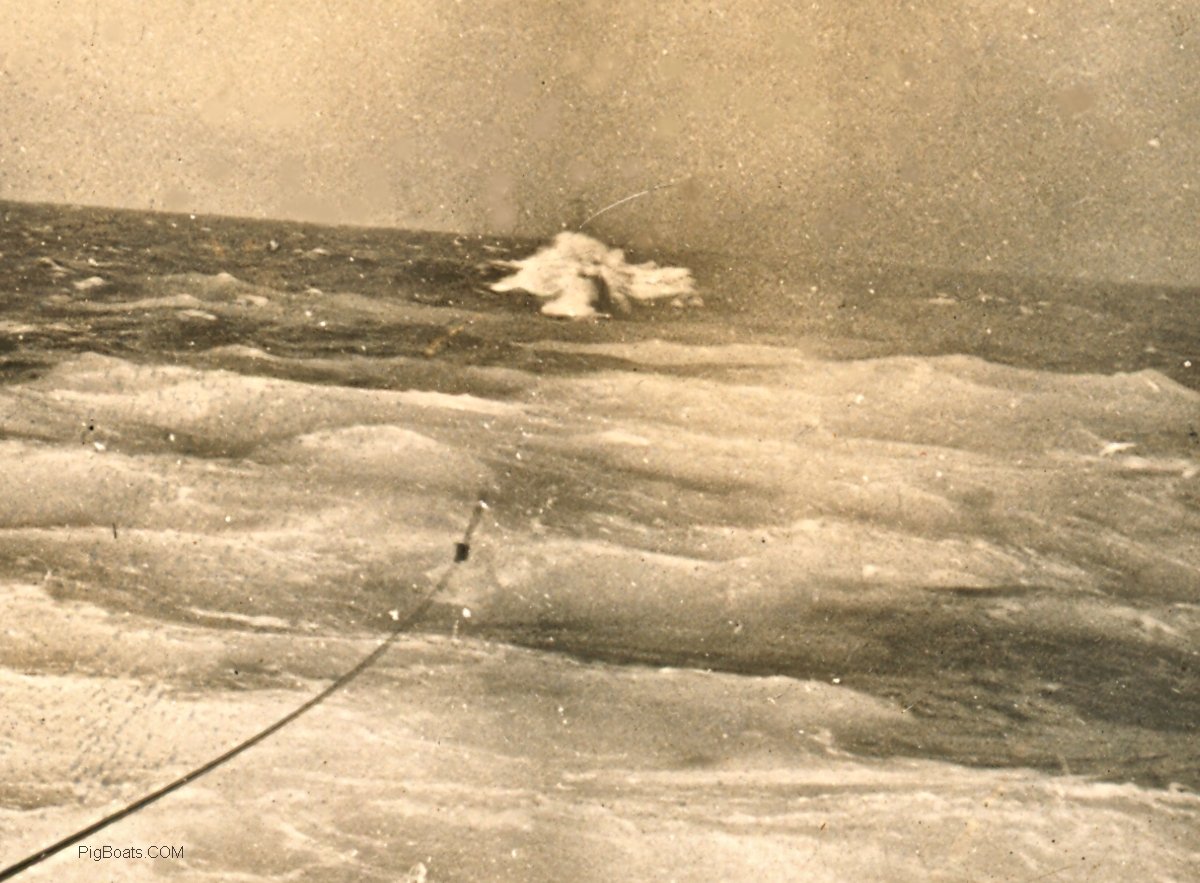
| The USS S-6 shown with the destroyer USS Borie DD 215 which has just run over the S-6 when she was submerged and damaged the S-6 periscopes and radio masts. |
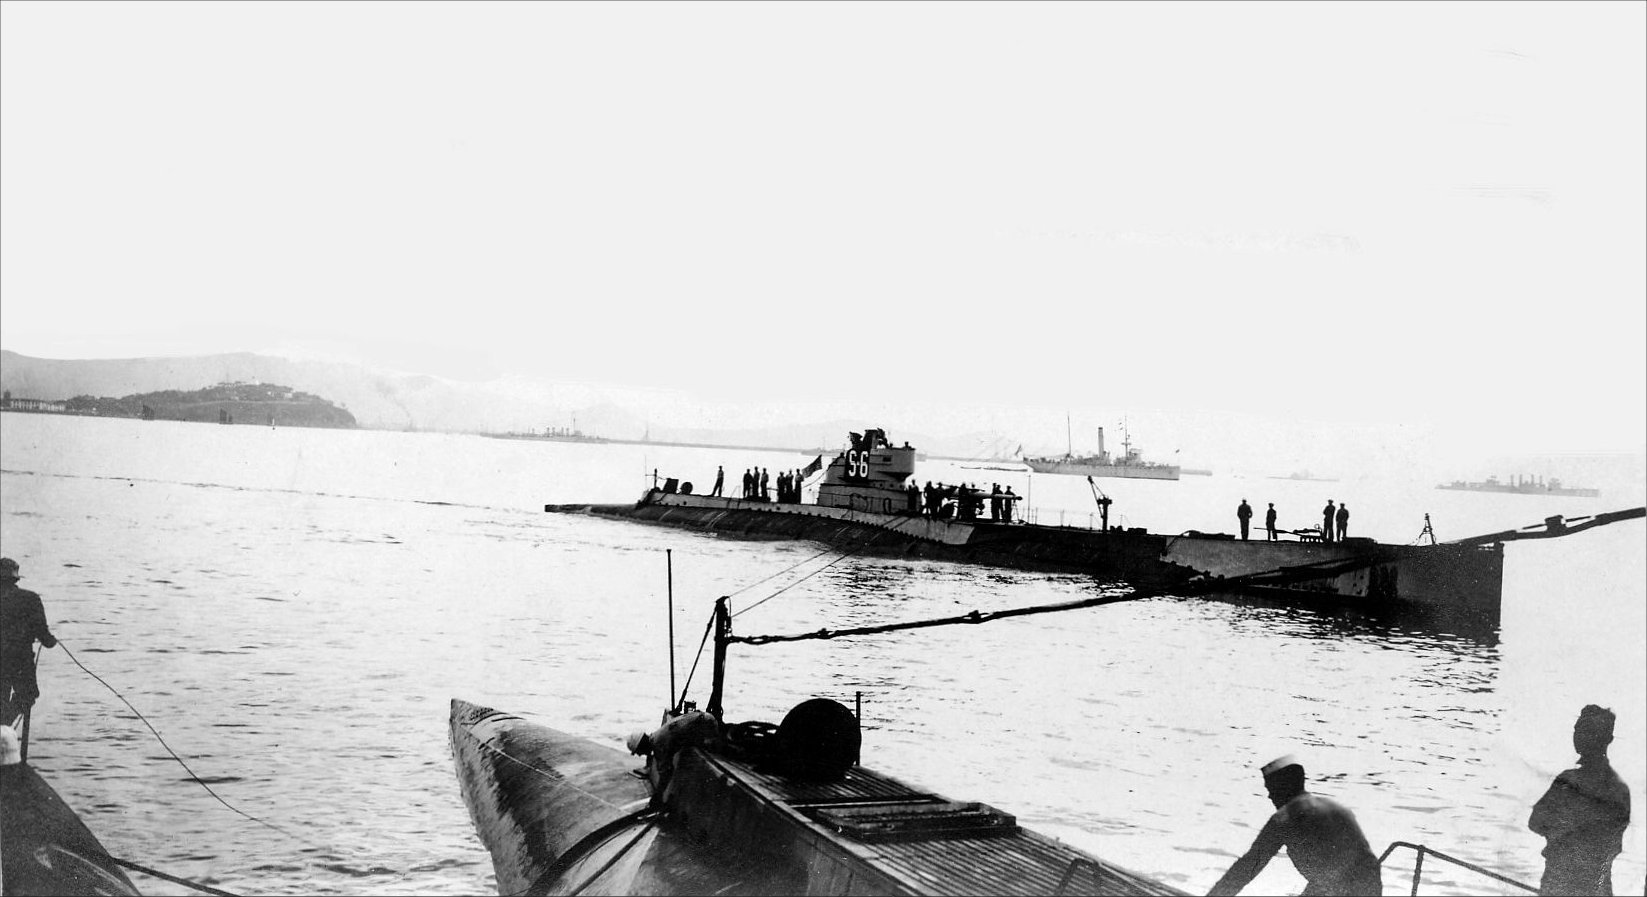
| The S-6 entering harbor after the collision with the USS Borie. I'm not familiar with the harbor. |
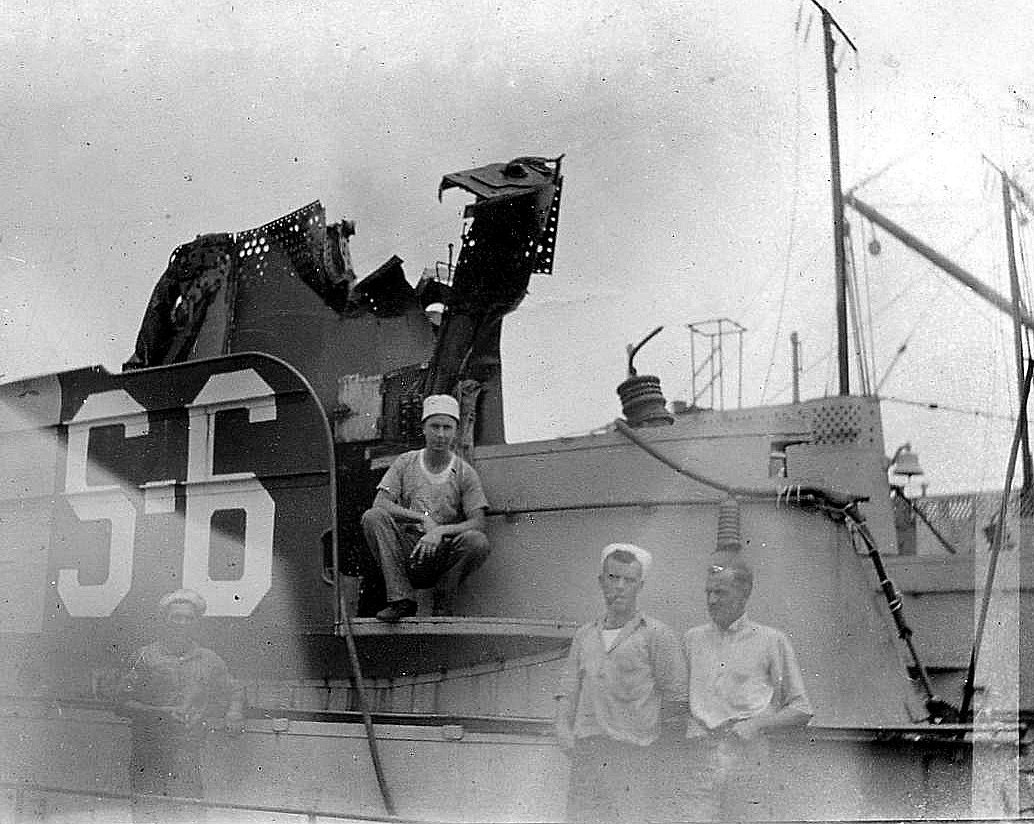
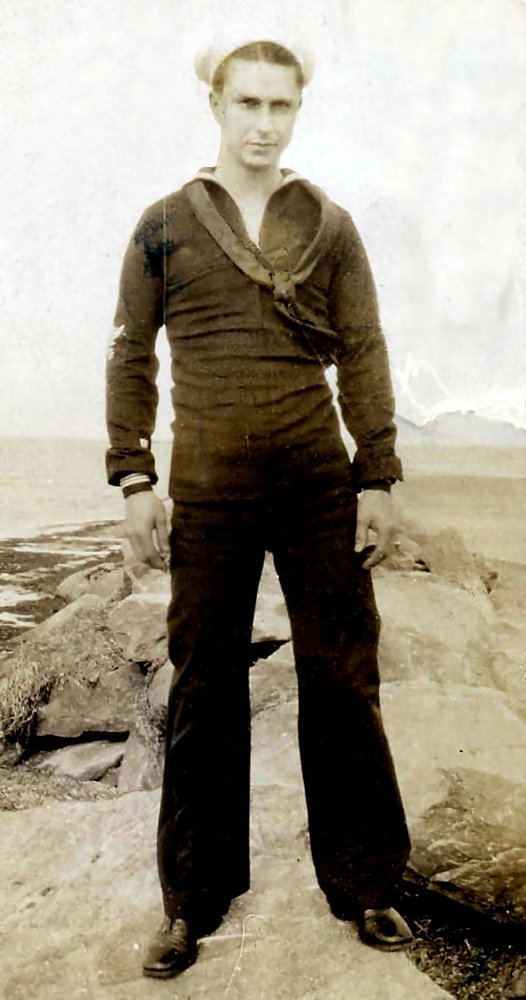
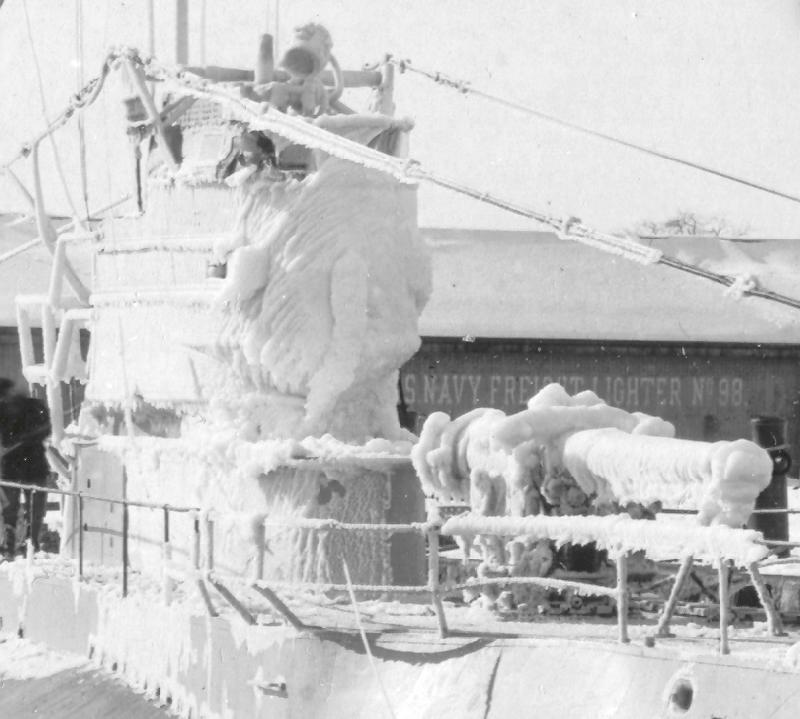
| Damaged to the USS S-6 seen after returning to port. Port side view of damage. In the center of the photo crouching on the aft end of the bridge is Charles J. Townsend. The other men are not identified. |
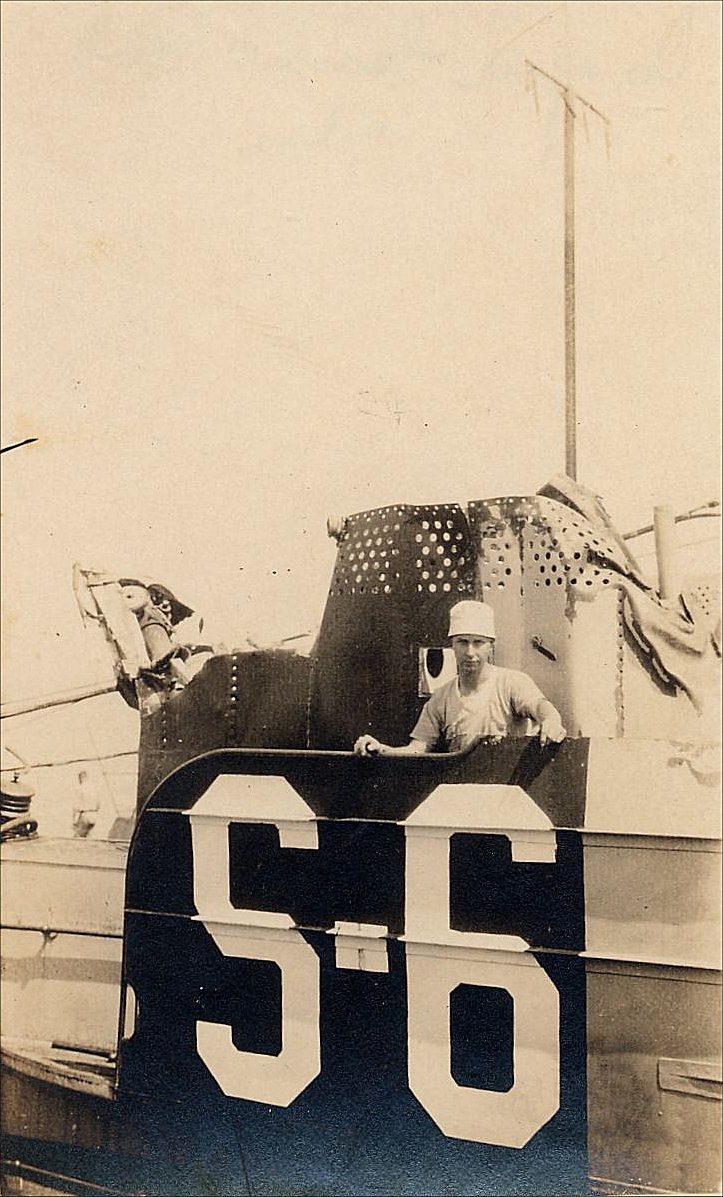
| Damaged to the USS S-6 seen after returning to port. Starboard side view of damage. In the center of the photo is Charles J. Townsend standing on the bridge. To the left in the photo is what is left of the telescoping radio mast. It should look like the raised mast seen behind the damaged periscope fairing. On the right side can be seen the stub of what is left of the forward periscope. |
| Damaged to the USS S-6 seen after returning to port. Starboard side view of damage. To the left in the photo is what is left of the telescoping radio mast. On the right side can be seen the stub of what is left of the forward periscope. |

| Damaged to the USS S-6 seen after returning to port. Port side view of damage. To the Right in the photo is what is left of the telescoping radio mast. On the left the stub of what is left of the forward periscope. Unidentified subs and ship in the background. |
| Charles J. Townsend seen after his naval service and in his Coast Guard uniform circa 1927. He joined the Coast Guard to stay closer to home after his Asia service in submarines. |
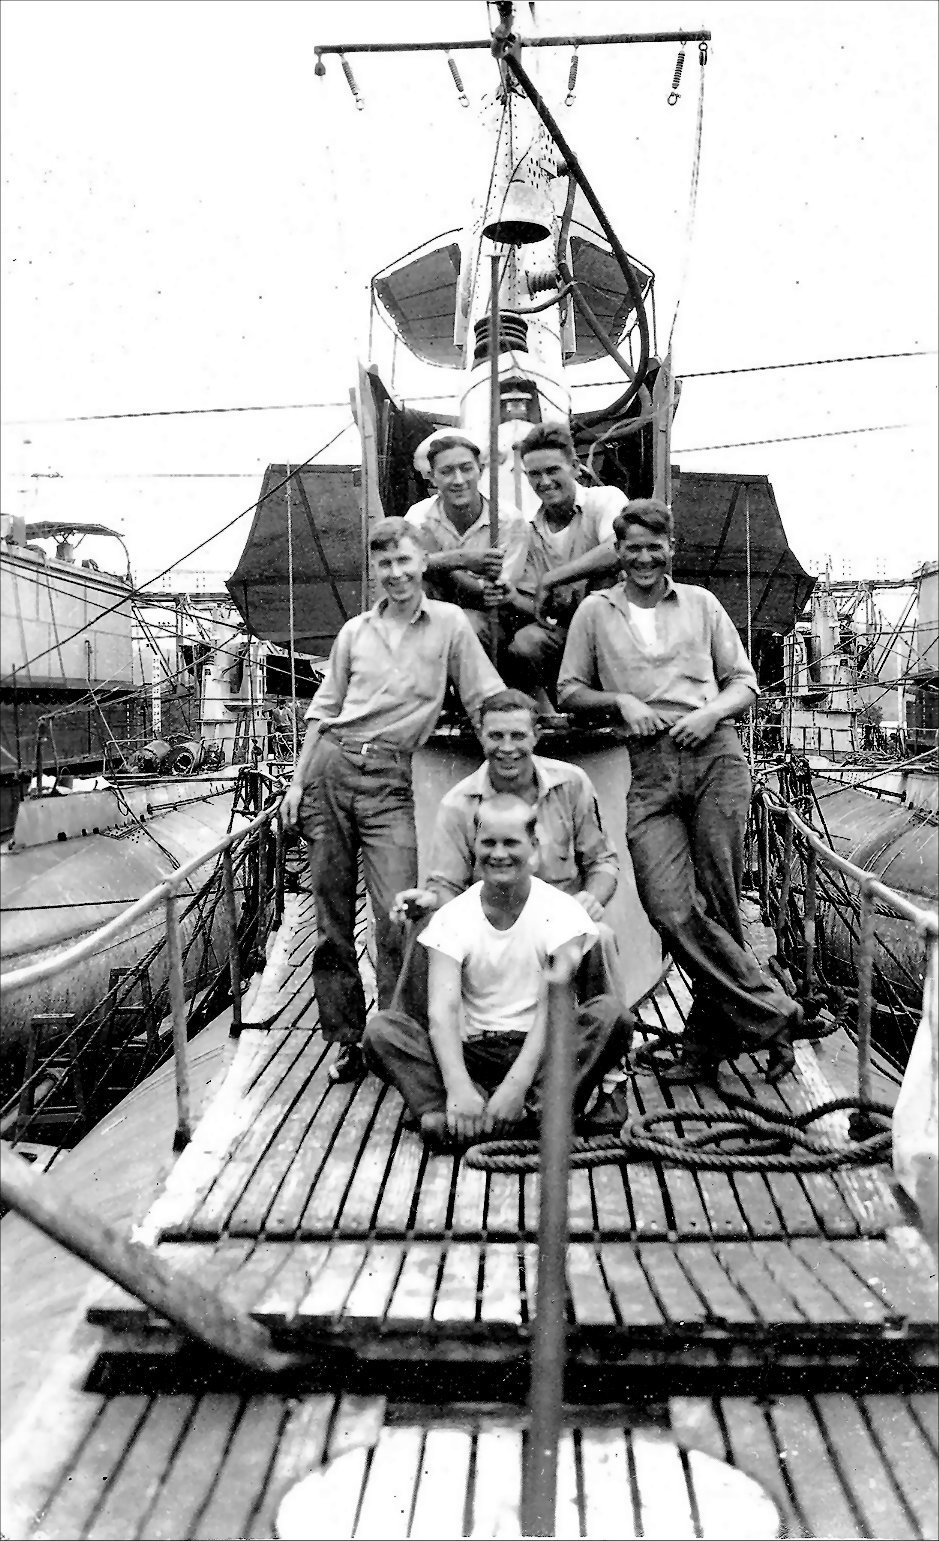
| Crew members of the USS S-6 getting haircuts on the aft deck of another submarine while the subs are in dry dock. The S-6 can be seen to the left. Another submarine is on the right. |
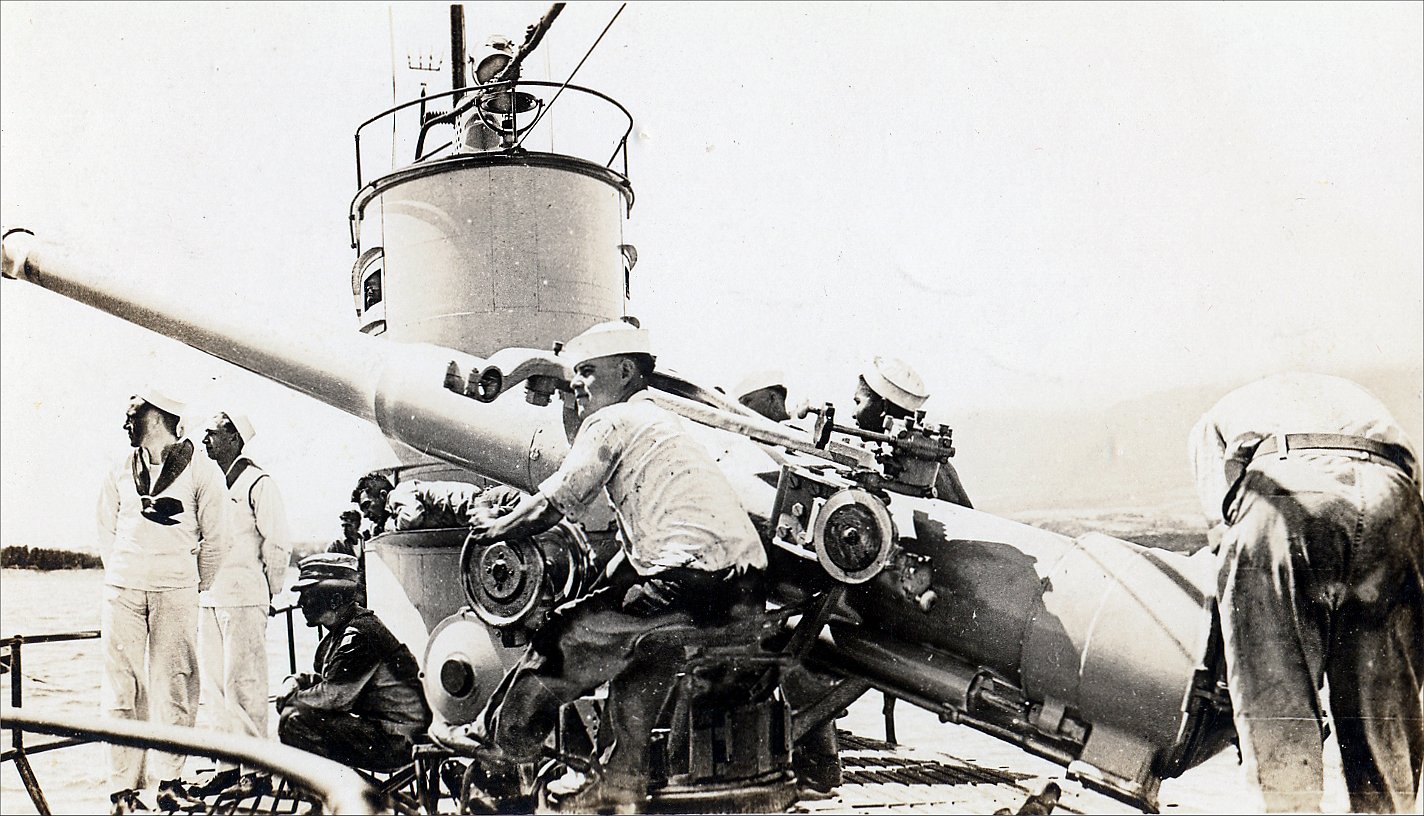
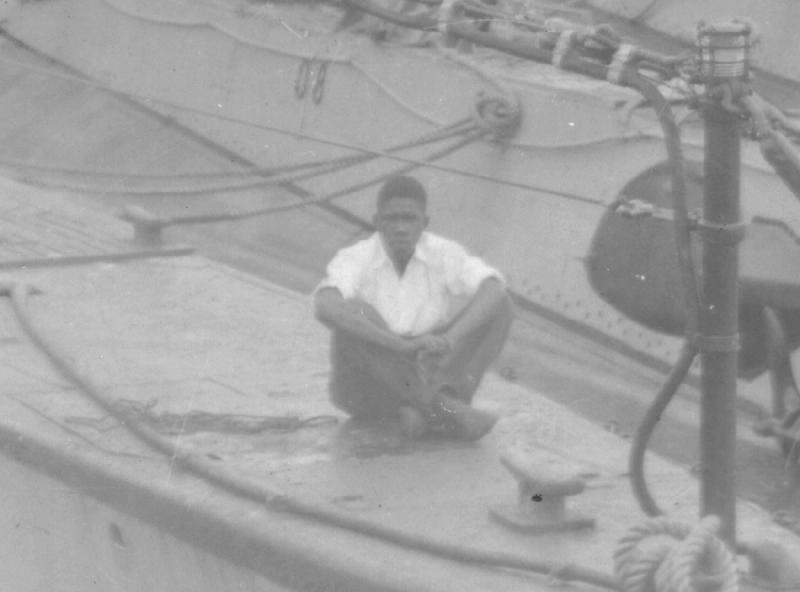
| The S-6 gun crew going through a drill. The men are unidentified but a Black crewman can be seen seated in the far gun seat. There were numbers of Black sailors in many positions in the Navy before President Wilson segregated the services and relegated Blacks to serving positions only. Those in a rate were allowed to stay. |
 |
 |
 |
 |
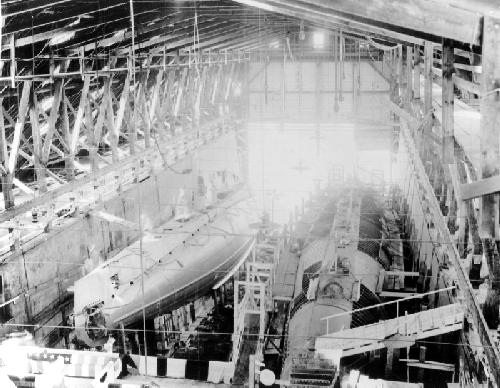
This is a pre-launch photo of the USS S-8 taken prior to her launch on April 21, 1920. It may be taken the day before or the same day as the launch. The platform is in place to accommodate guests and dignitaries. A second submarine, the S-9, is seen to the right in the photo. Research and Description Provided by David L Johnston: The photo was taken inside the old Franklin Shiphouse at Portsmouth Navy Yard. The S-class boats were built two at a time inside the shiphouse with the boat on the left being the first of the pair started. The boat has the below water fixed bow planes so that makes her S-8 through S-13. So if you do the math the pairs would be S-8 and S-9, S-10 and S-11, and S-12 and S-13. Also details on the decks vary so that makes these two different boats. The boat in the left photo had a unique limber hole pattern on the port bow so that makes her the S-8 with the boat next to her the S-9. |
 |
 |
 |
 |
 |
 |
 |
 |
 |
 |
 |
 |
 |
 |
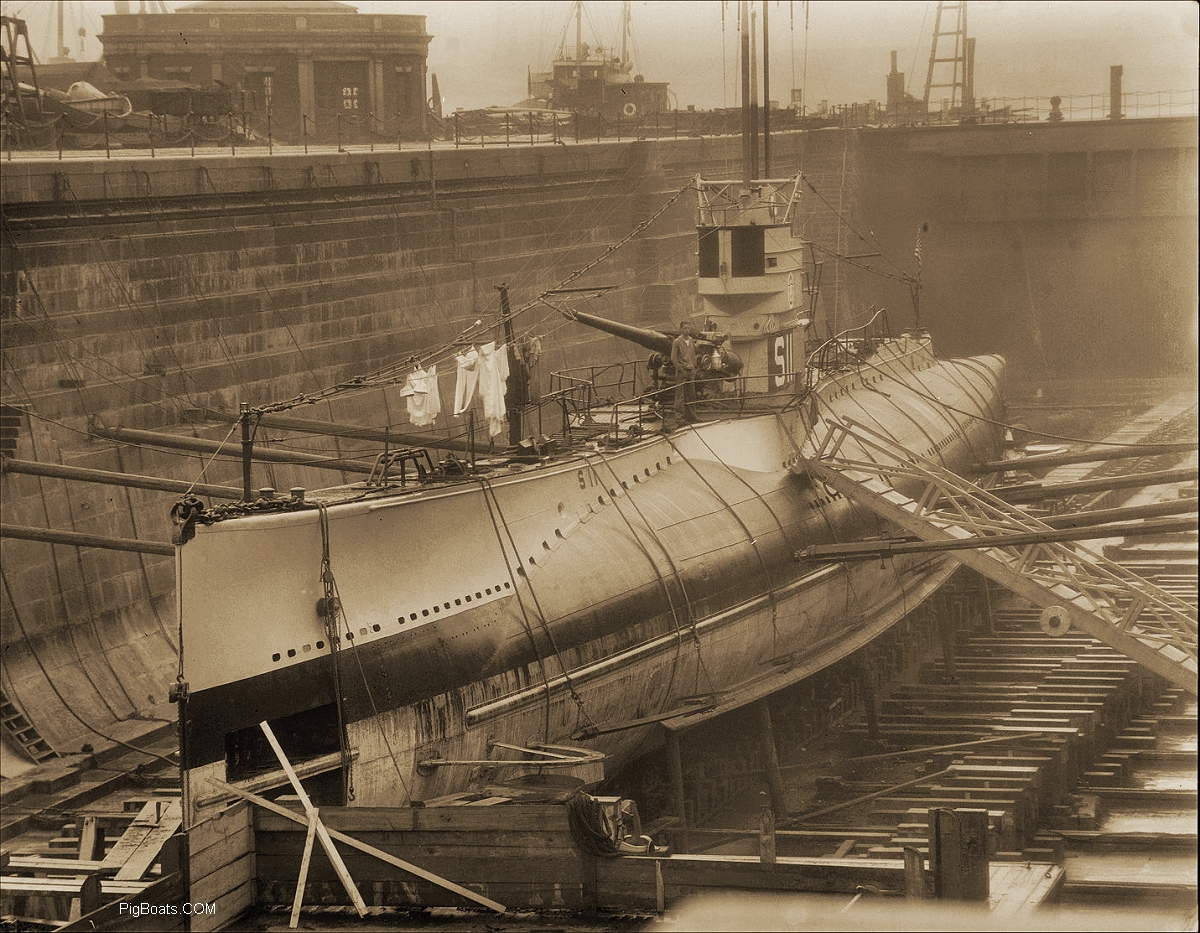
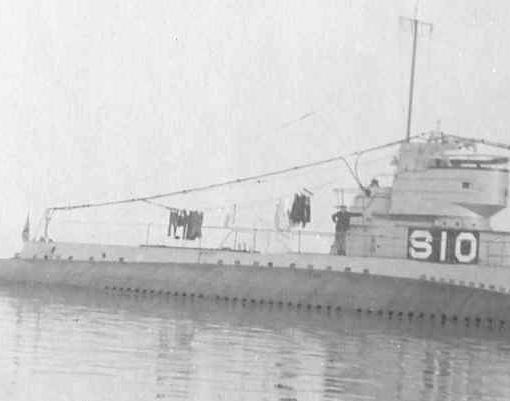
The USS S-11 in dry dock at what is thought to be the Naval Shipyard Boston circa 1924, maybe prior to her transit of the Panama Canal in October of that year heading to California and then Hawaii. Some sort of work is going on at the bow in and around the torprdo tubes though what it is isn't clear since, what appears to be a barrier, actually a barge in the dry dock with the S-11, has blocked the view. A block and tackle has been rigged and hangs over that location. Some crew has been doing some laundry. A crew man stands on the deck near the gun. |

Close up of the man on deck and the types of laundry hanging to dry from the Jack Stays. It appears to be two white hats, four shirts and a set of longjohns along with a matress cover and pillowcase. Behind those and harder to see are several pairs of dungaree pants and some socks. |
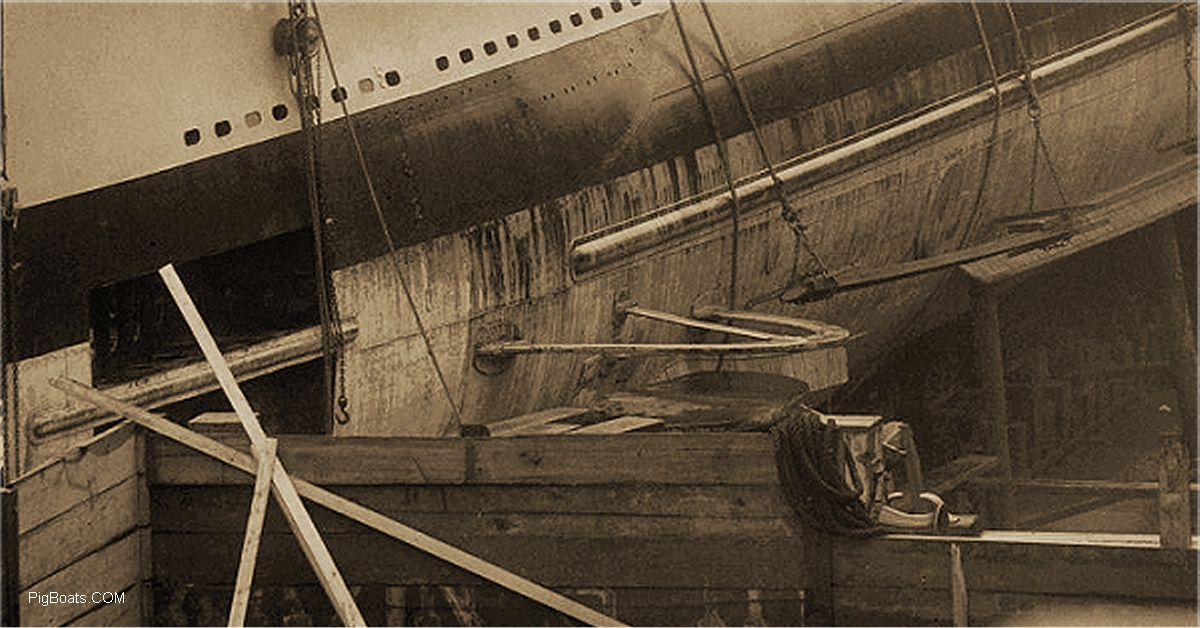
Close up of the work area showing the port torpedo tube shutter doors open and the port bow plane with its guard above it. Just aft and seen just above the plank scaffold as a circular disk is the Fessenden Oscillator sound head, used for underwater communication and sound detection. |
A stern view of the S-11 in the dry dock. A barge can be seen in front and to the left side in the photo. Access tunnels into the dry dock can be seen at the far end and to the right. This S class design has a single stern plane stretching across the stern aft of the props. |
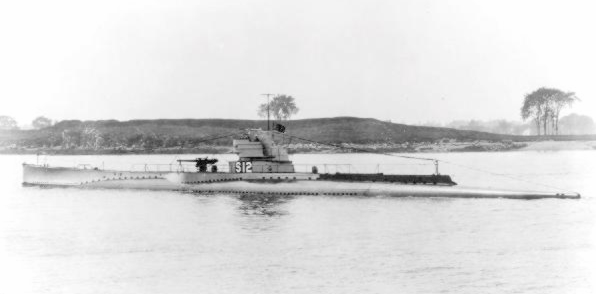
A slightly different angle of the stern and the planes and rudder. The S-10 through S-13 were the first US subs designed with an aft torpedo tubes. This came about at the insistence of sub skippers who had WW I experience and wished they had one. When it was discovered the German subs had aft tubes these boats were redesigned to test the concept. |
Close up of the stern from the image posted above showing the stern plane, rudder and aft tube. It may look like the port propeller has been removed but it is just at a different place in rotation than the starboard one. |
 |
 |
 |
 |
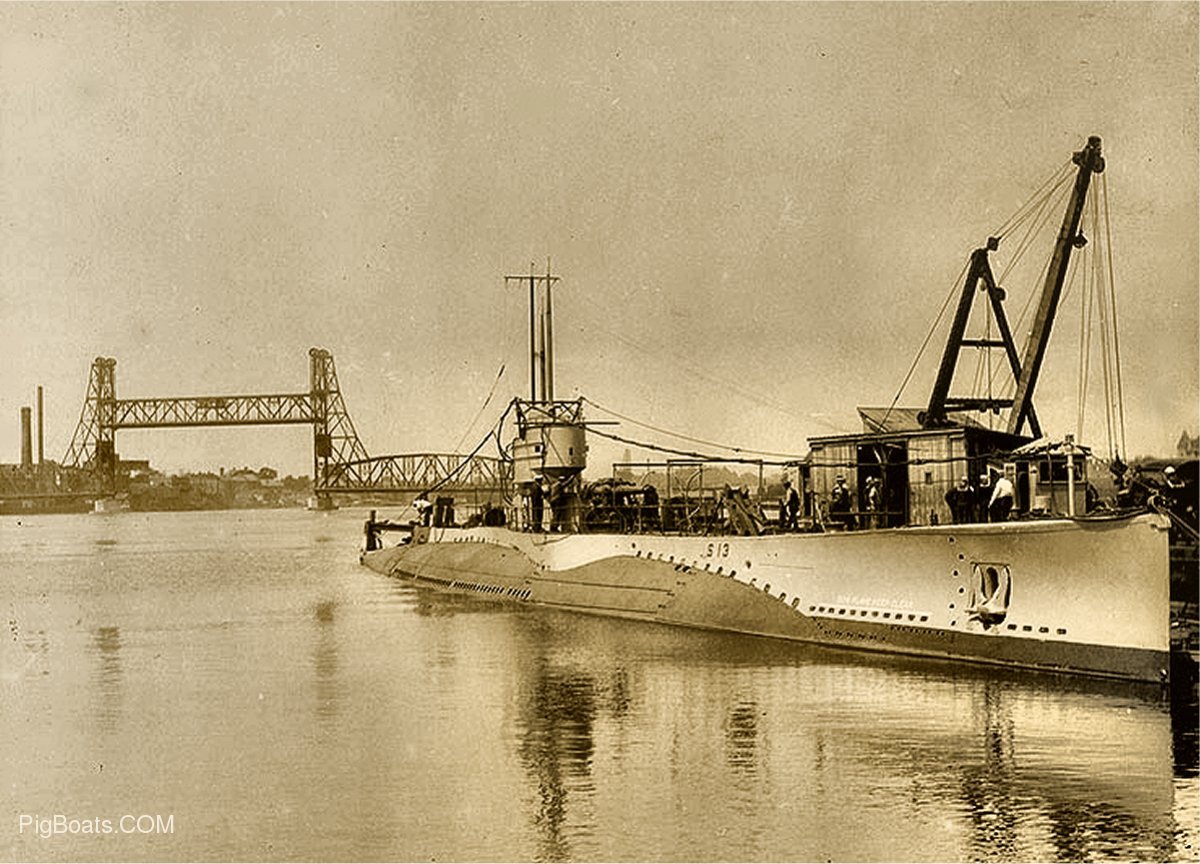
This photo of the S-13 is taken at the Portsmouth Shipyard sometime close to her commissioning on July 14, 1923. There are both civilians and Navy sailors in uniform on the dock. It is noted, however, that the sailors are wearing dress blue uniforms which could place the photo prior to June 1st, before the change to summer white uniforms. These is no sign of a commissioning pennant, American flag or the Navy Jack at the bow which the vessel would carry if it was commissioned. In the background is the World War I Memorial Bridge that was a vertical-lift bridge that carried U.S. Route 1 across the Piscataqua River between Portsmouth, New Hampshire, and Badger's Island in Kittery, Maine. The bridge is seen in its raised position and probably still under construction. The bridge was officially opened on August 17, 1923 so this photo is notable in that neither the bridge or the submarine have been inaugurate for use at this point. In a side note; Five-year old Eileen Foley who cut the ceremonial silk ribbon in 1923 to open the bridge returned in 2013, 90 years later, to dedicate the bridge's replacement.
Bridge identification by Jim Christley Bridge information via Wikipedia |
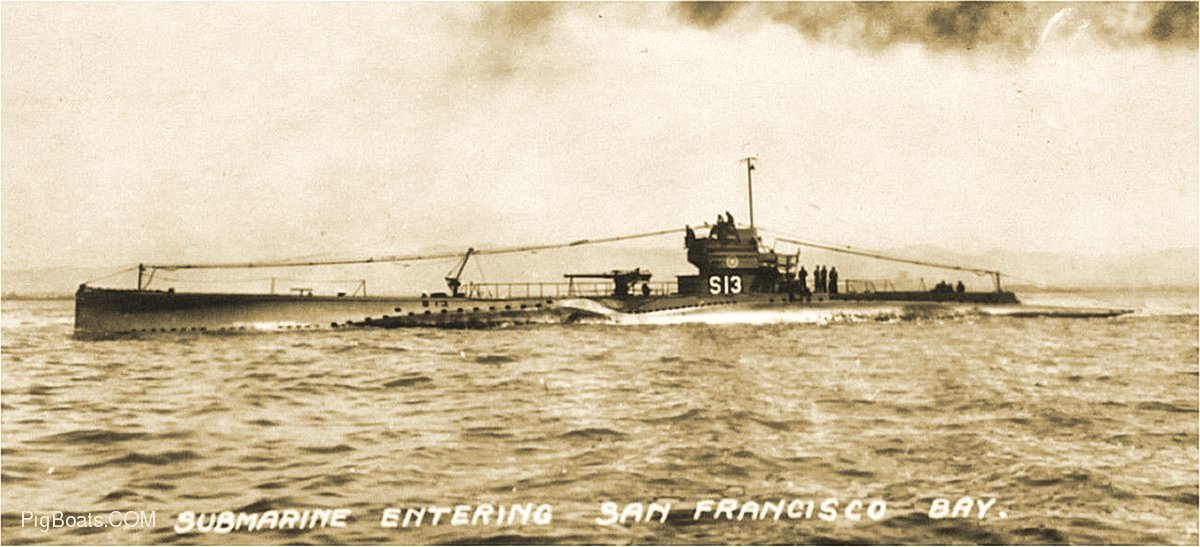
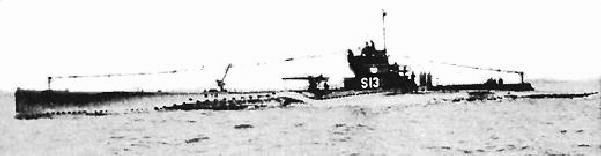
The USS S-13 is seen here entering into San Francisco Bay. What the exact date is is not known. We do know that the S-13 left New London on November 24, 1924 and proceeded, via the Panama Canal and visited California and arrived in Hawaii on April 27 and stayed there until May 25, 1925 before arriving back in New London on July 12, 1925. Using this information we can extrapolate an approximate date of late 1924 to early 1925 for this image of her sailing into San Francisco Bay.
|
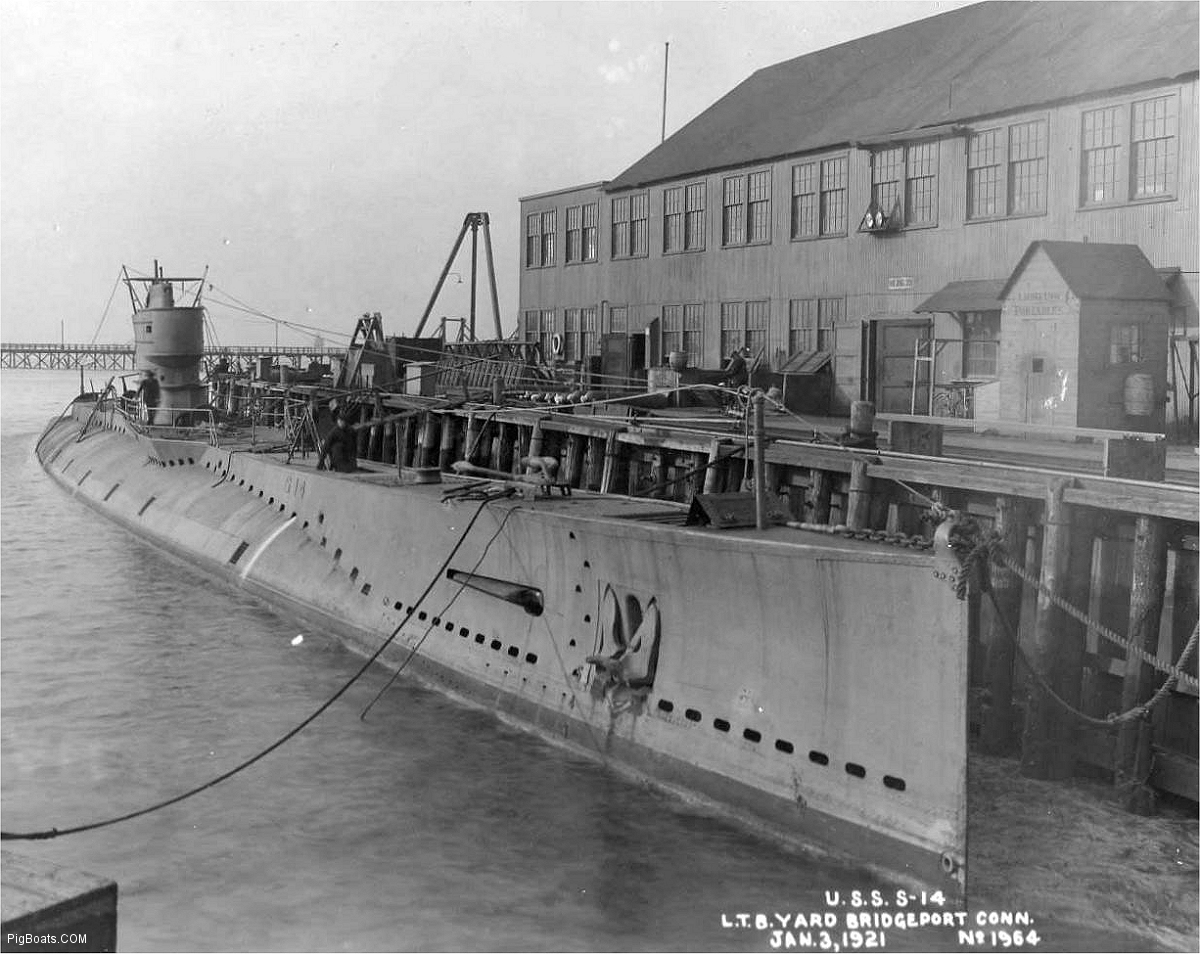
The USS S-14 at the Lake Torpedo Boat Company shipyard on January 3, 1921. The S-14 was launched from the same yard on October 22, 1919. She still wasn't commissioned at this time. That happened on February 11, 1921.
|
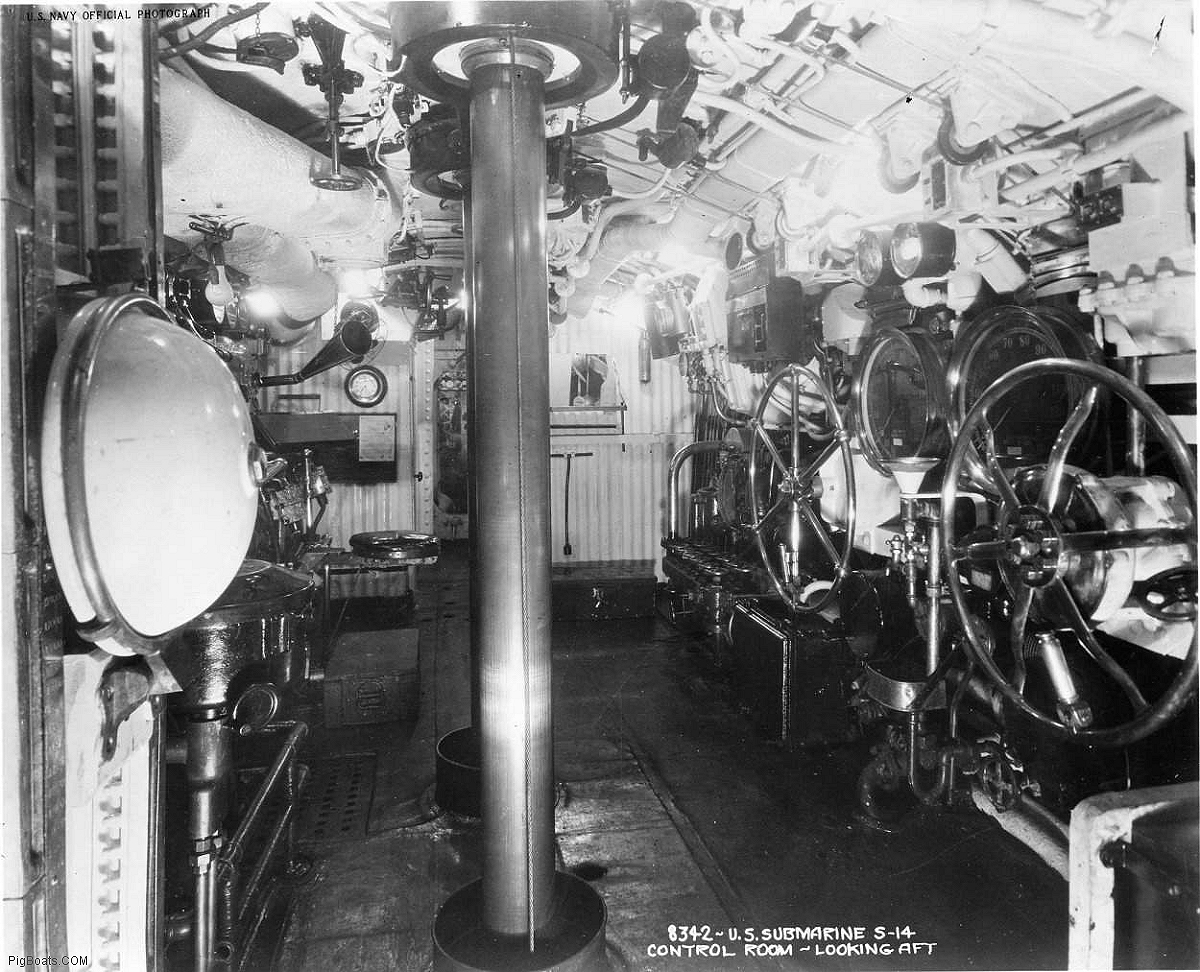
The control room of the S-14. The view is looking aft. To the right of the periscope at the far end is the ships galley, you can see a small window where men could pick up their food. To the left of the periscope is the radio room. In the left foreground is a wash basin. It is flipped in an upright position to get it out of the way and this also how the basin was drained. The water poured out the back into a drain tank. Bow and stern planes wheels and the trim systems are seen on the right side of the photo. All the way in the far right corner of the room are the levers for operating the Kingston Valves.
|
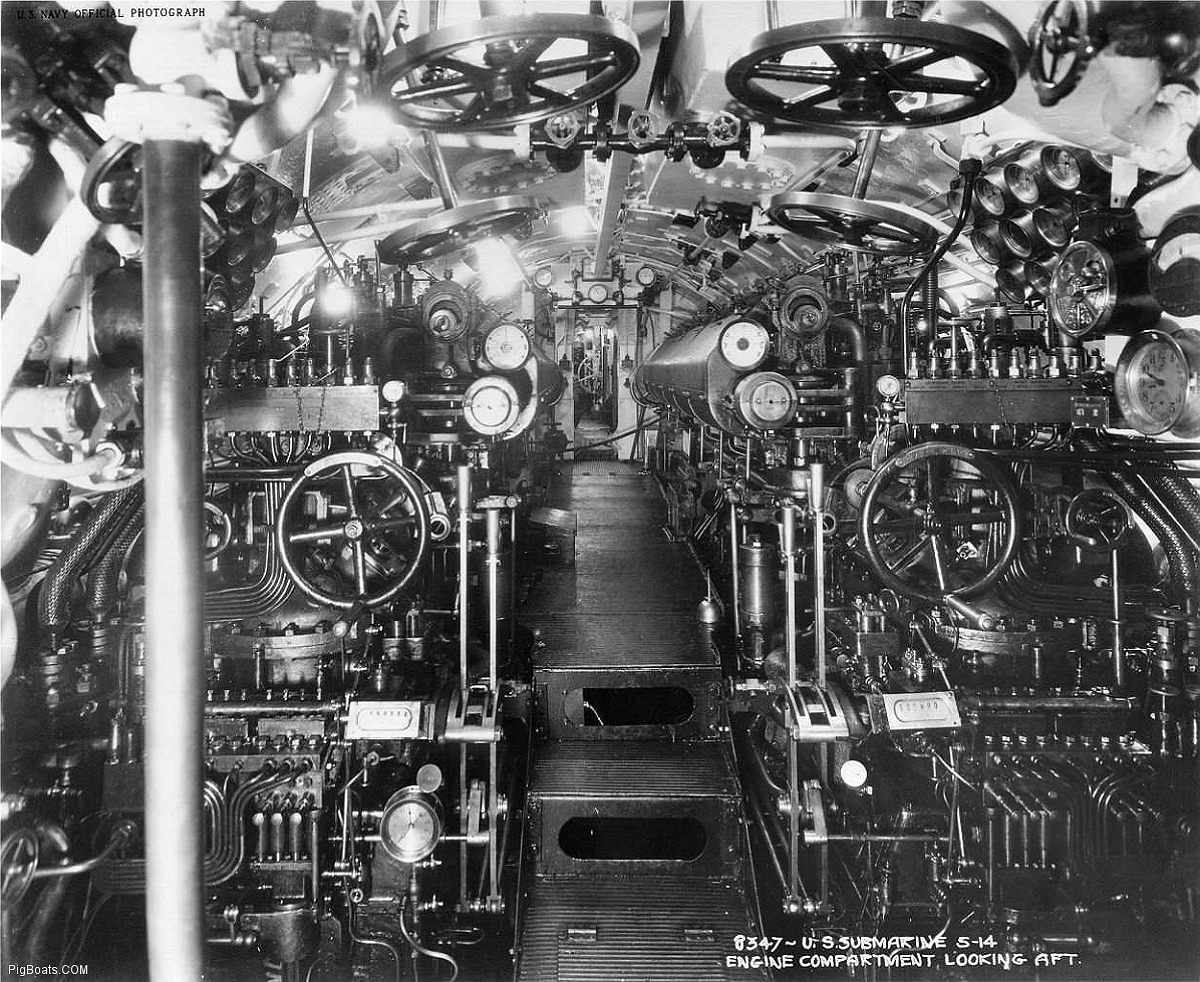
The Engine Room of the S-14 looking aft. Interesting that we know the time of the photo since there is a clock on the right side. The photo was taken at about ten minutes to ten. Above the clock is one of the Engine Order Telegraphs where engine speed requests from control was received and acknowledged. At the aft end of the compartment, through the door way, you are looking into the Motor Room. At the far end of the Motor Room you can see the secondary steering station wheel.
|
The torpedo tubes of the S-14. From the boxes in the foreground and the following photo it is believed to be taken about January 1928. She shifted her home port from Mare Island to Coco Solo, Panama at that time. The quantity of stores portends a lengthy voyage.
|
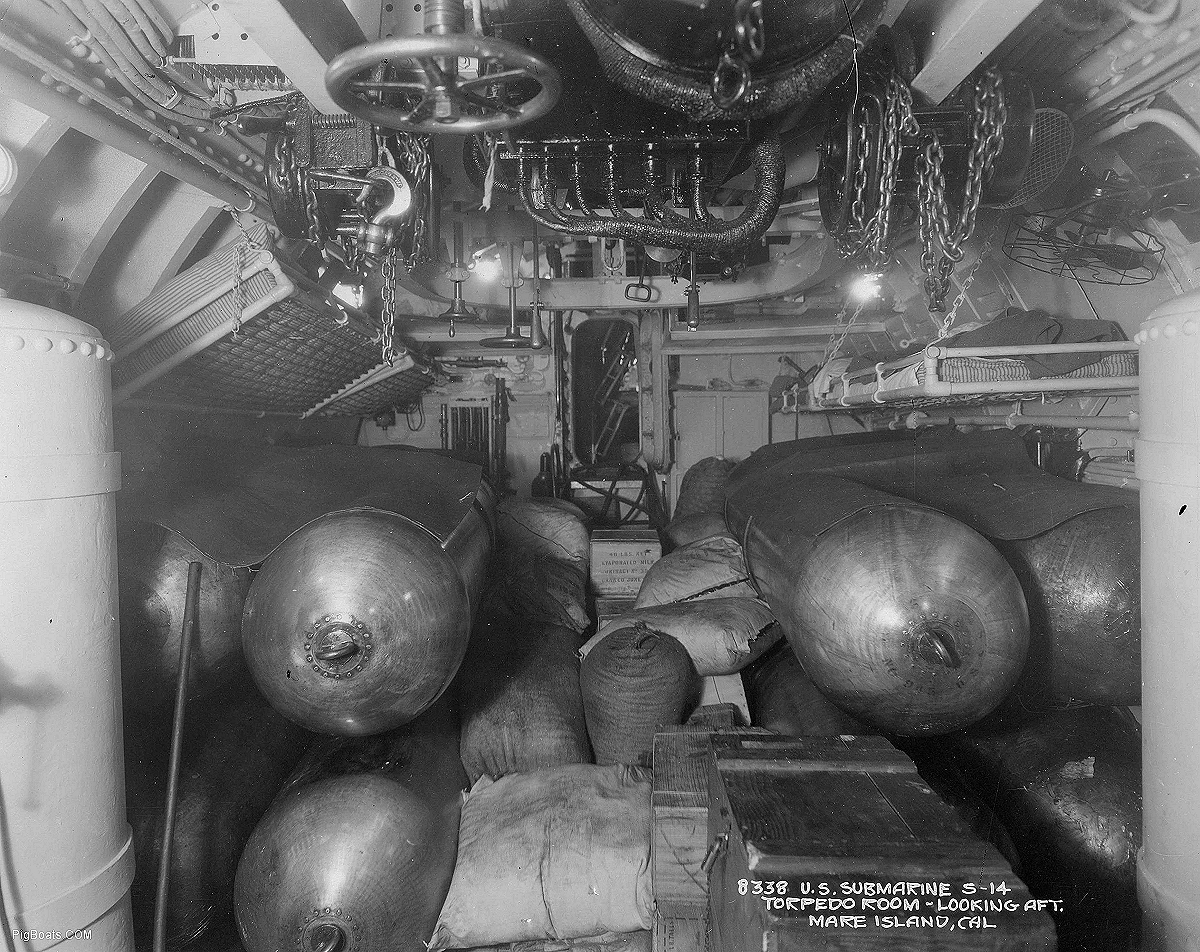
From the boxes in the foreground and the quantity of goods stored in and around the torpedoes it is believed to be taken about January 1928. She shifted her home port from Mare Island to Coco Solo, Panama at that time. The quantity of stores portends a lengthy voyage. Through the open door way bunks can be seen in their "triced up" position.
|
 |
 |
 |
 |
The USS S-17 under tow from Guam to Honolulu by an unknown ship. It must have been a nasty ride plunging in the ships wake like that. Maybe the crew had been taken off for the tow or a minimum crew left aboard in case the tow line parted. In the summer of 1924 the S-17 visited Shanghai, Tsingtao, Chefoo, and Chinwangtao, before returning via Chefoo and Amoy to Olongapo, Luzon, on September 23, 1924. Departing Cavite on October 29 1924, she arrived at Mare Island, Calif., on December 31. Whether she was under tow the whole way or just from Guam To Honolulu is unknown at this time..
|

Reverse of the card with the above photo. Unfortunately the caption writer didn't add his own ship. Has anyone heard of this incident?
|
 |
 |
 |
 |
 |
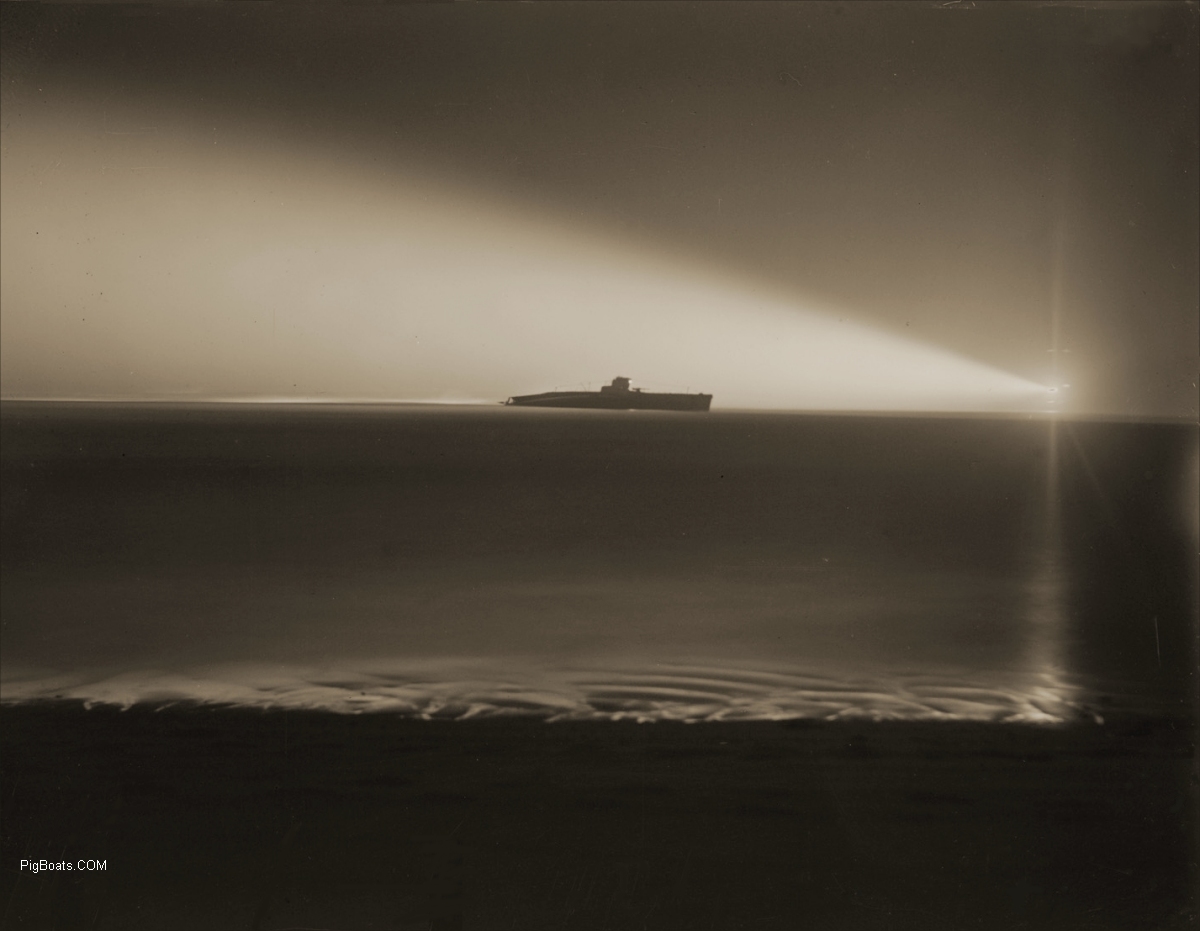
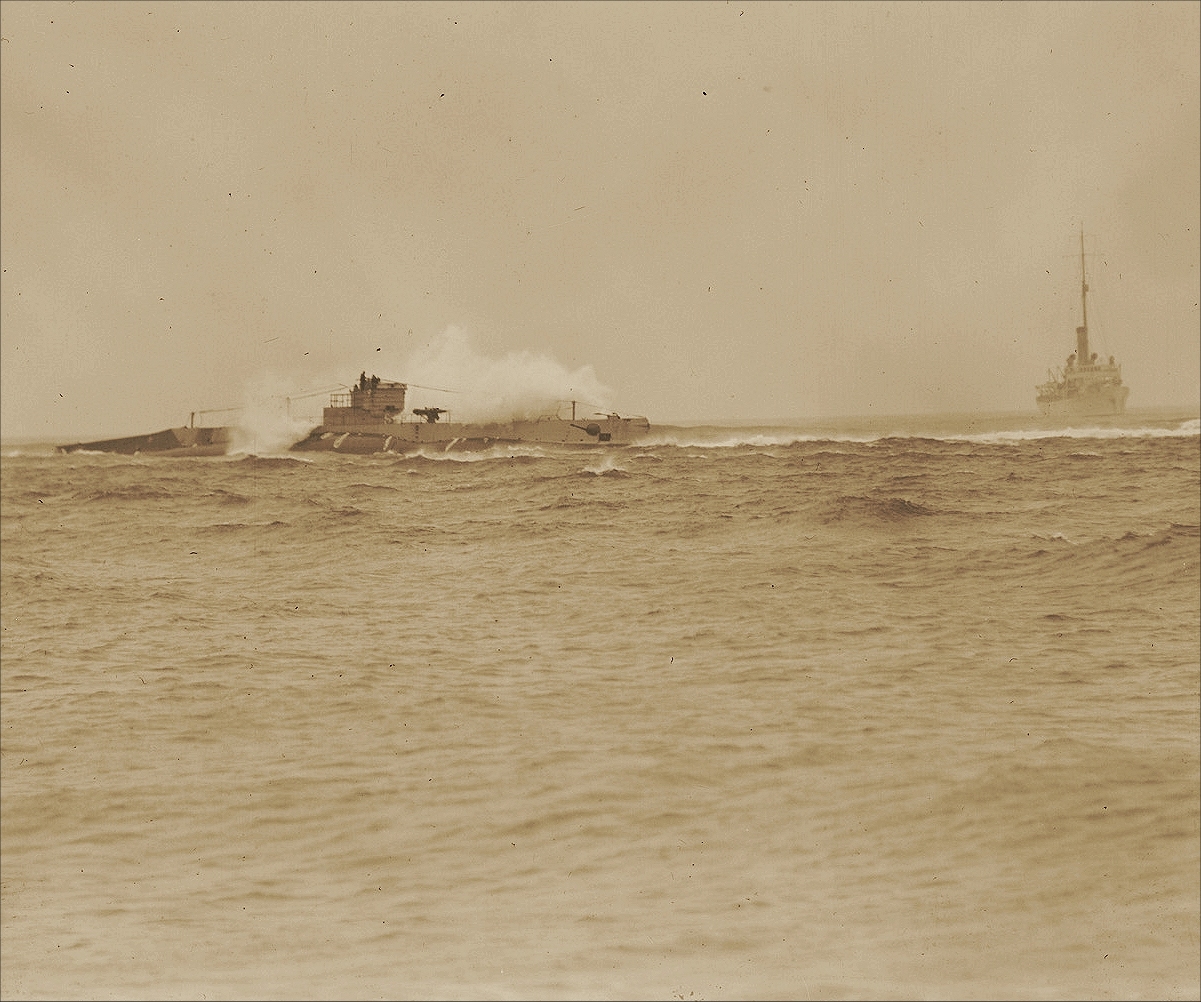
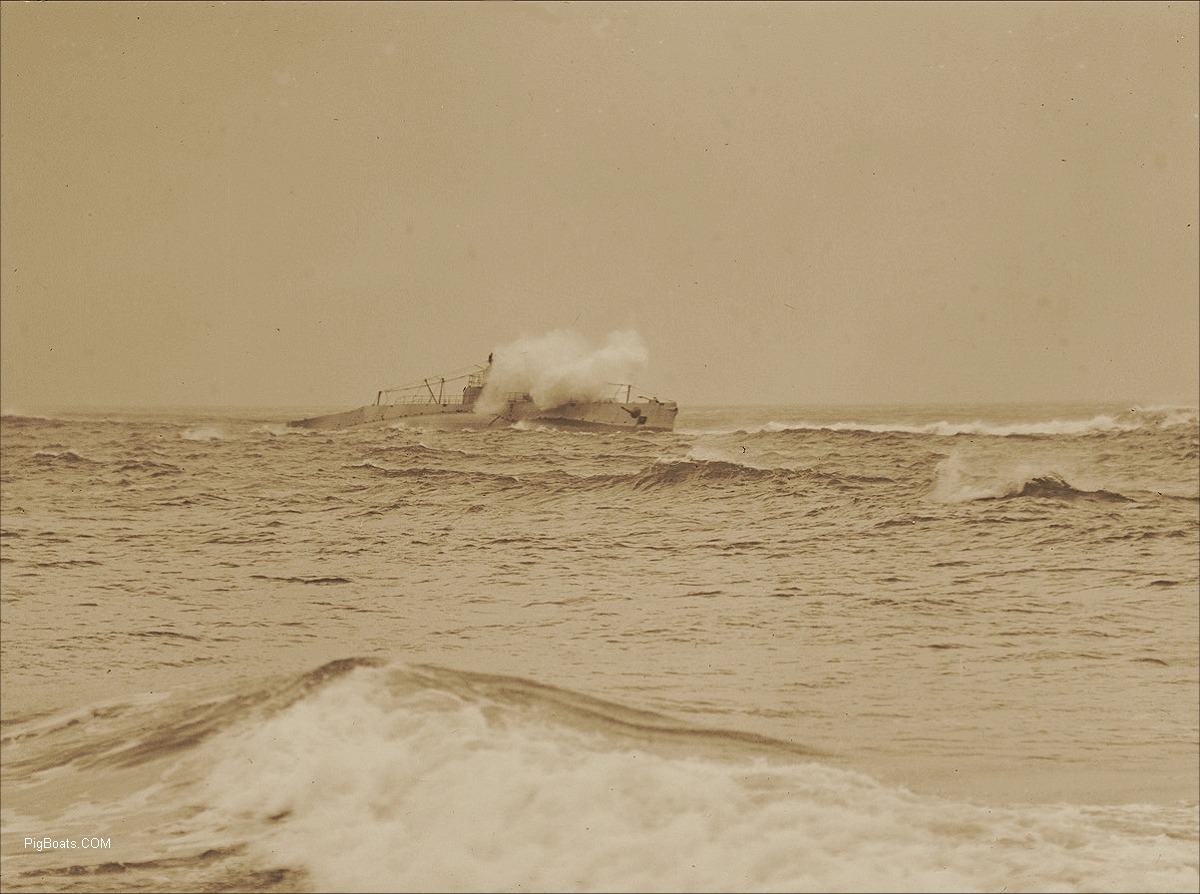
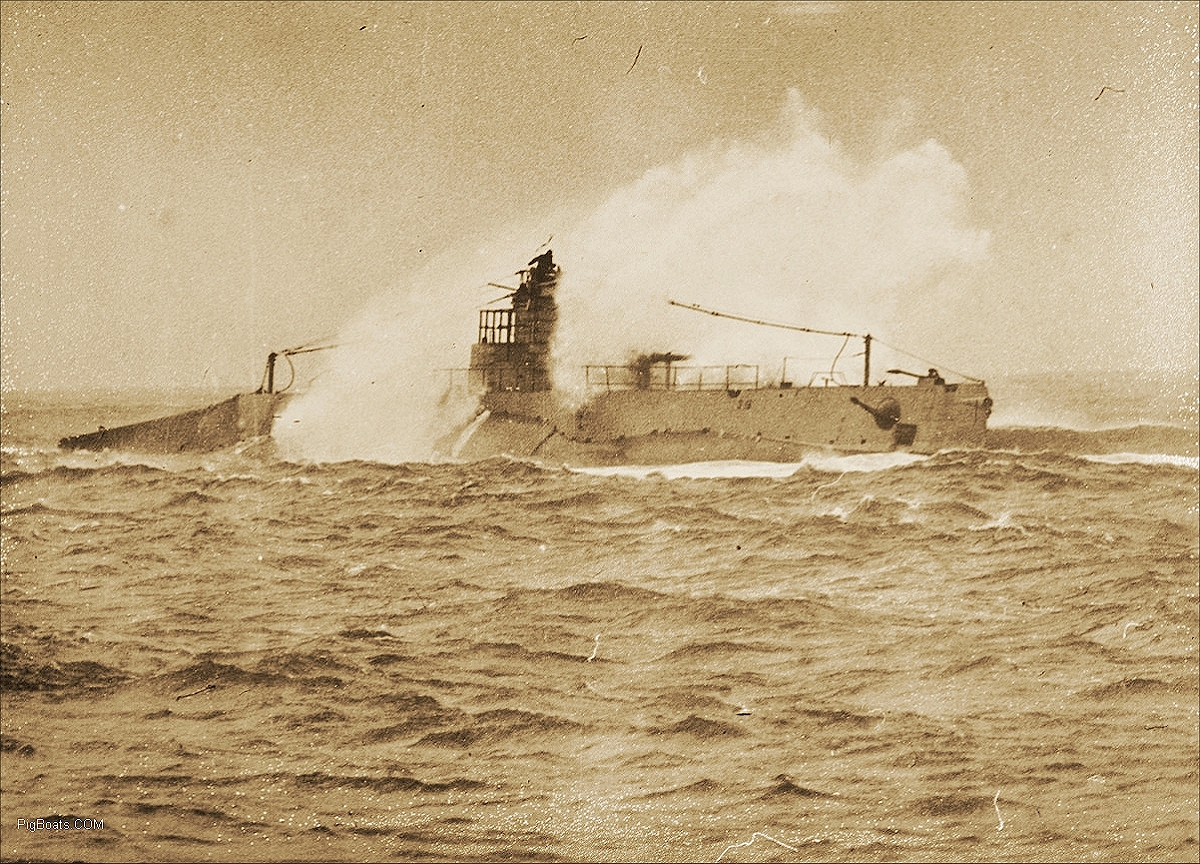
USS S-19 ran aground off Chatham, Mass Jan 13, 1925
on the southern coast of Cape Cod, on Nauset Beach after foggy weather,
strong winds and unusually heavy seas had pushed her far from her course.
The Coast Guard Cutters TAMPA (Coast Guard Cutter No. 48) and ACUSHNET came her assistance. Here, the searchlight from the TAMPA illuminates the S-19 in the dark.
|
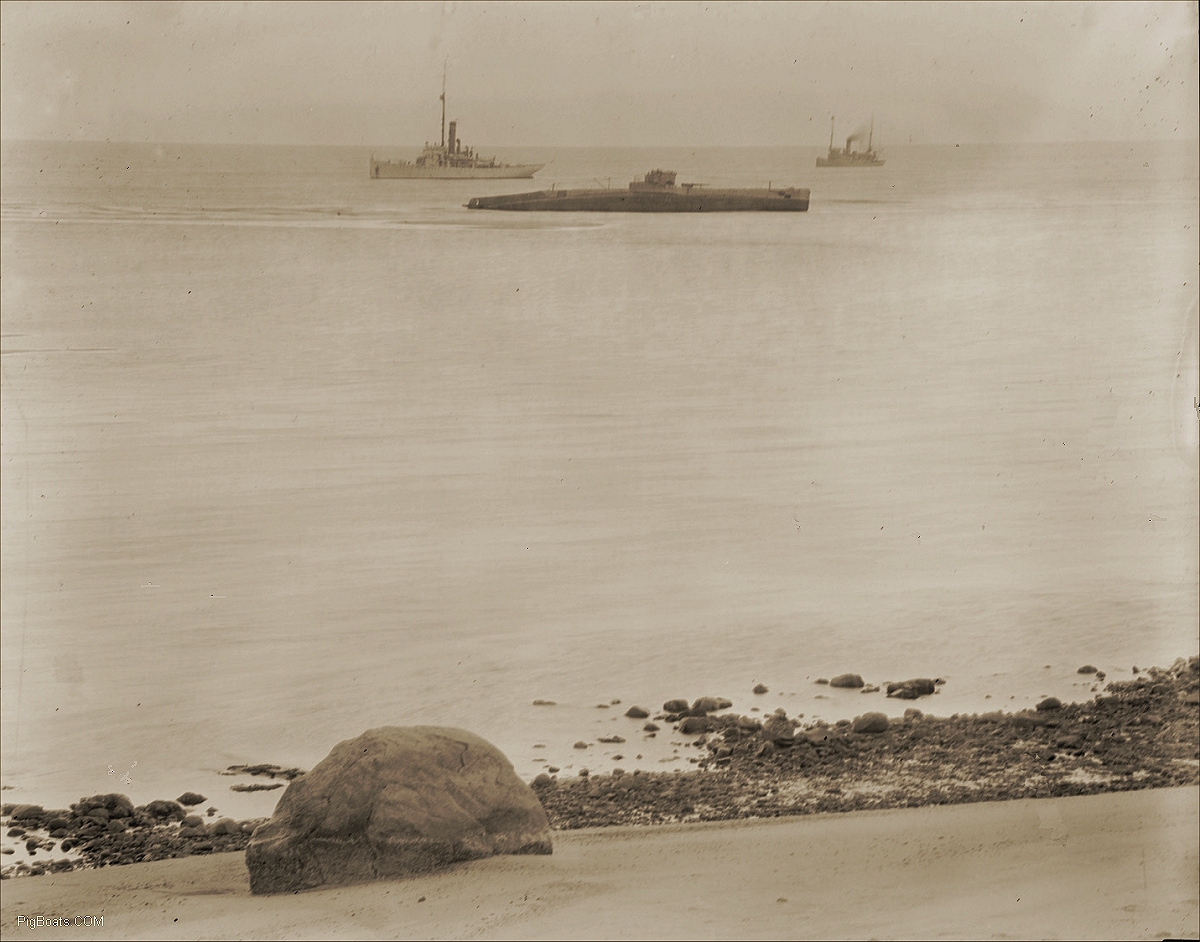
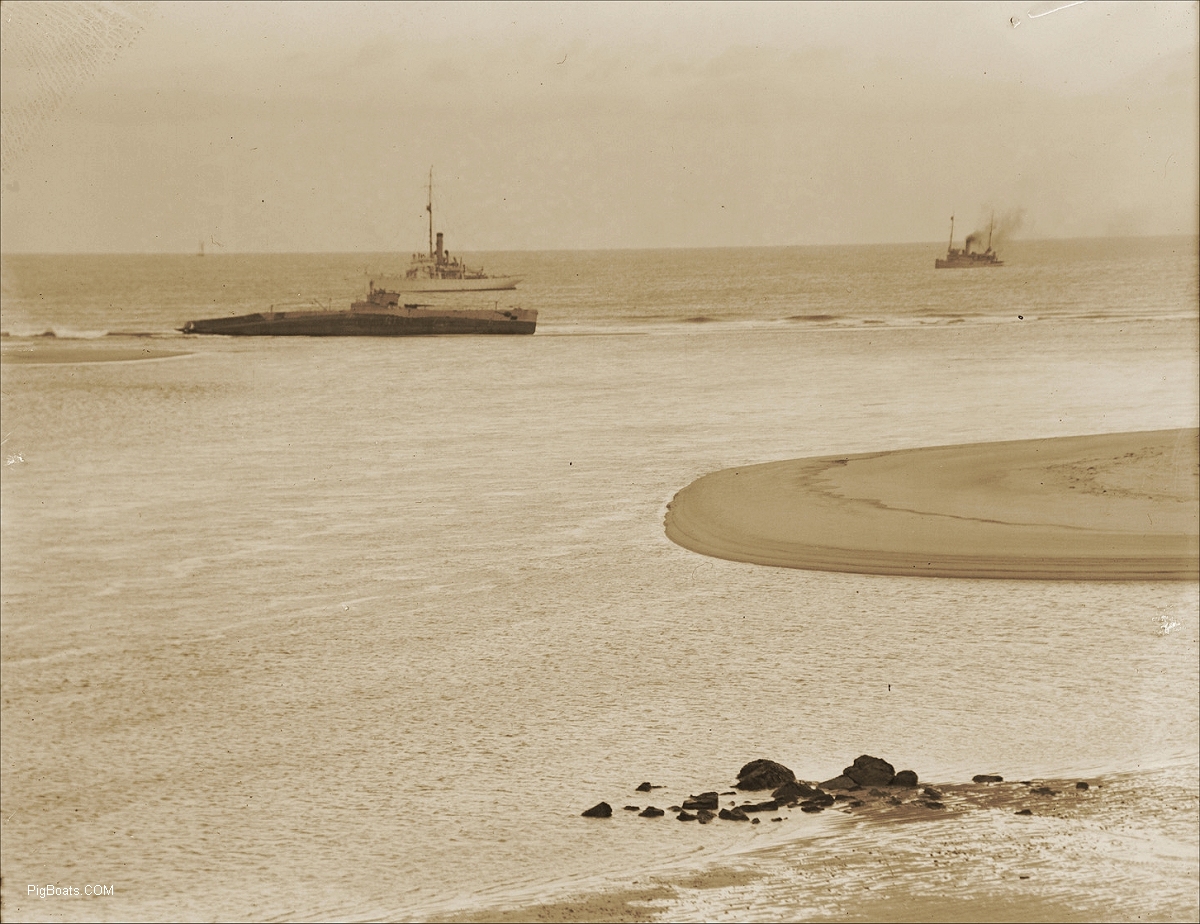
The Coast Guard Cutters TAMPA (Coast Guard Cutter No. 48) and ACUSHNET, seen left to right, stand by to assist the S-19.
|
|
|
|
|
|
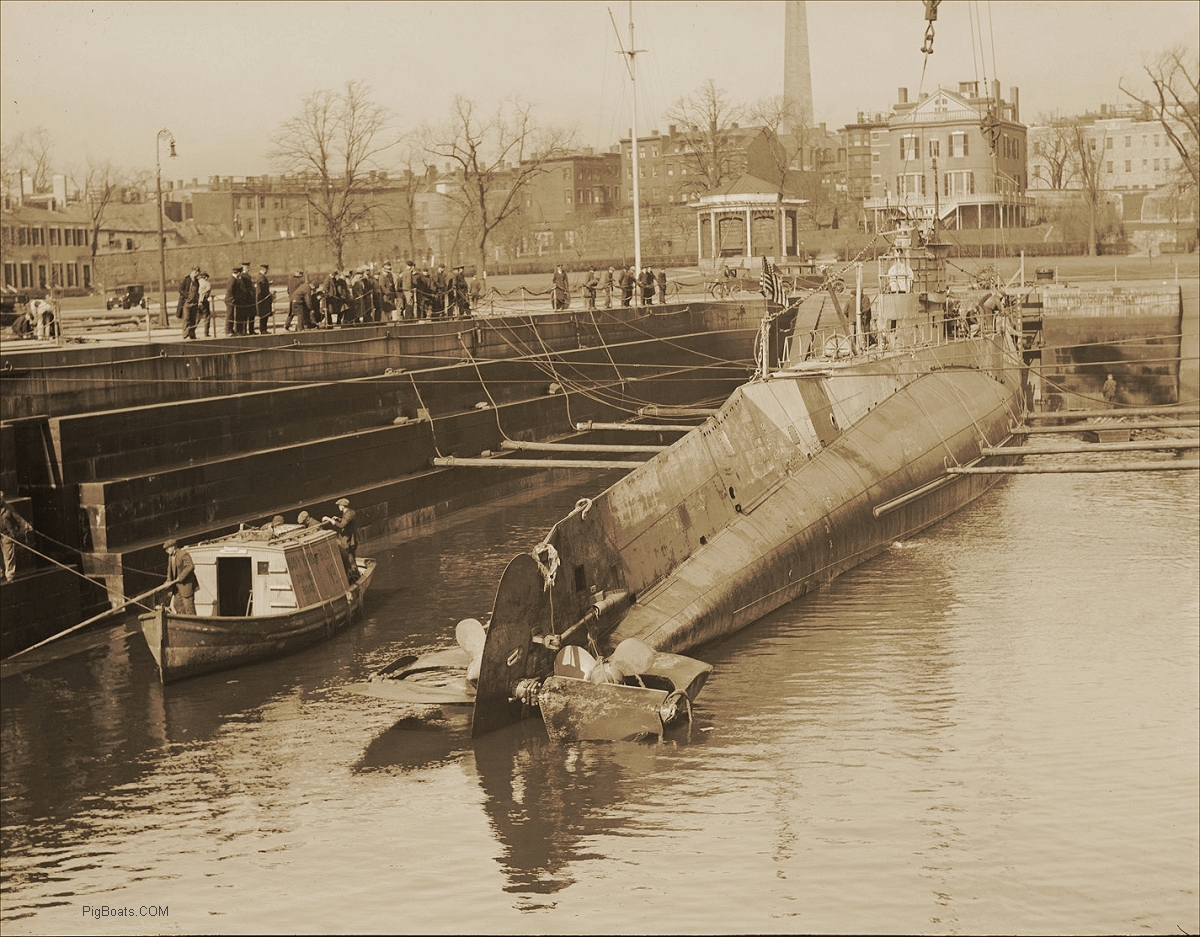
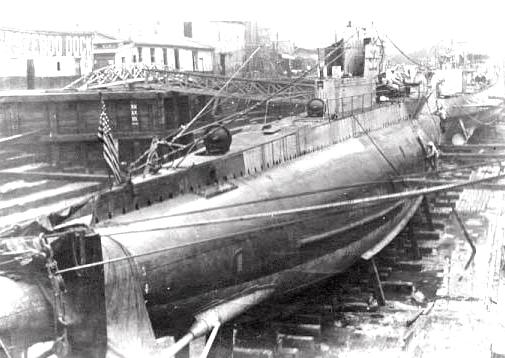
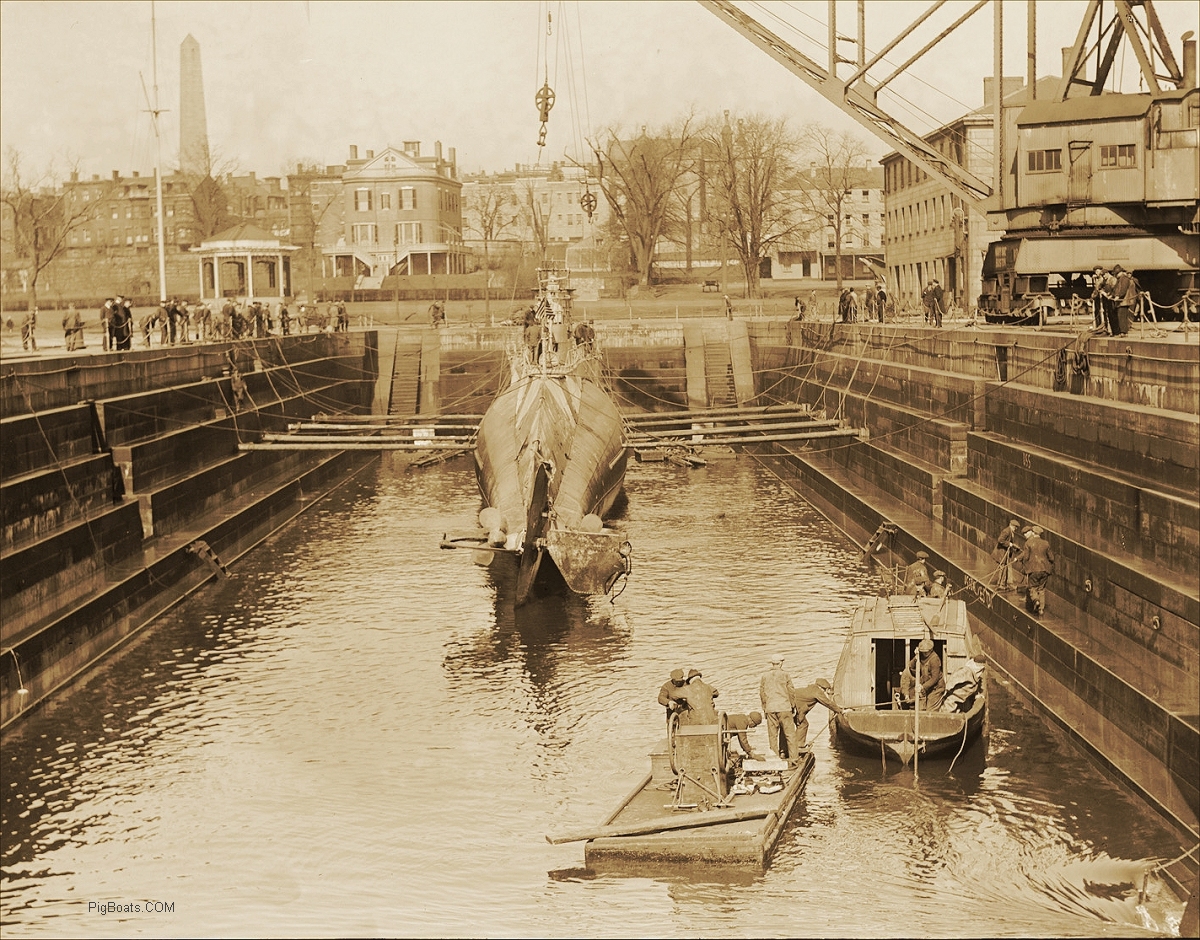
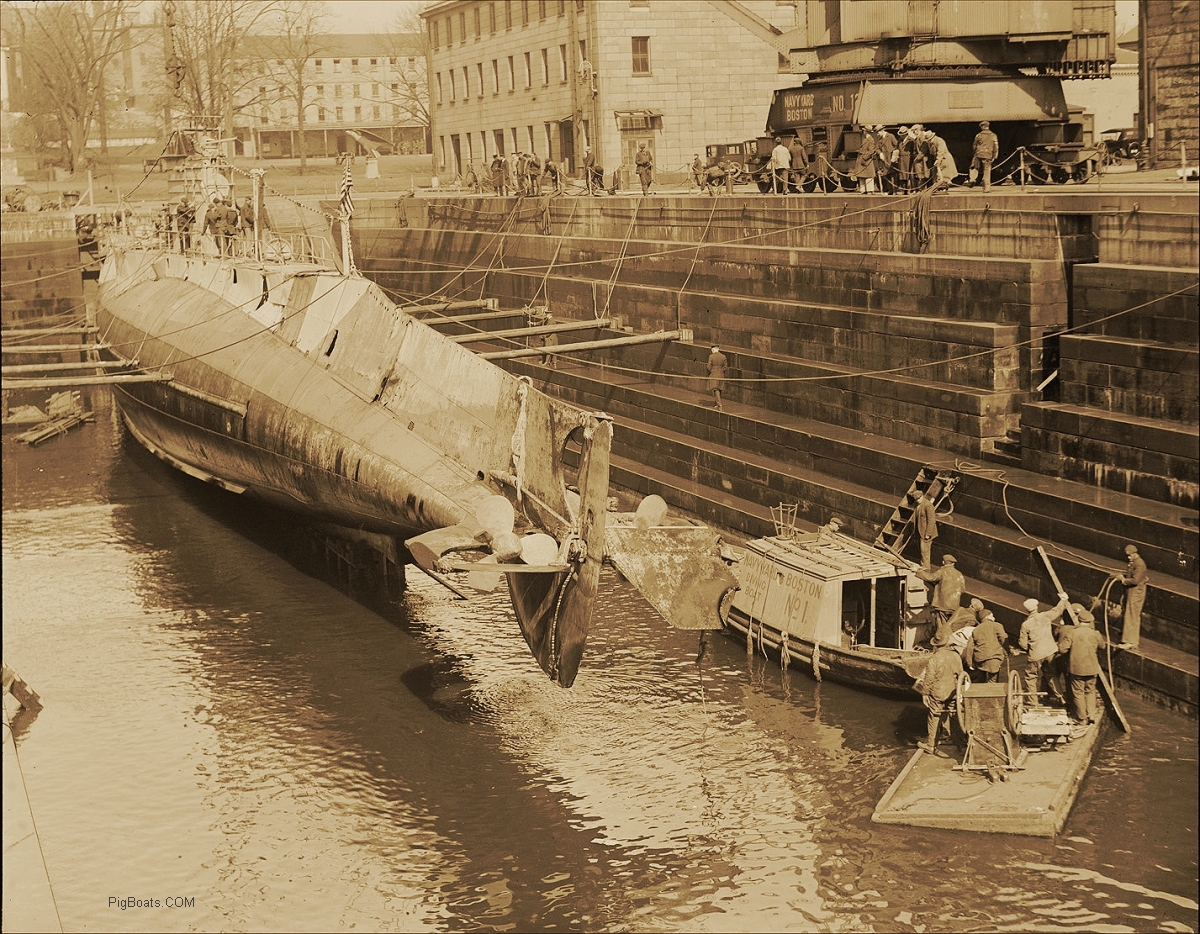
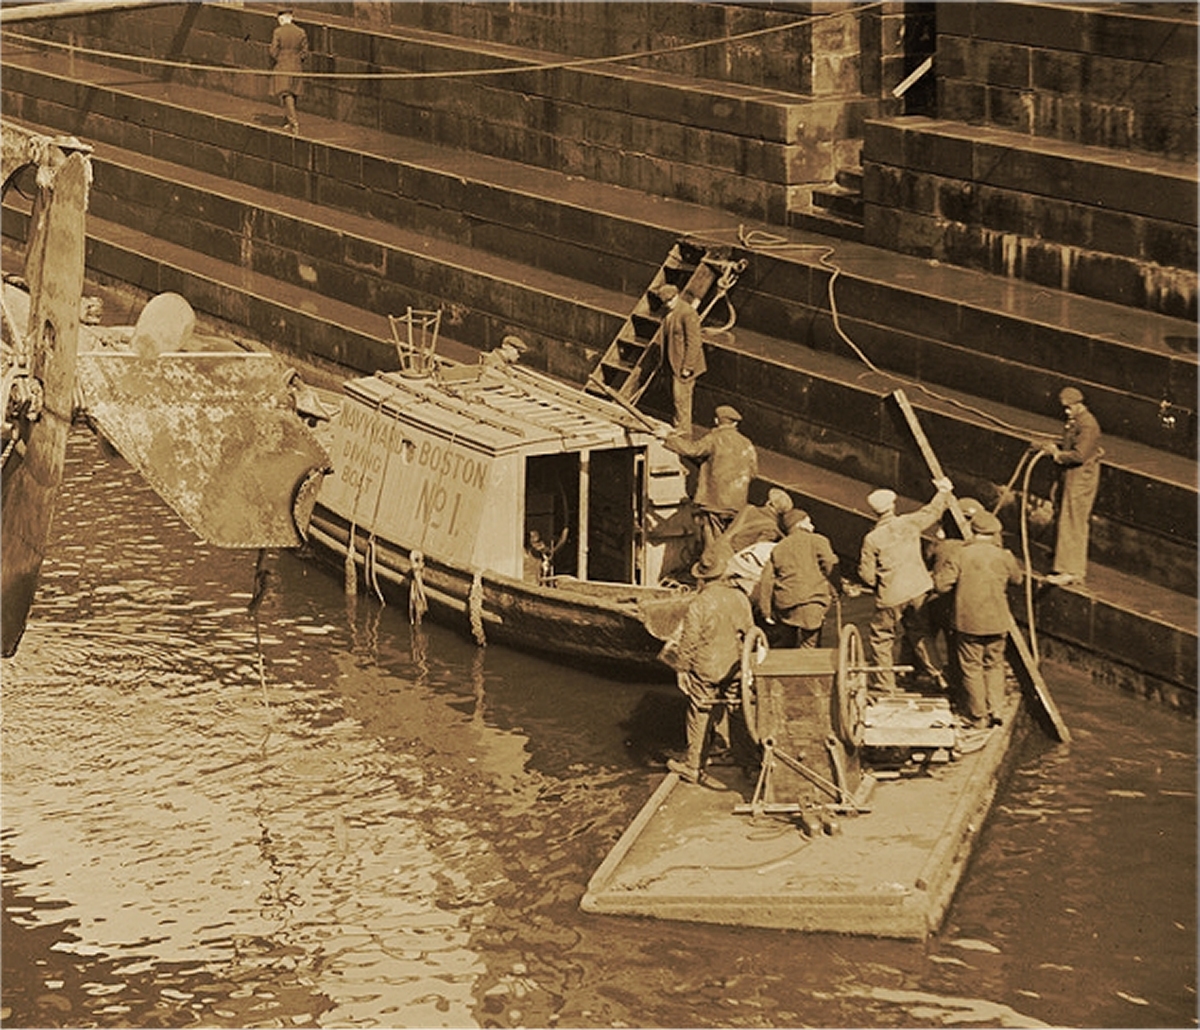
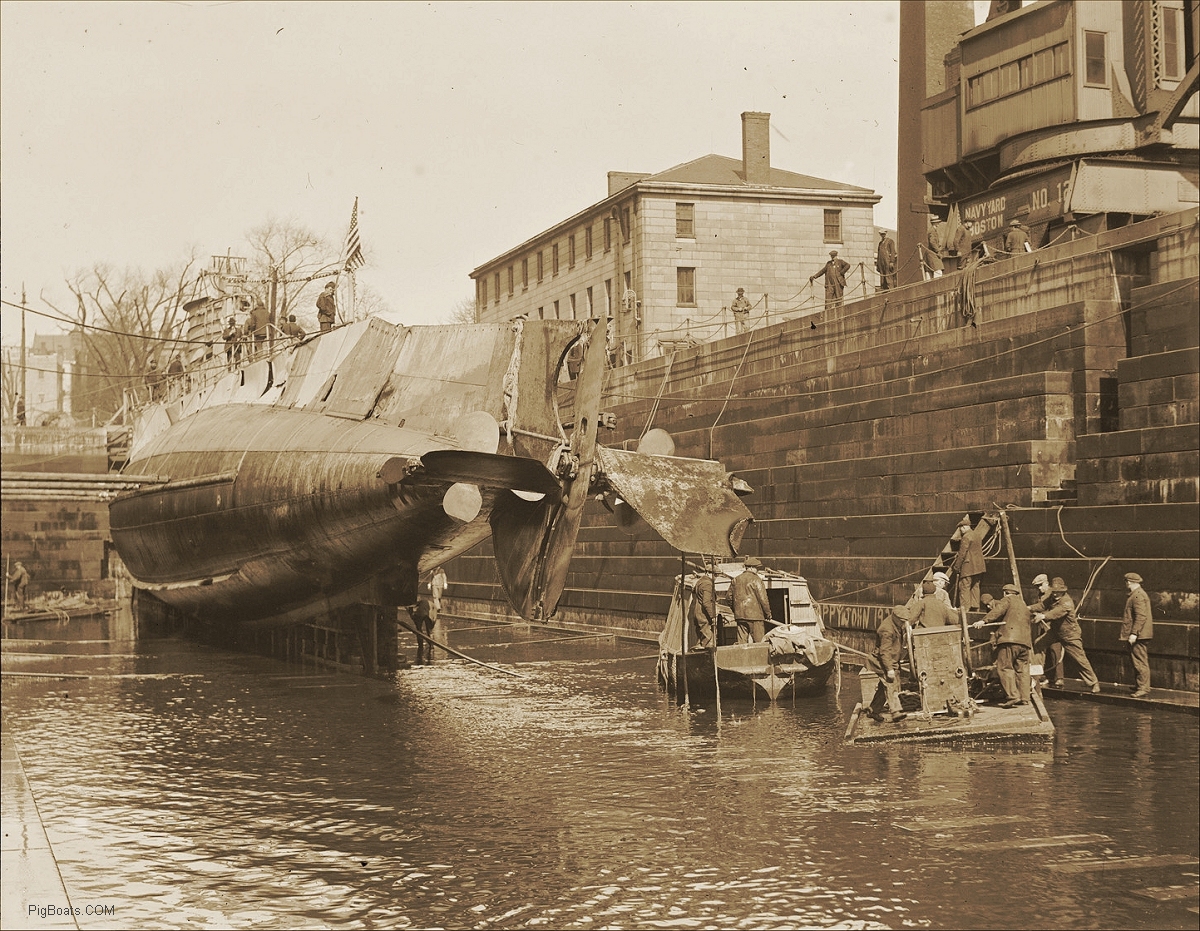
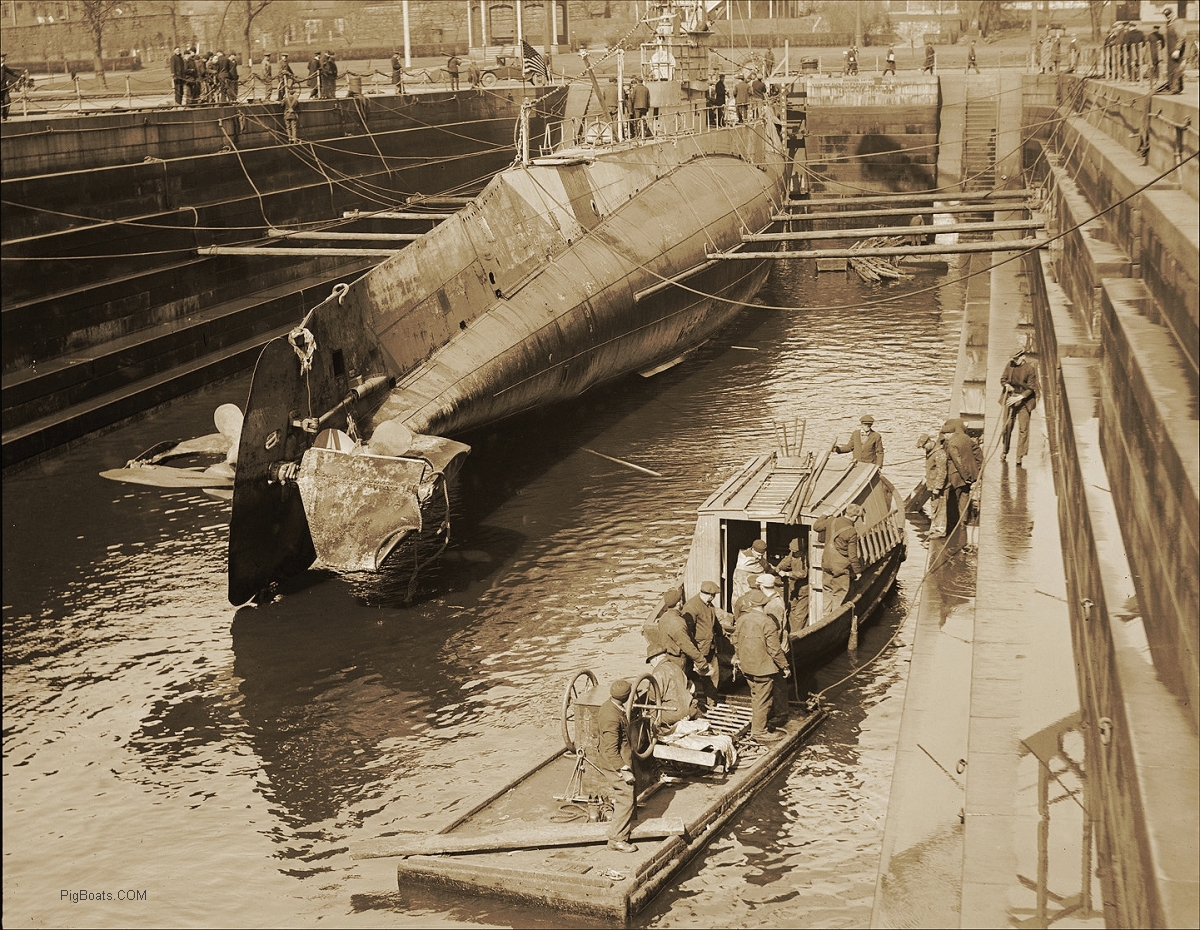
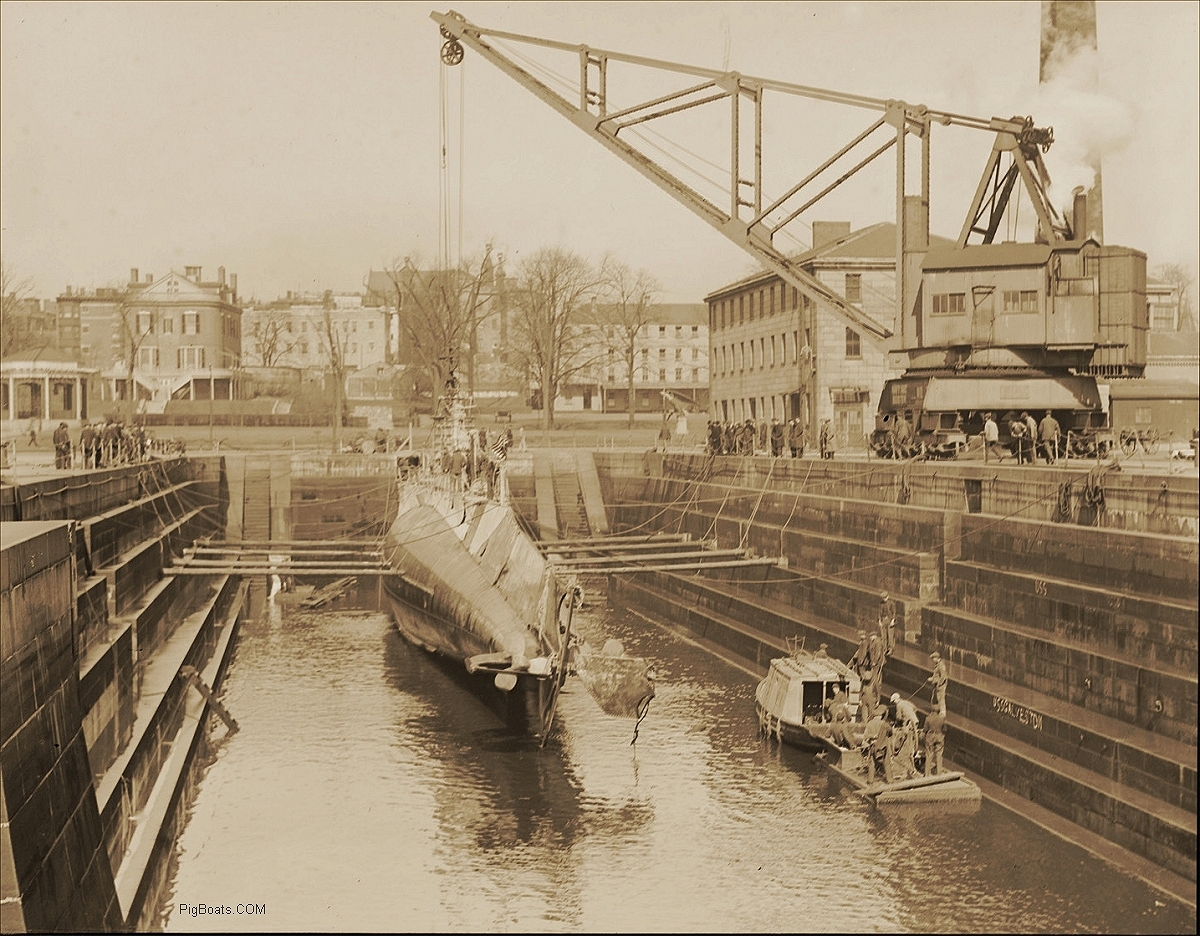
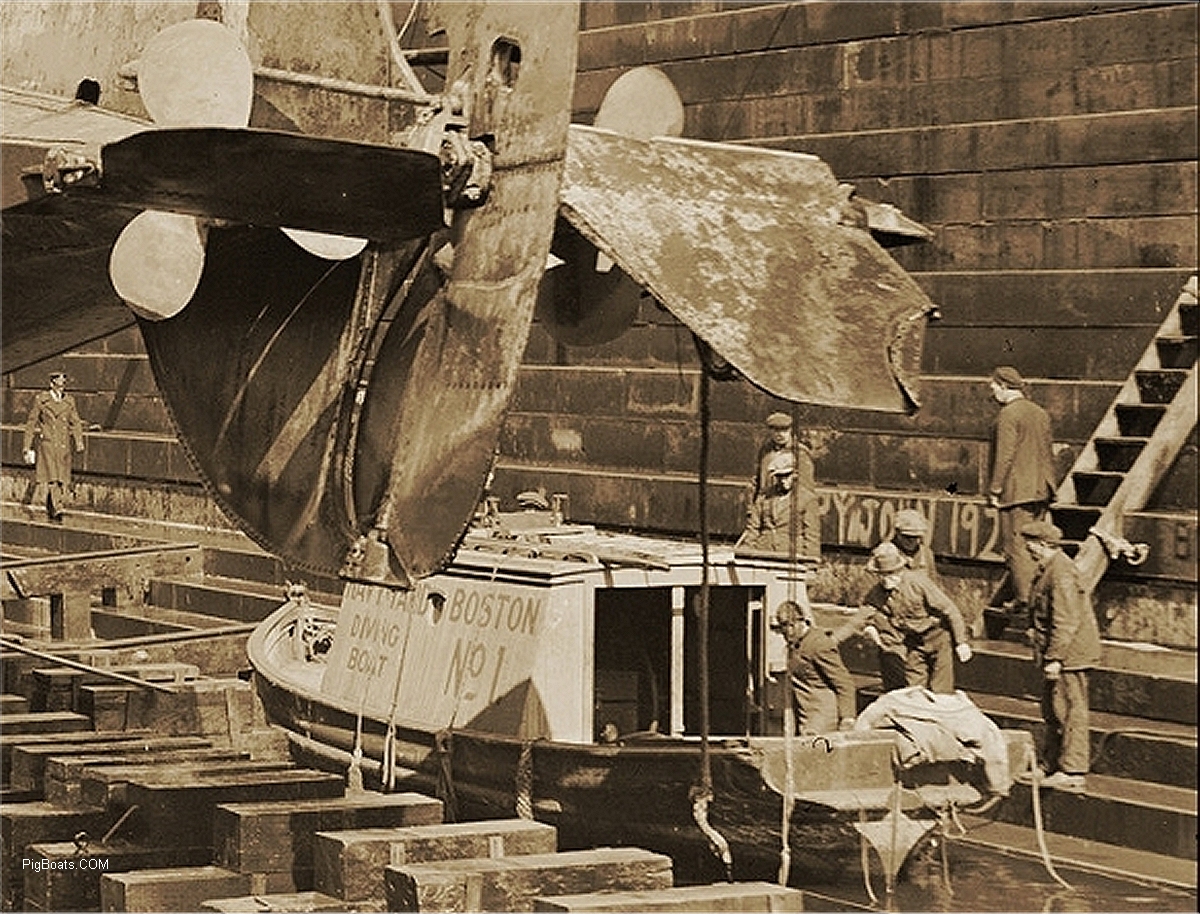
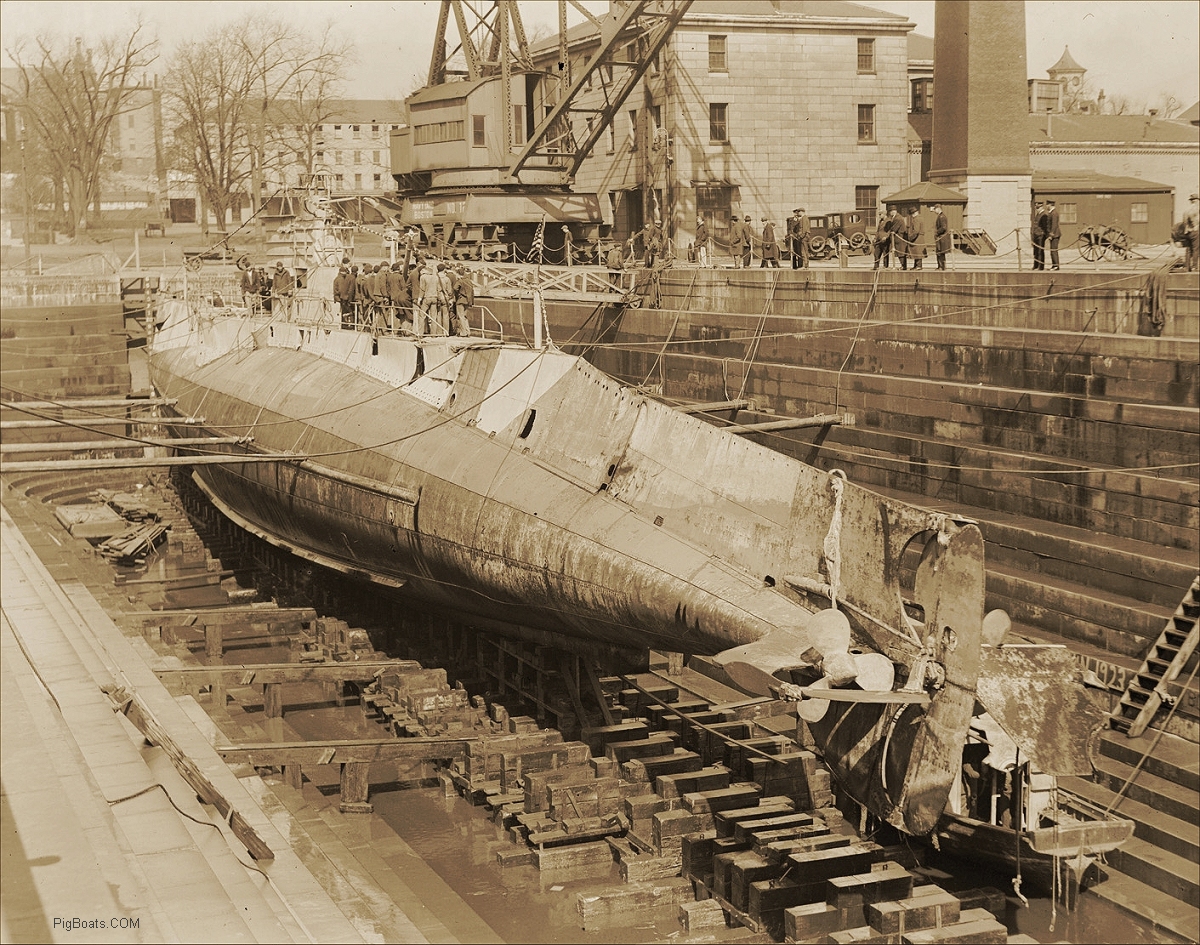
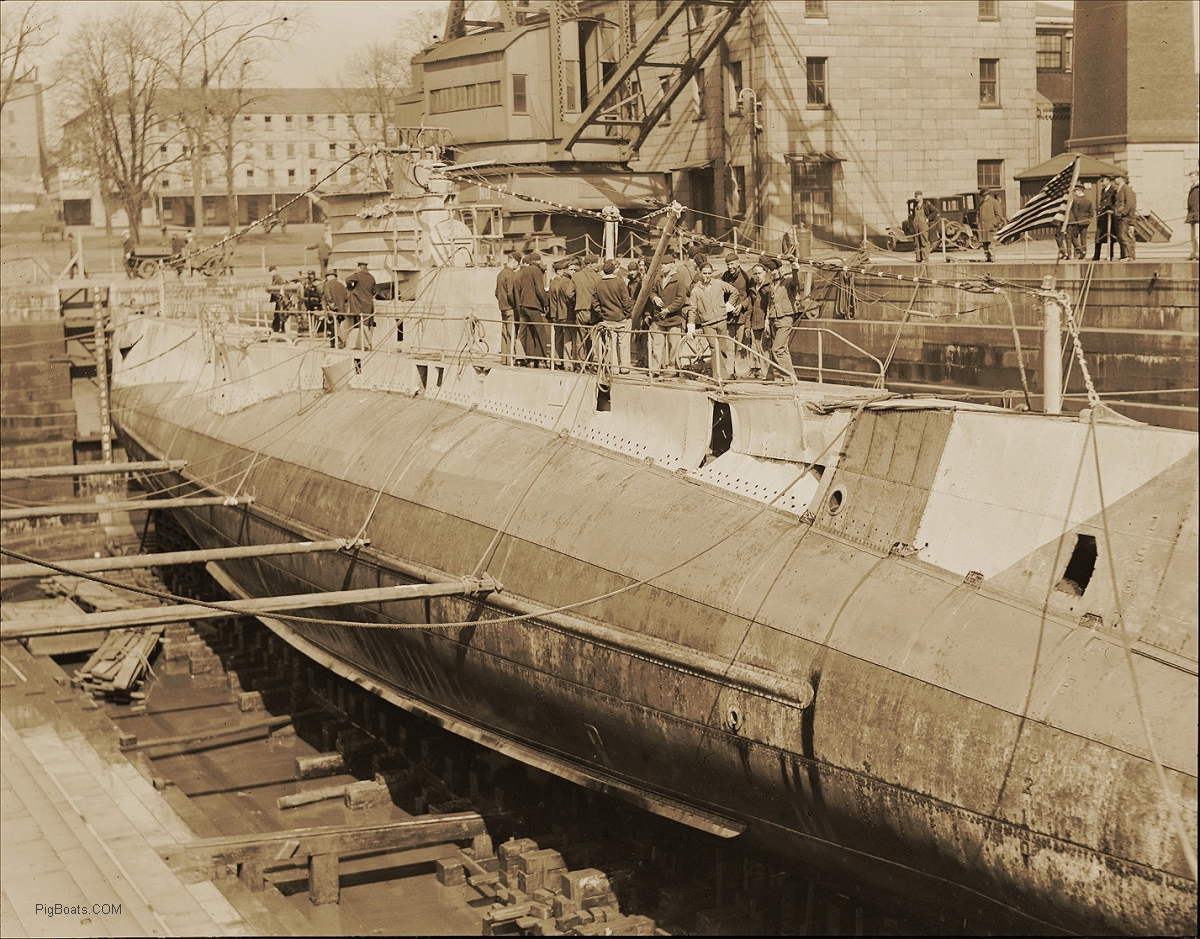
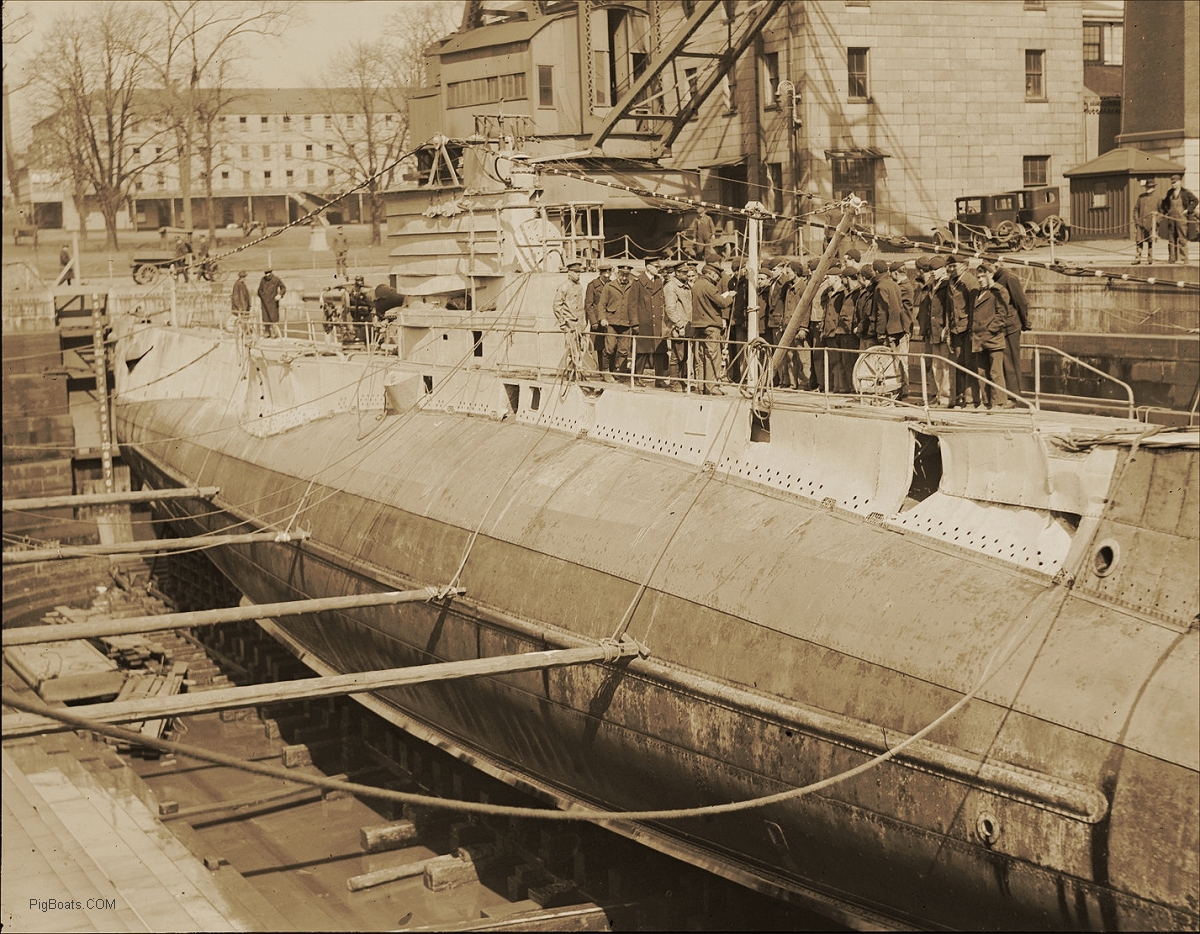
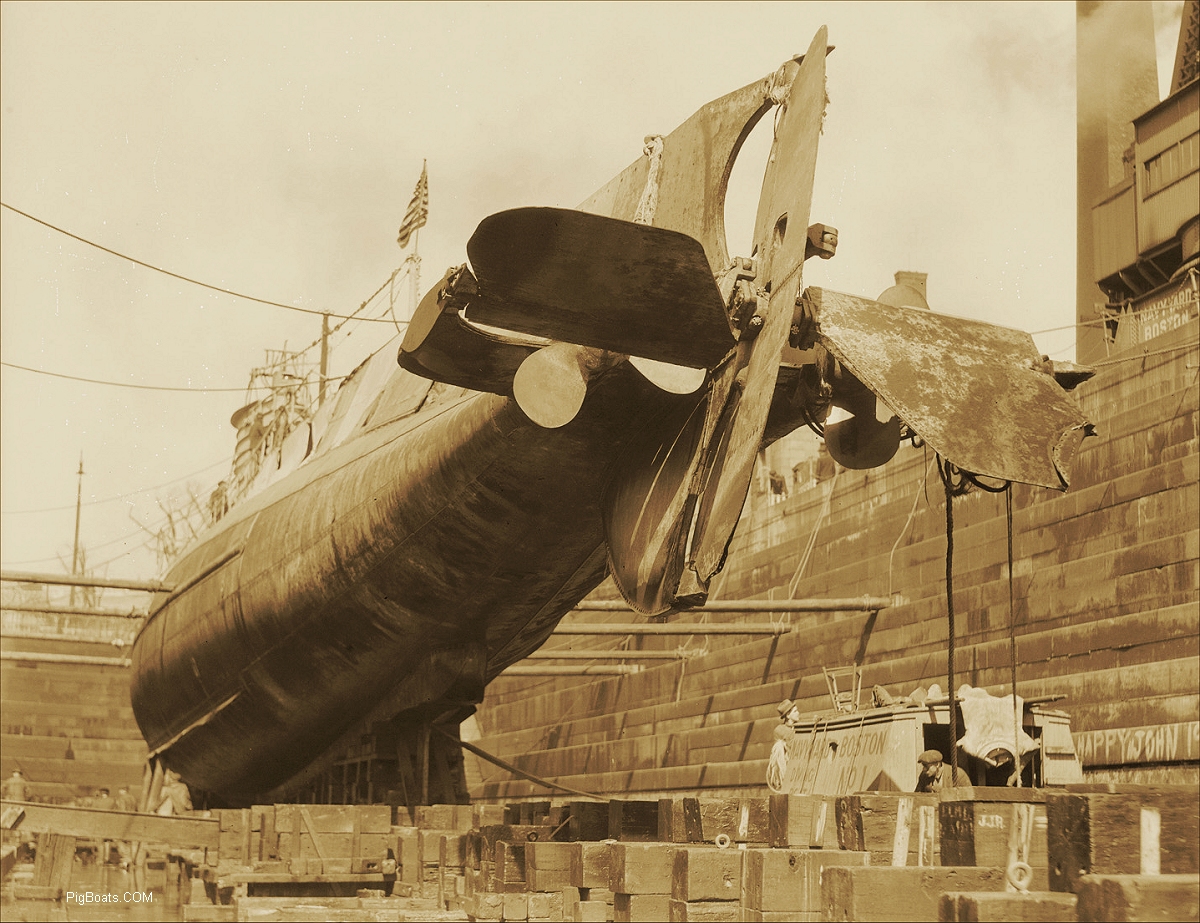
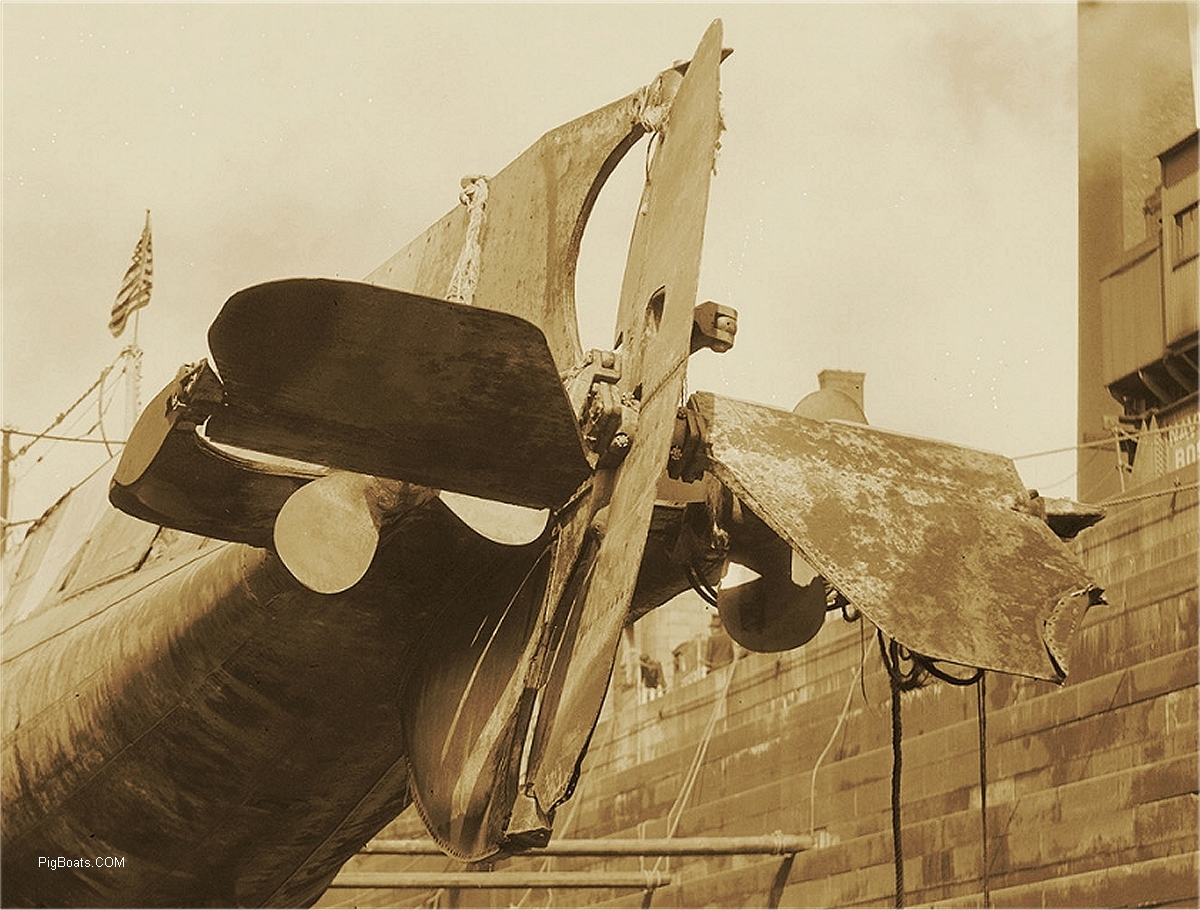
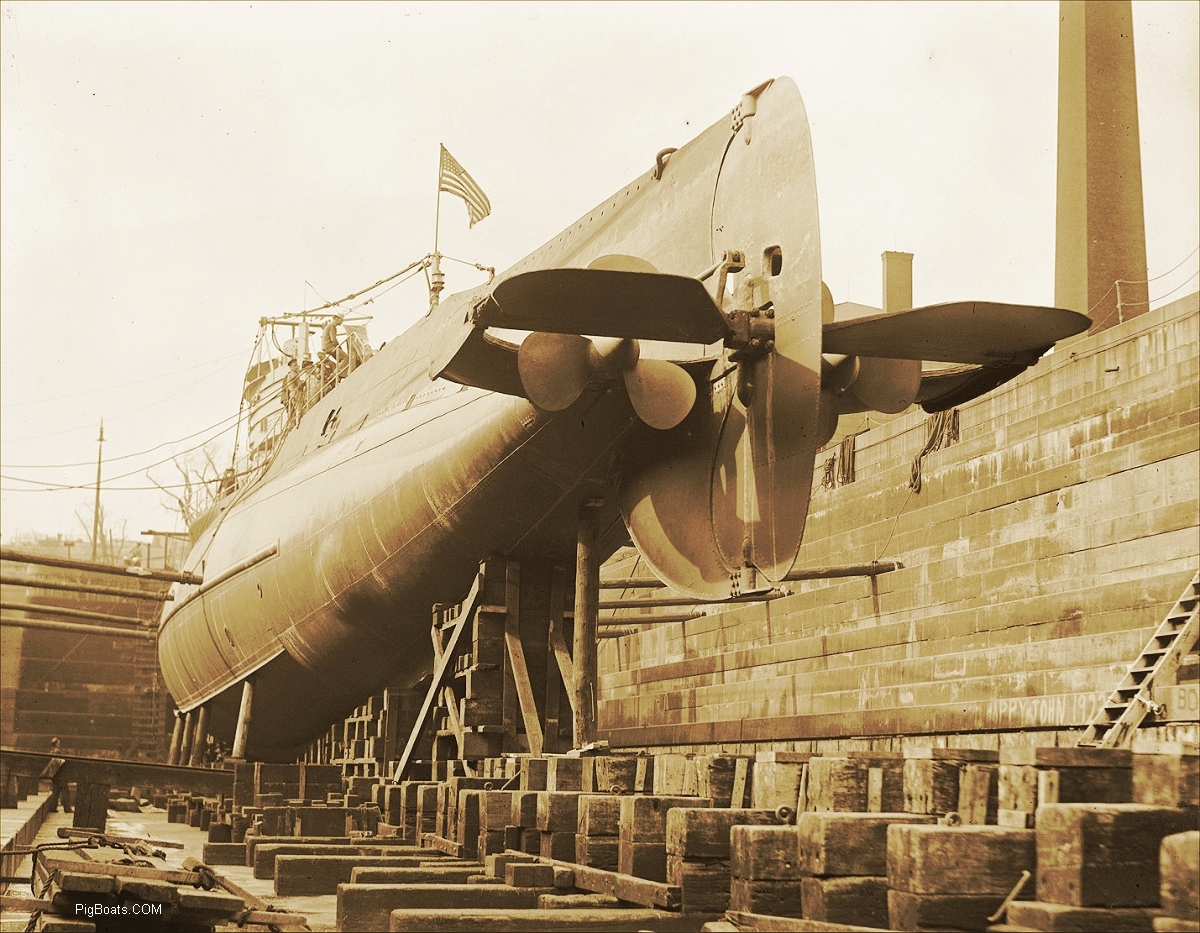
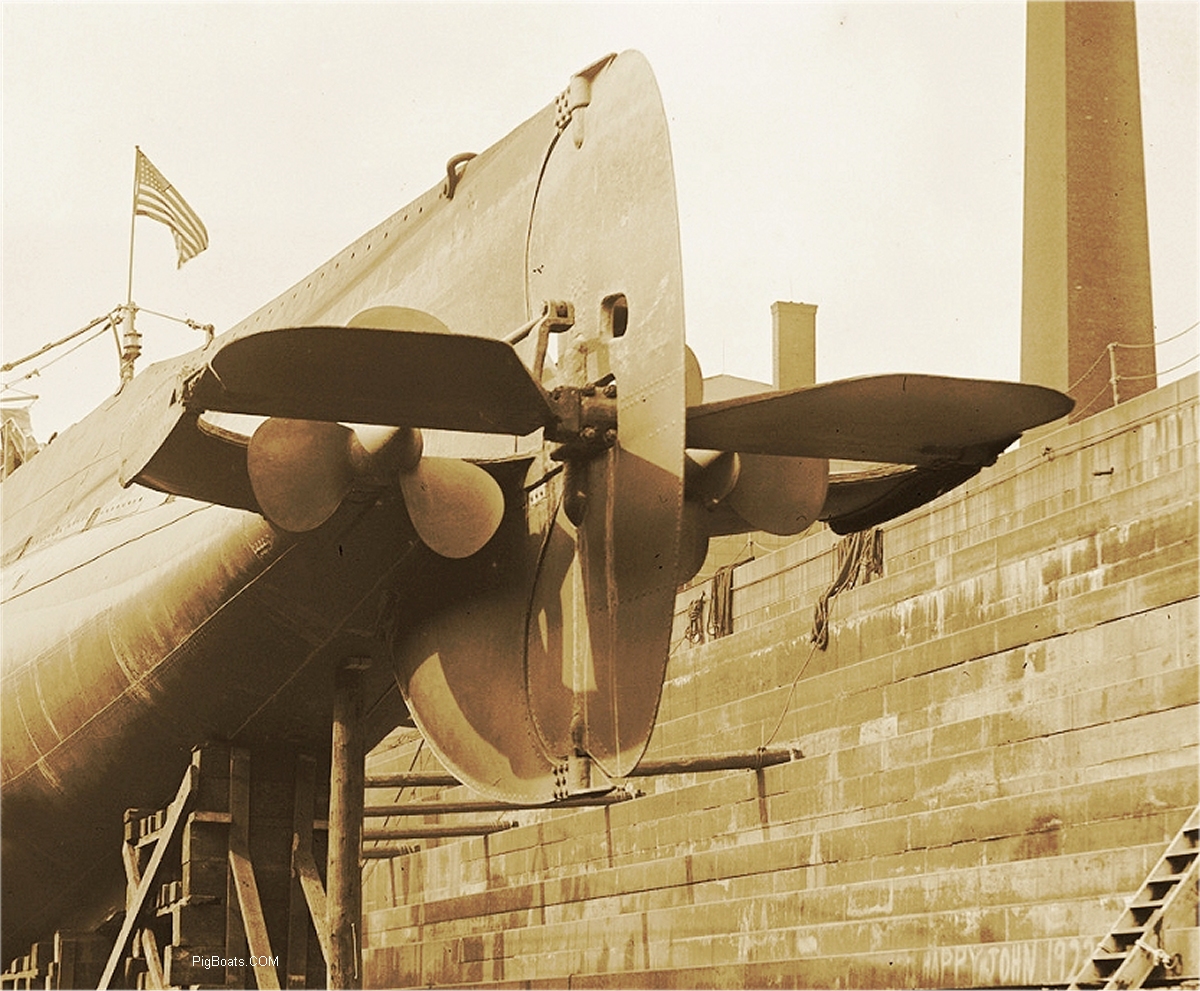
The S-19 was finally pulled off the beach and placed in a dry dock at the Boston Navy Yard for repair. Here she is seen with the dock pumped half down and shorings in place to brace the hull. The damage to her starboard stern plane and rudder is evident.
|
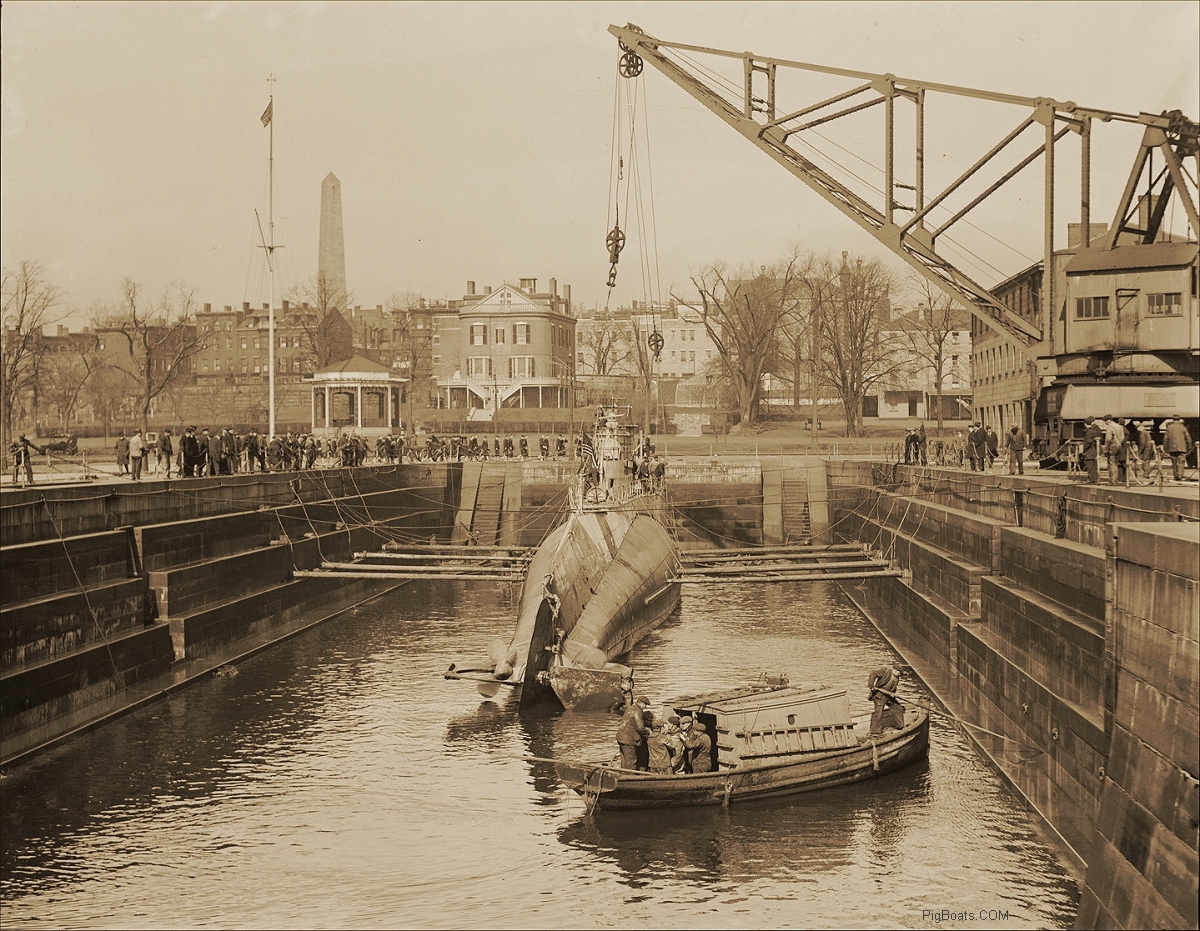
The S-19 was finally pulled off the beach and placed in a dry dock at the Boston Navy Yard for repair. Here she is seen with the dock pumped half down and shorings in place to brace the hull. The damage to her starboard stern plane and rudder is evident as the water receeds. The Navy Yard Dive boat has shifted its position to the other side of the dock.
|
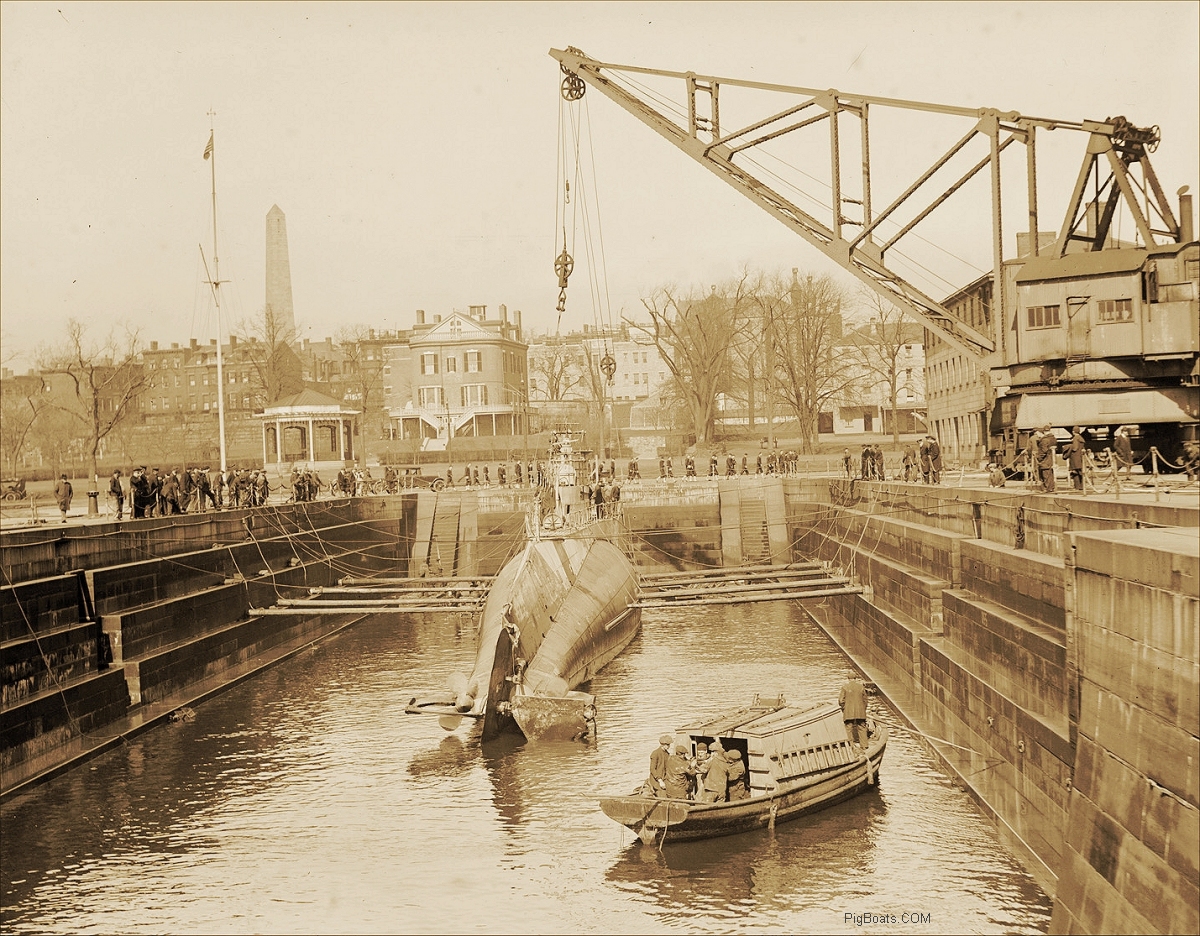
A photo taken moments after the one just above. The dive boat is in a slightly different position.
|
|
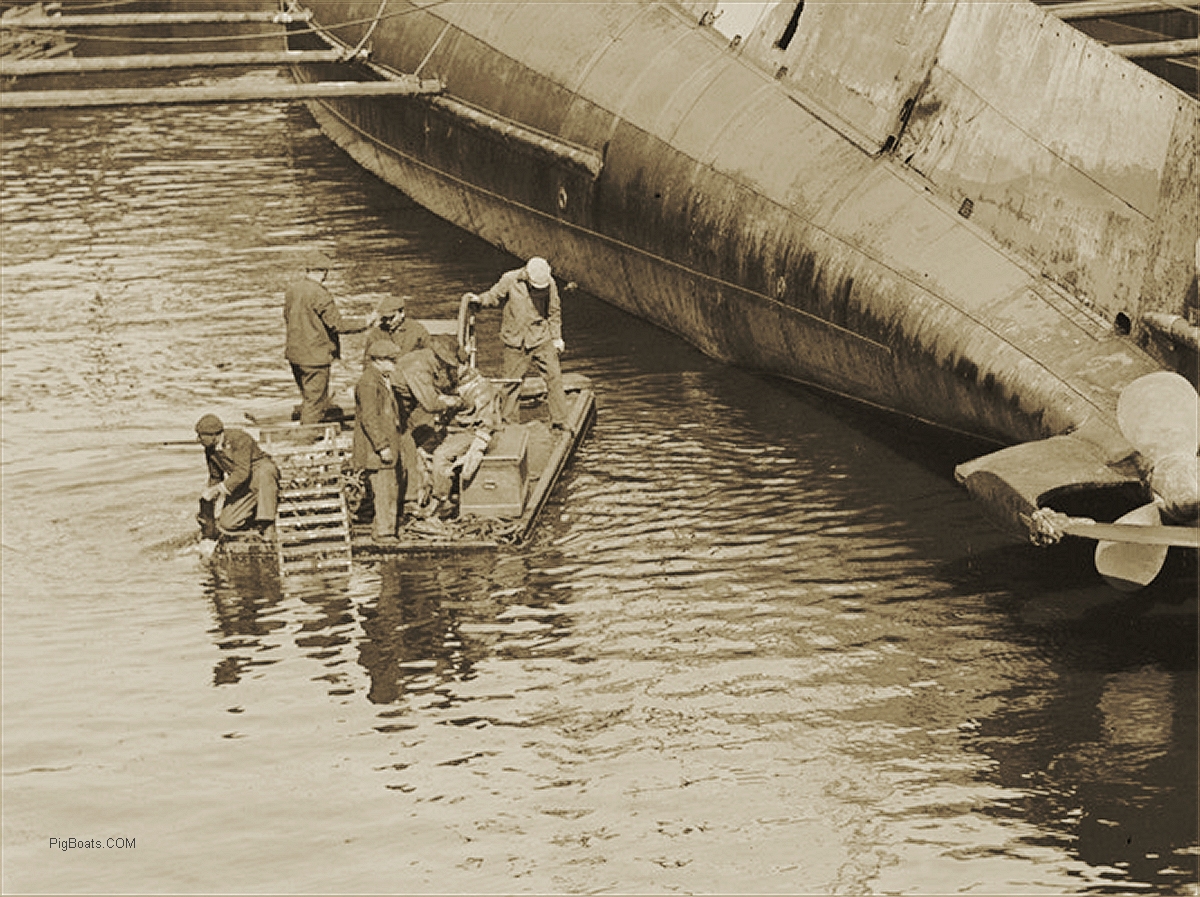
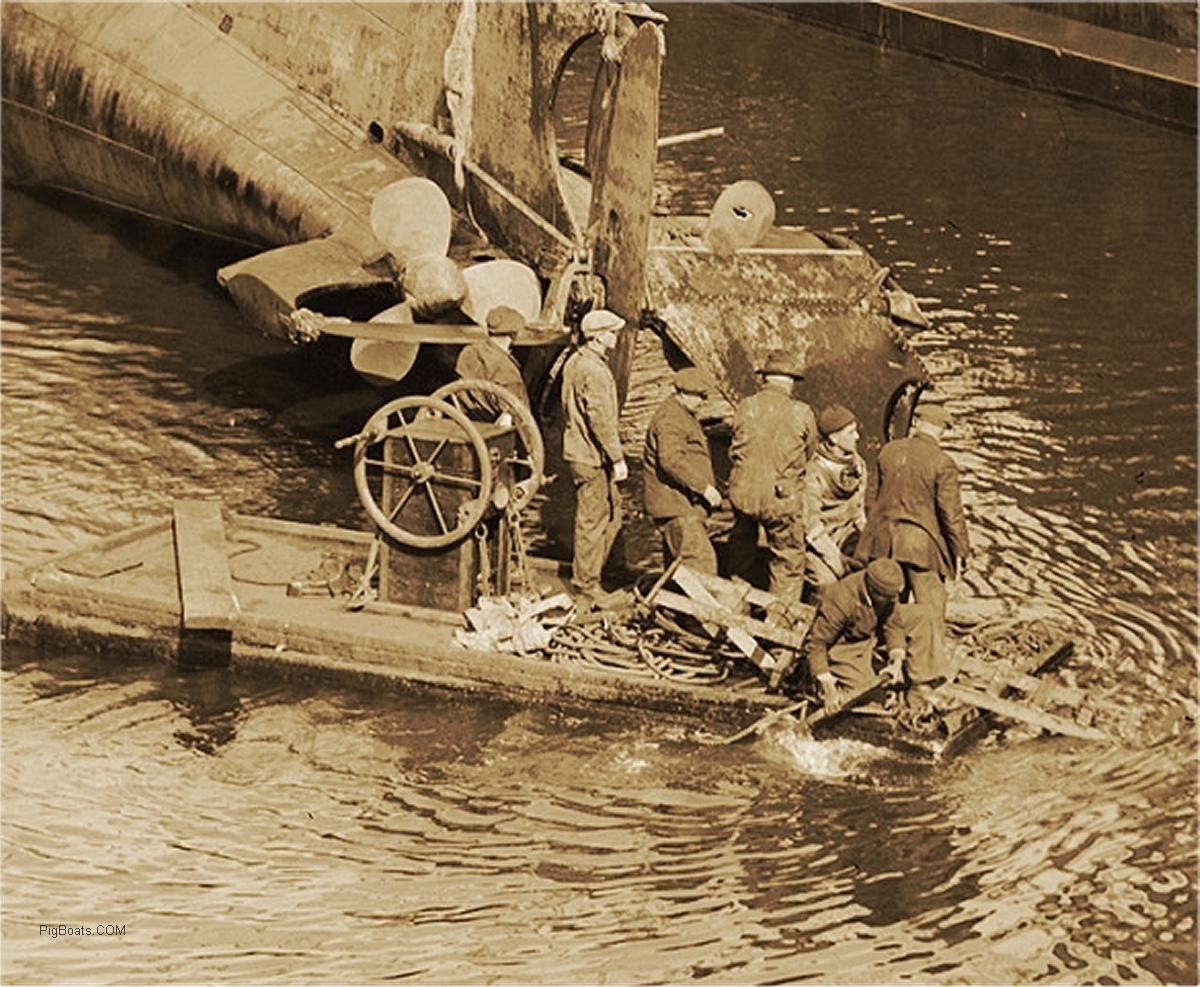
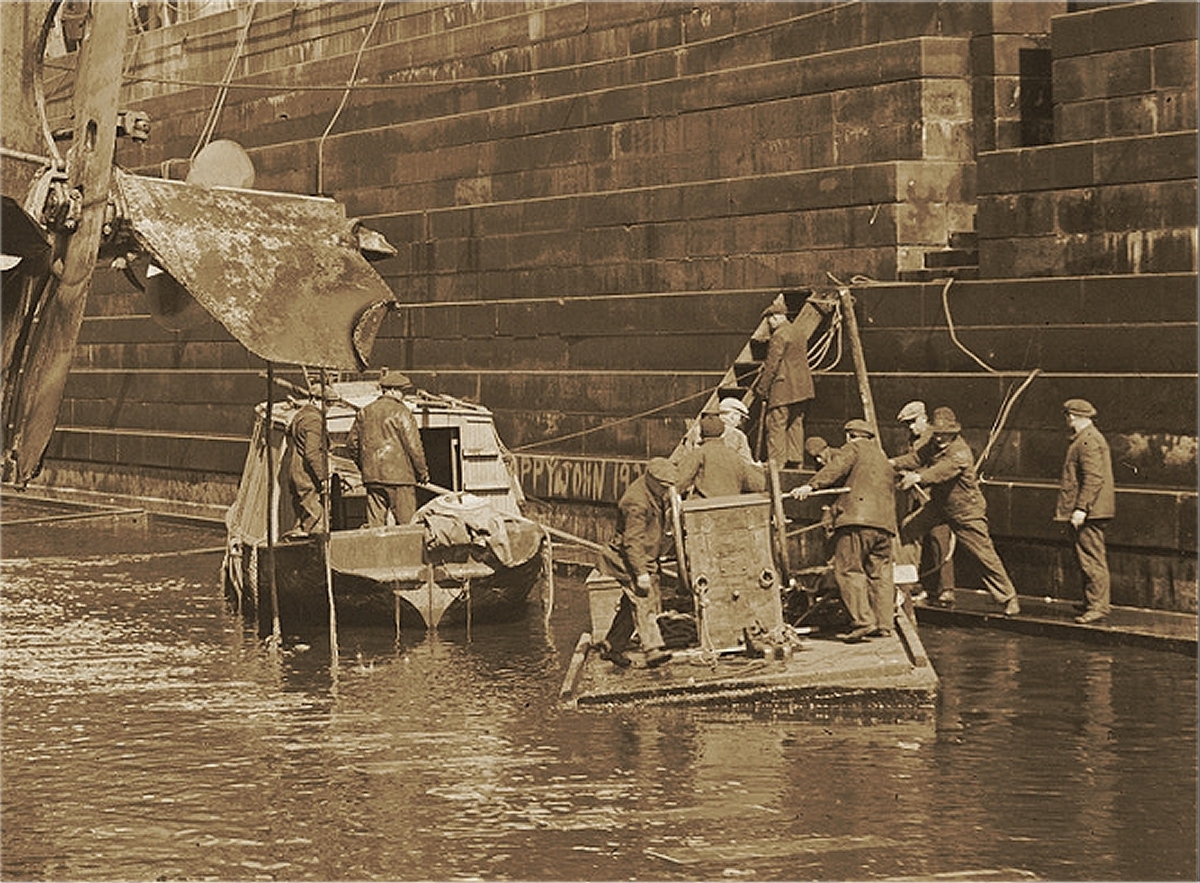
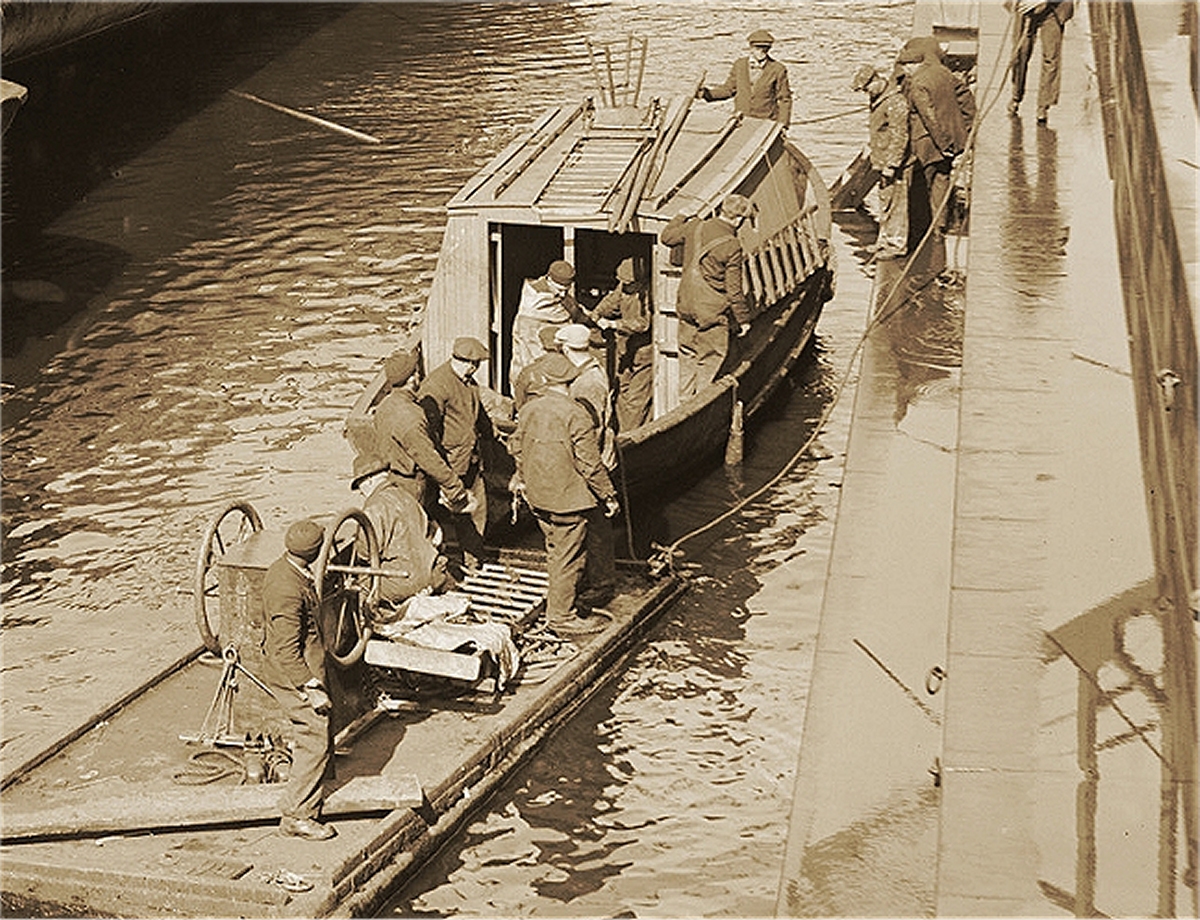
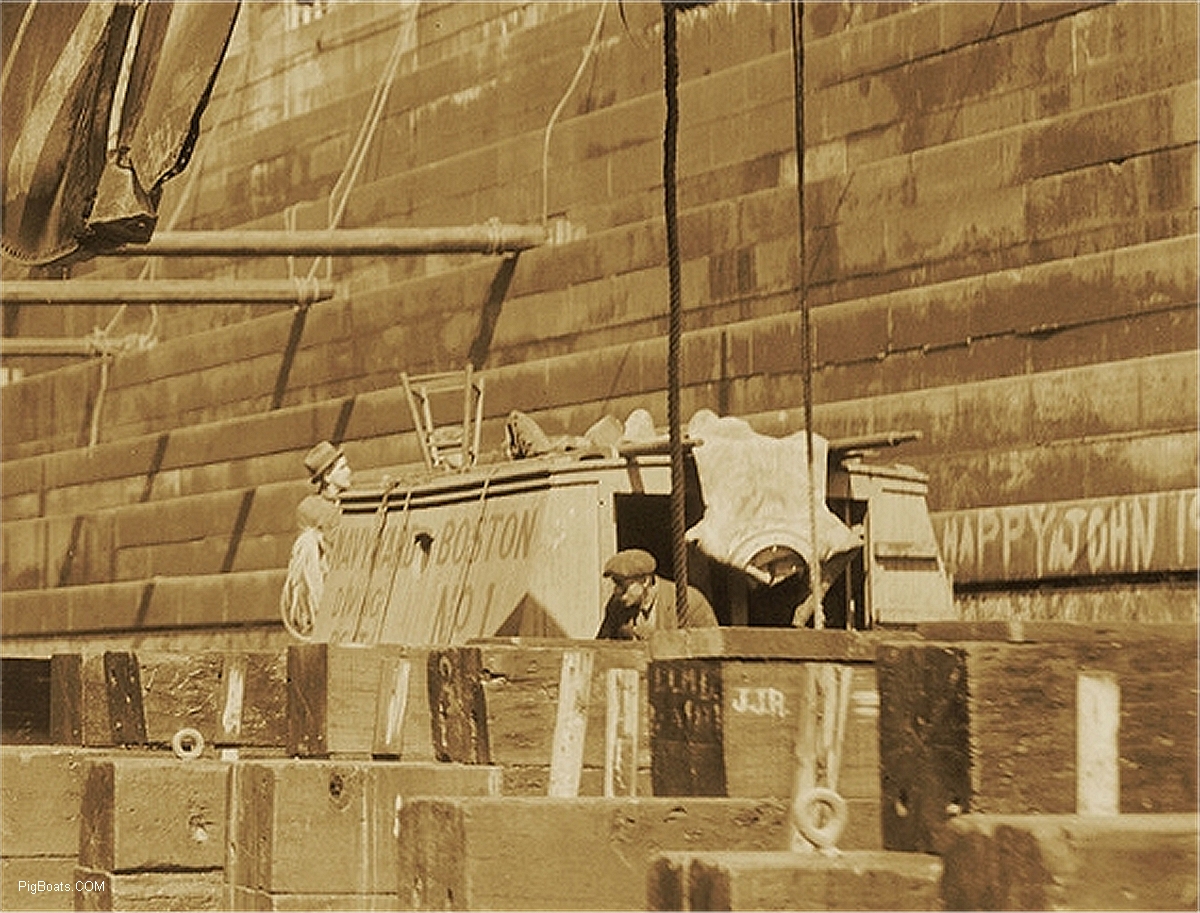
Divers assistents can be seen suiting up the hard hat diver so he can inspect the keel blocking and make adjustments if possible.
|
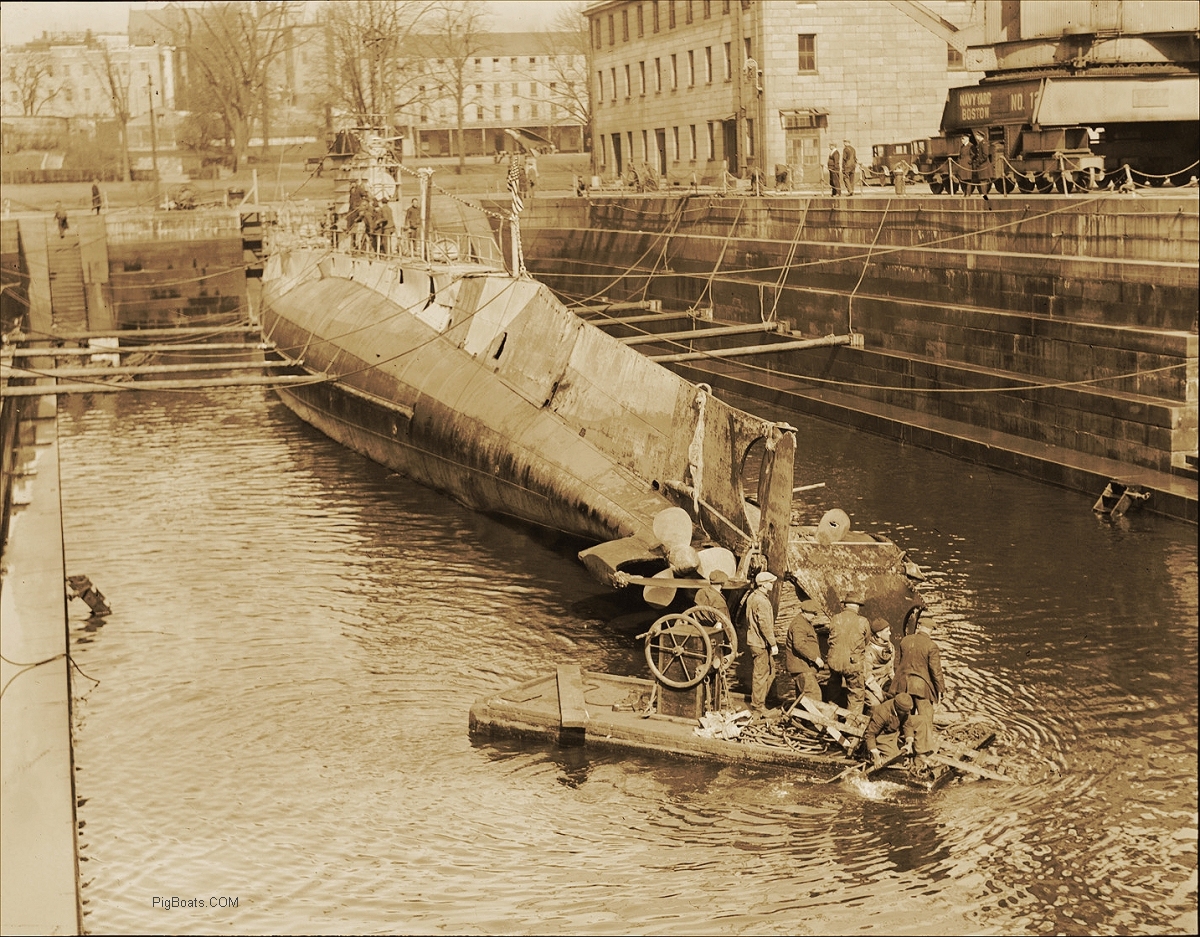
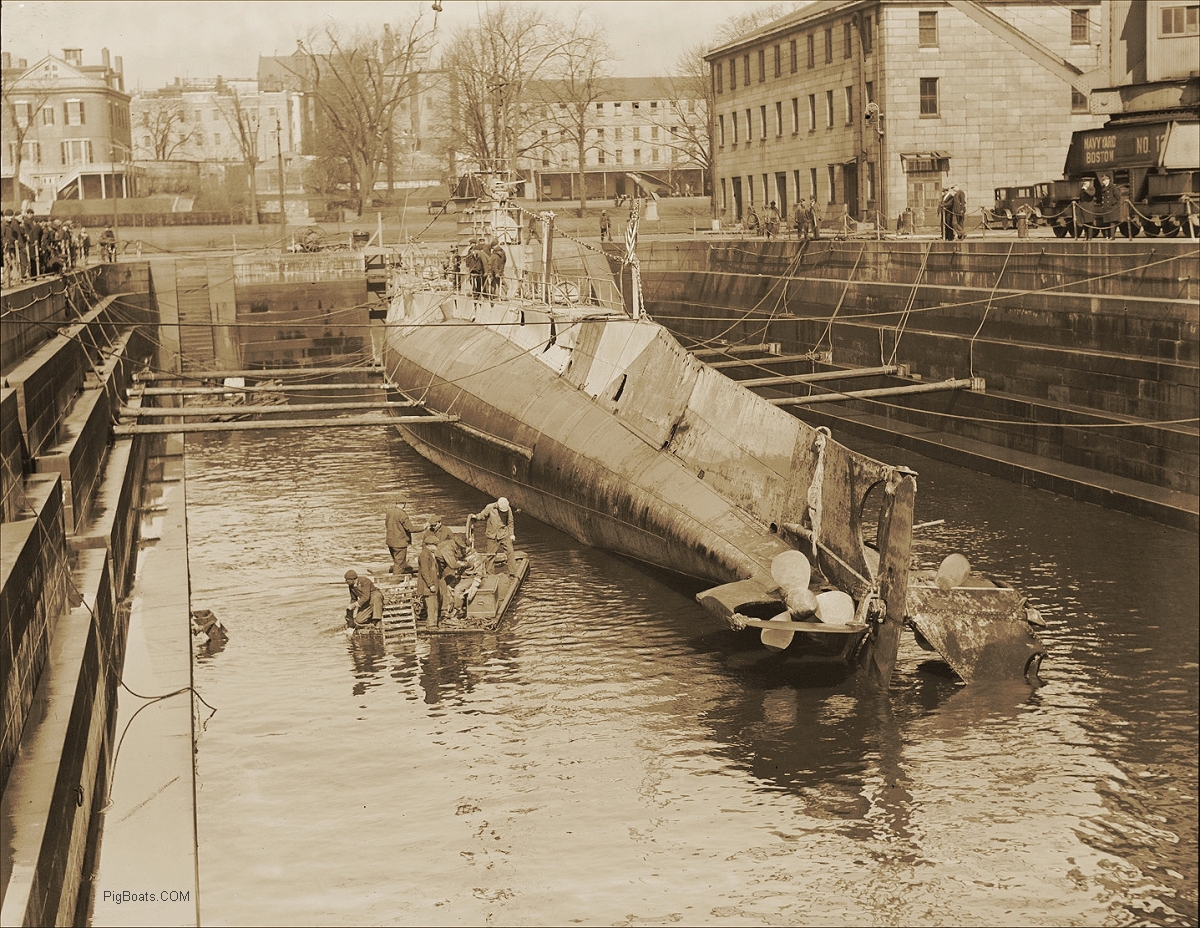
Again, a photo taken meer momemts after the previous one seen above. A work raft with a hand driven divers air pump has been moved into position in the dry dock. The water level can be seen to have dropped even lower and the pumps empty the dock. The whole stern of the submarine appears to have been twisted to starboard by the grounding.
|
|
|
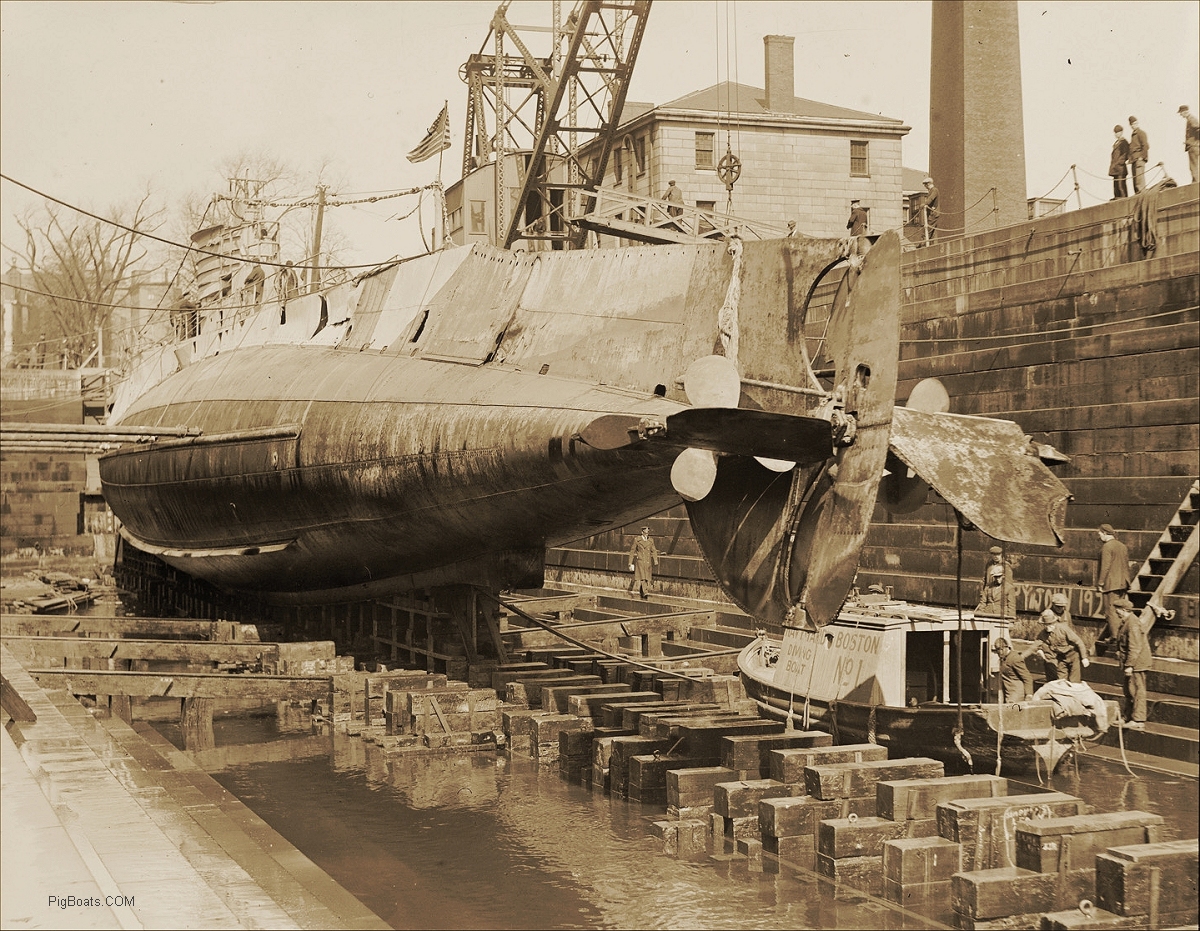
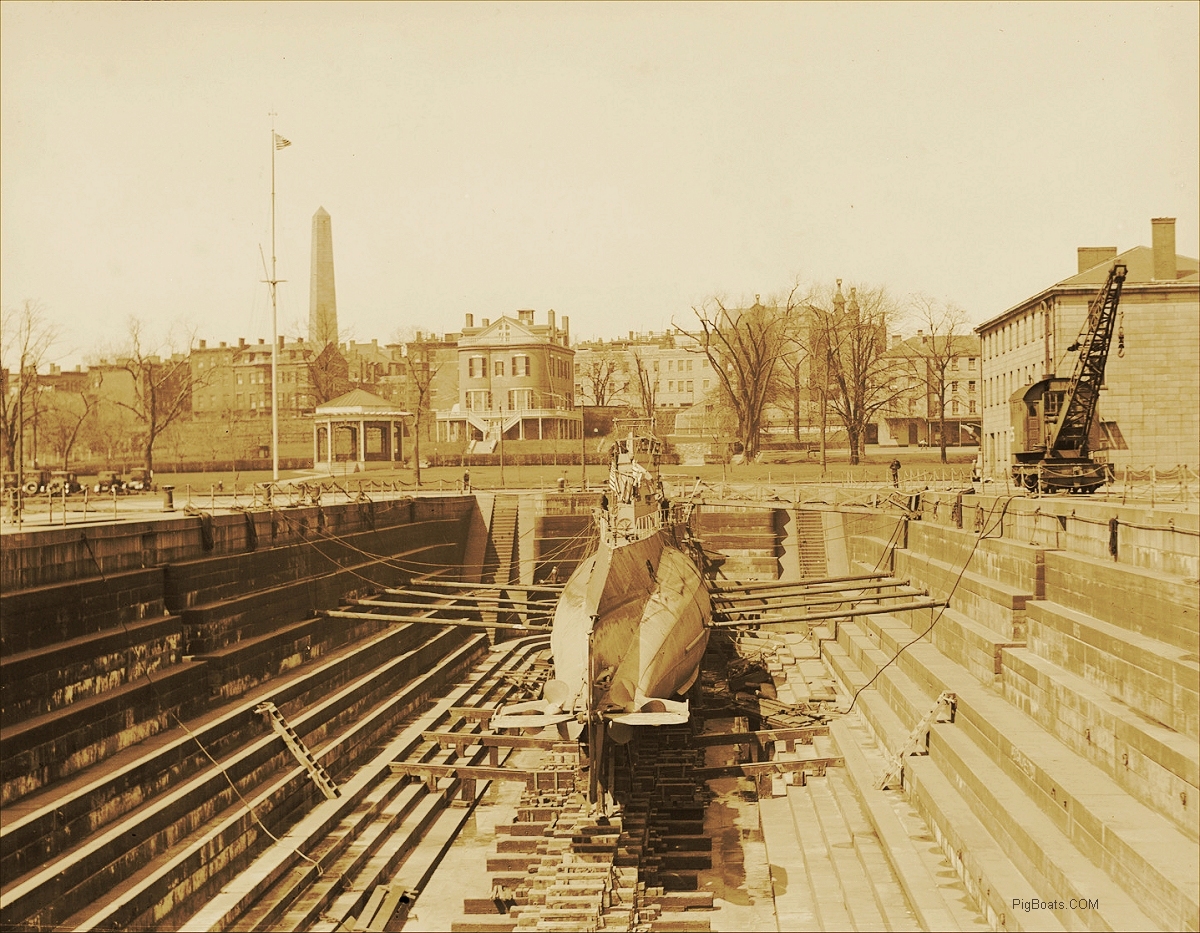
The S-19 is sitting high on her keel blocks and the divers are wrapping up their work.
|
Close-up of the diver and assistences taking care of last minute details before the dry dock is completely emptied.
|
|
|
|
|
|
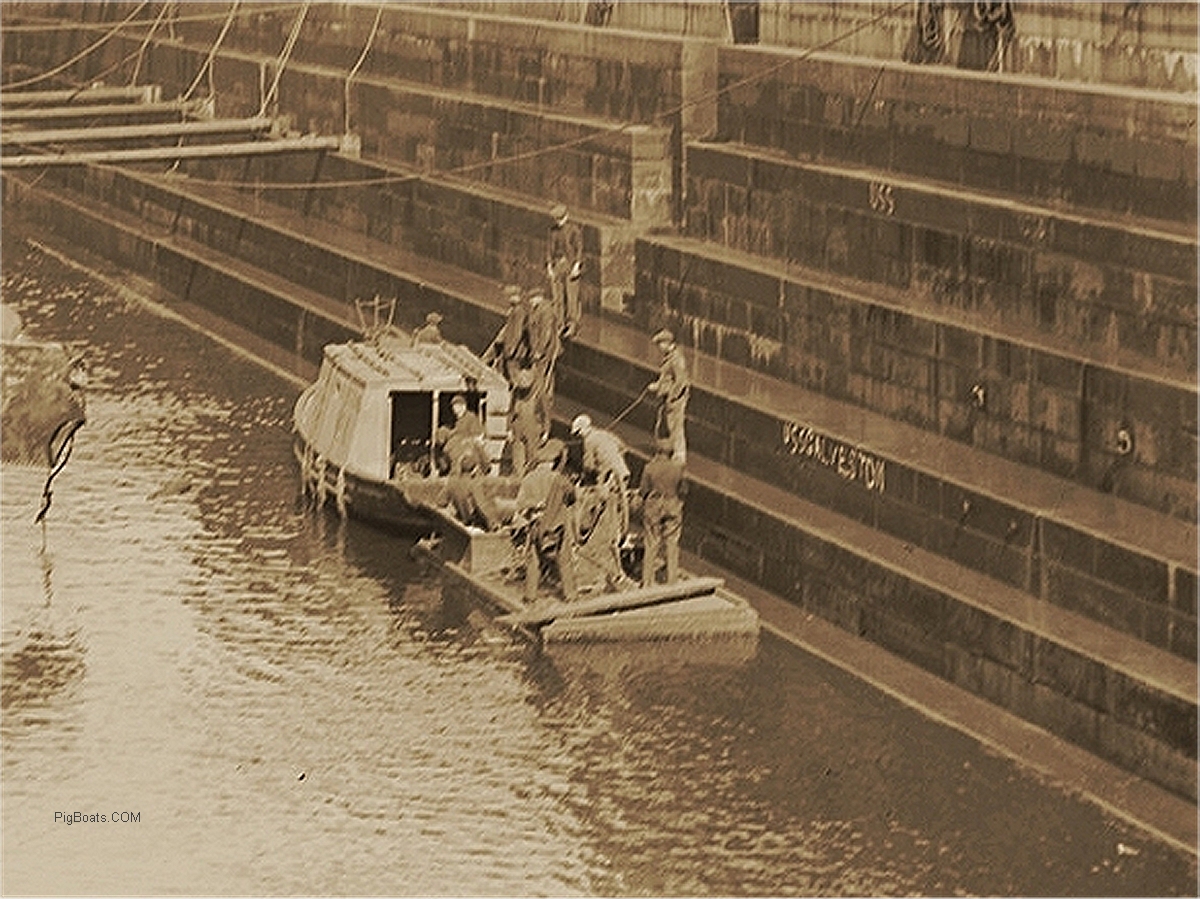
Written on the dry dock wall is "USS GALVESTON". The Cruiser Galveston, CL-19, returned from duty in the Mediterranean and reached Boston on September 17, 1920. It appears she went into dry dock at the Navy Yard because the crew left their "calling card" in paint. Someone else, maybe the Galveston crew, tried to put a ships name two tiers up but all there is is the "USS".
|
|
|
|
|
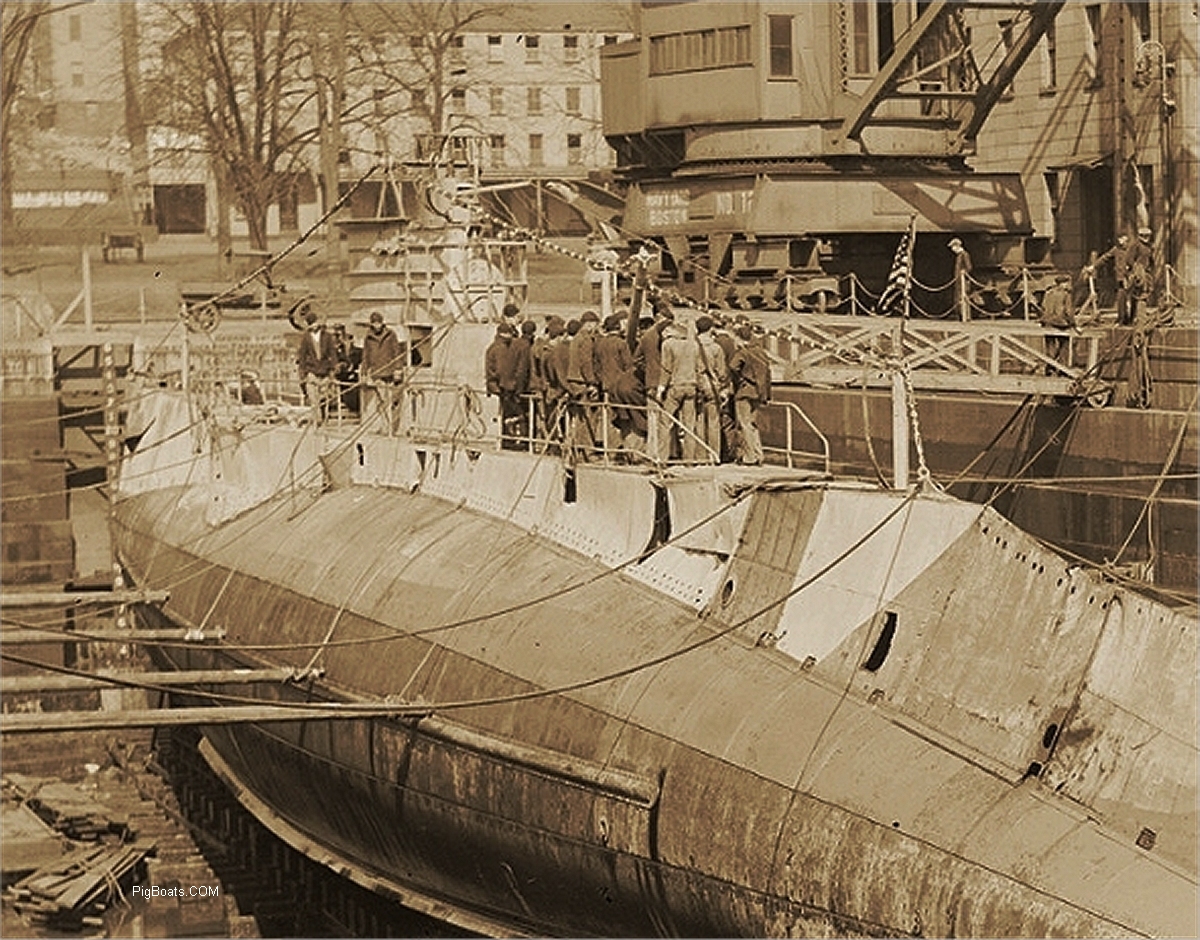
The crew of the S-19 had been taken of the submarine on Jan 14, 1925 before the attempt to pull her off the beach. Here the crew has returned to the submarine after the dry dock was pumped down and the vessel stable. They are seen milling about waiting for the official muster.
|

|
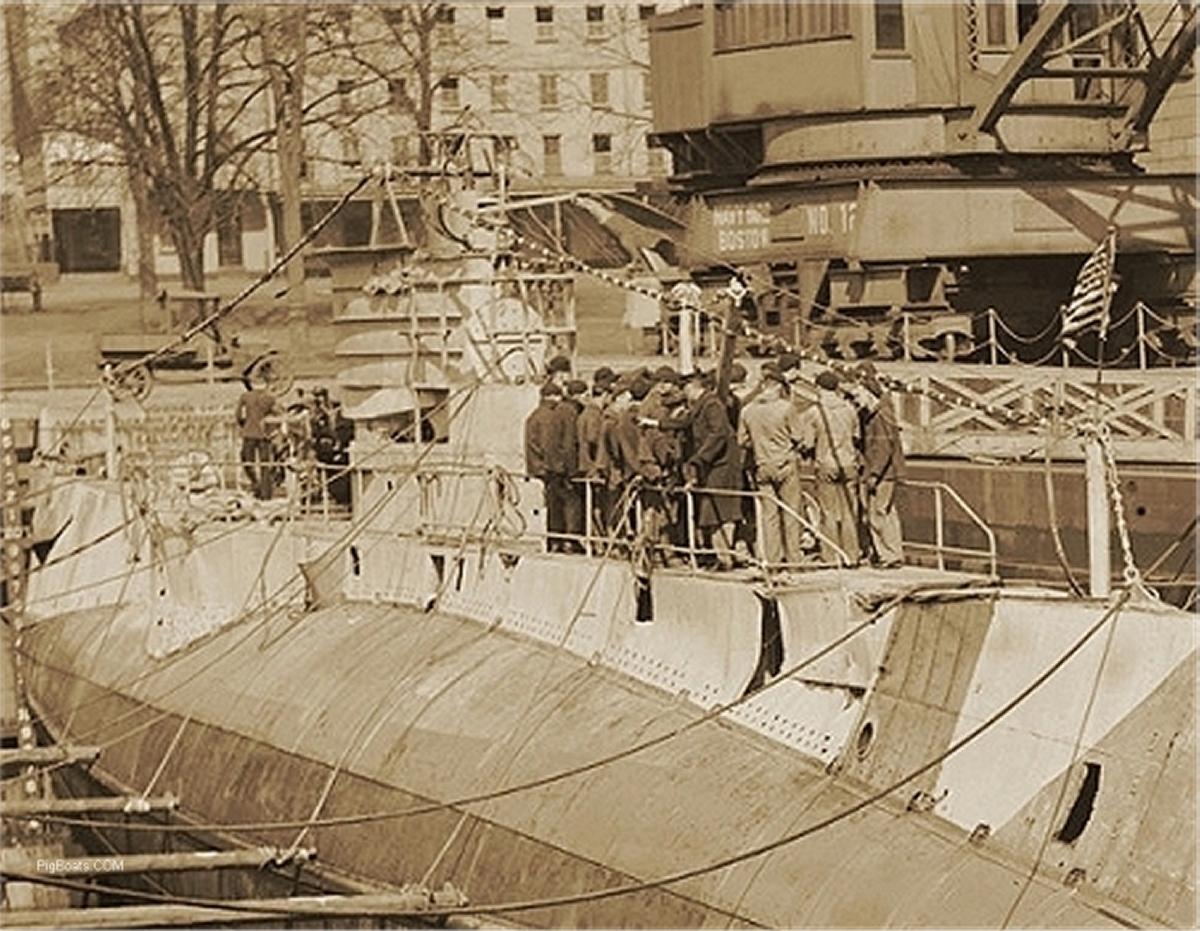
The crew of the S-19 had been taken of the submarine on Jan 14, 1925 before the attempt to pull her off the beach. Here the crew has returned to the submarine after the dry dock was pumped down and the vessel stable. They are seen milling about waiting for the official muster.
|
|
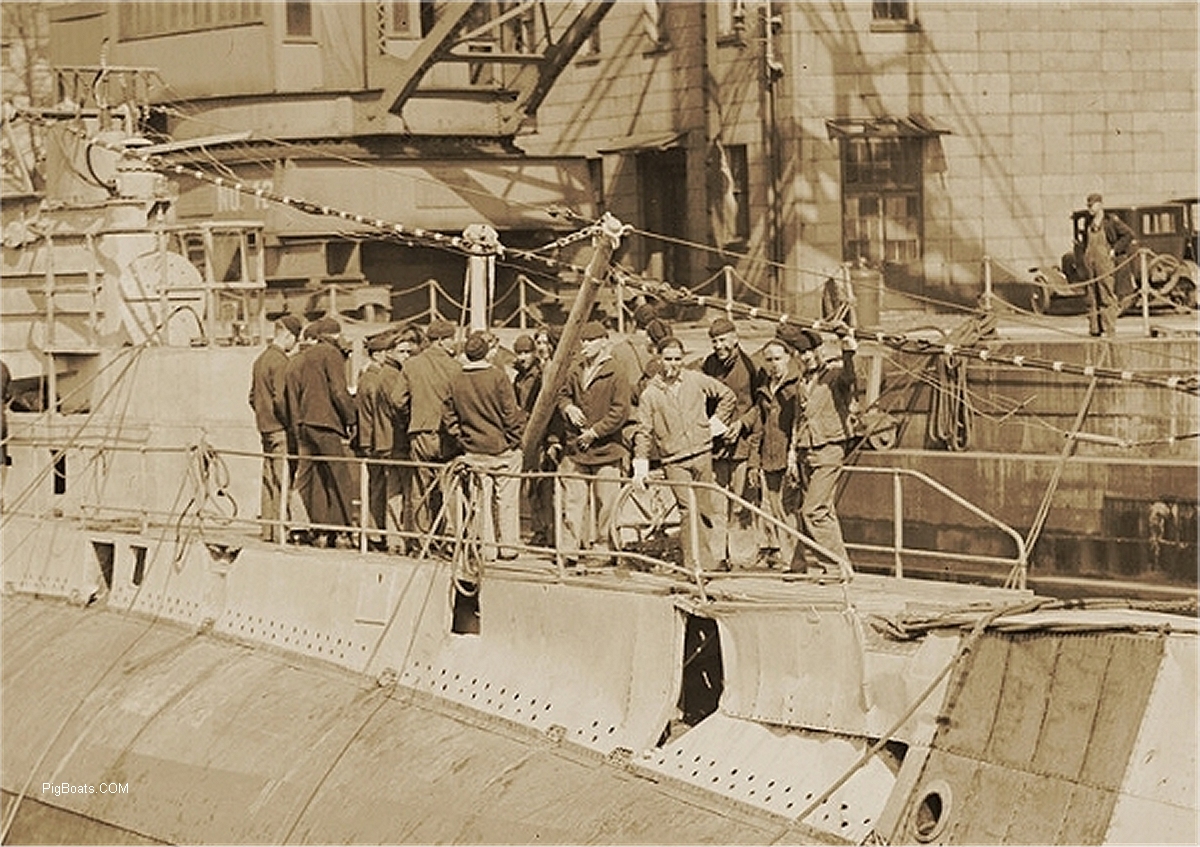
The crew of the S-19 had been taken of the submarine on Jan 14, 1925 before the attempt to pull her off the beach. Here the crew has returned to the submarine after the dry dock was pumped down and the vessel stable. They are seen milling about waiting for the official muster.. Some of the men have noticed the photographer taking pictures.
|
|
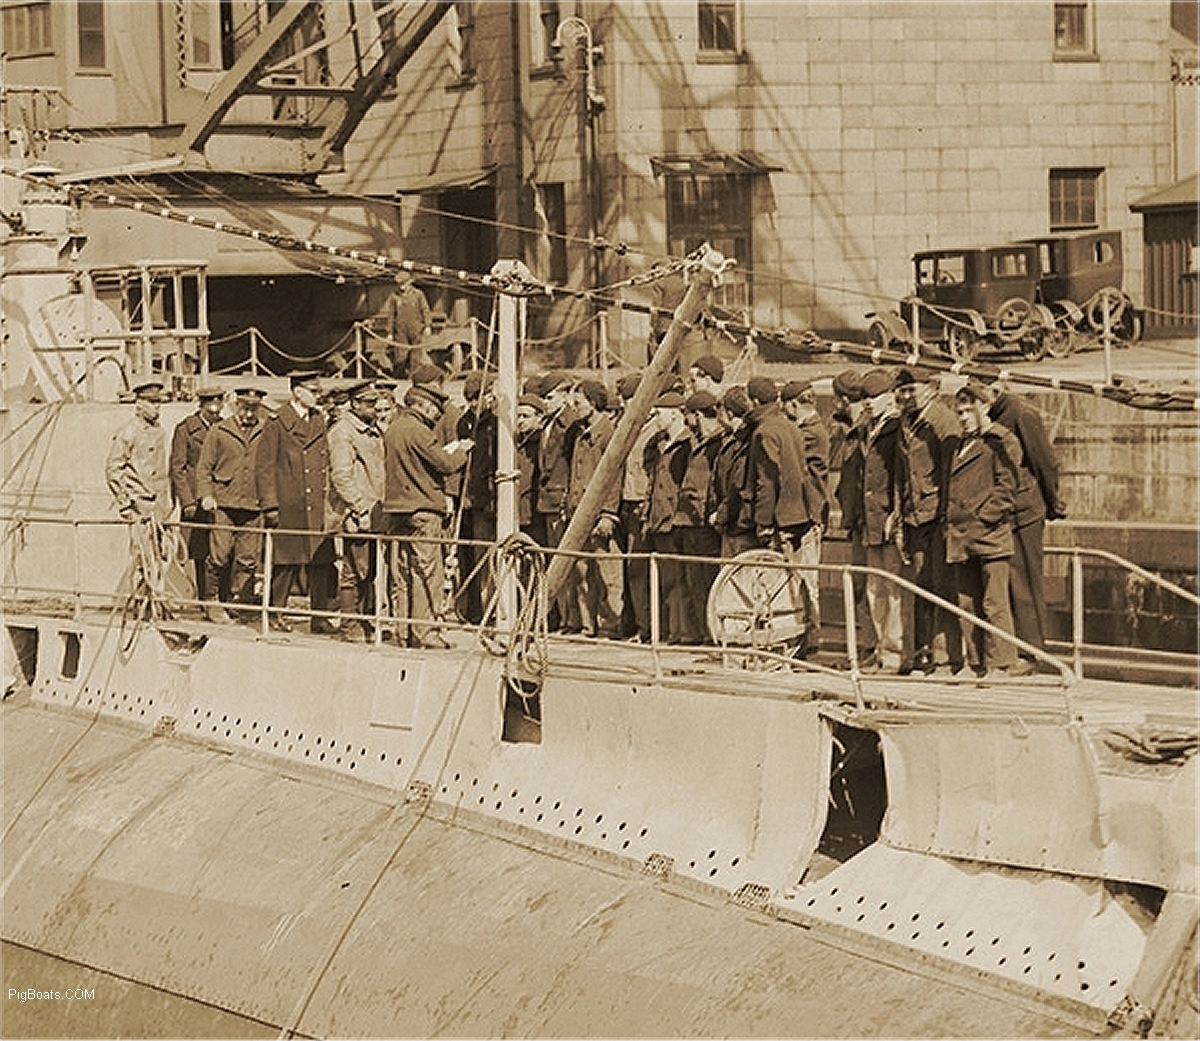
The crew of the S-19 had been taken of the submarine on Jan 14, 1925 before the attempt to pull her off the beach. Here the crew has returned to the submarine after the dry dock was pumped down and the vessel stable. The crew standing in formation for muster and general orders and the Plan Of the Day are read.
|
|
|
|

|
|

|
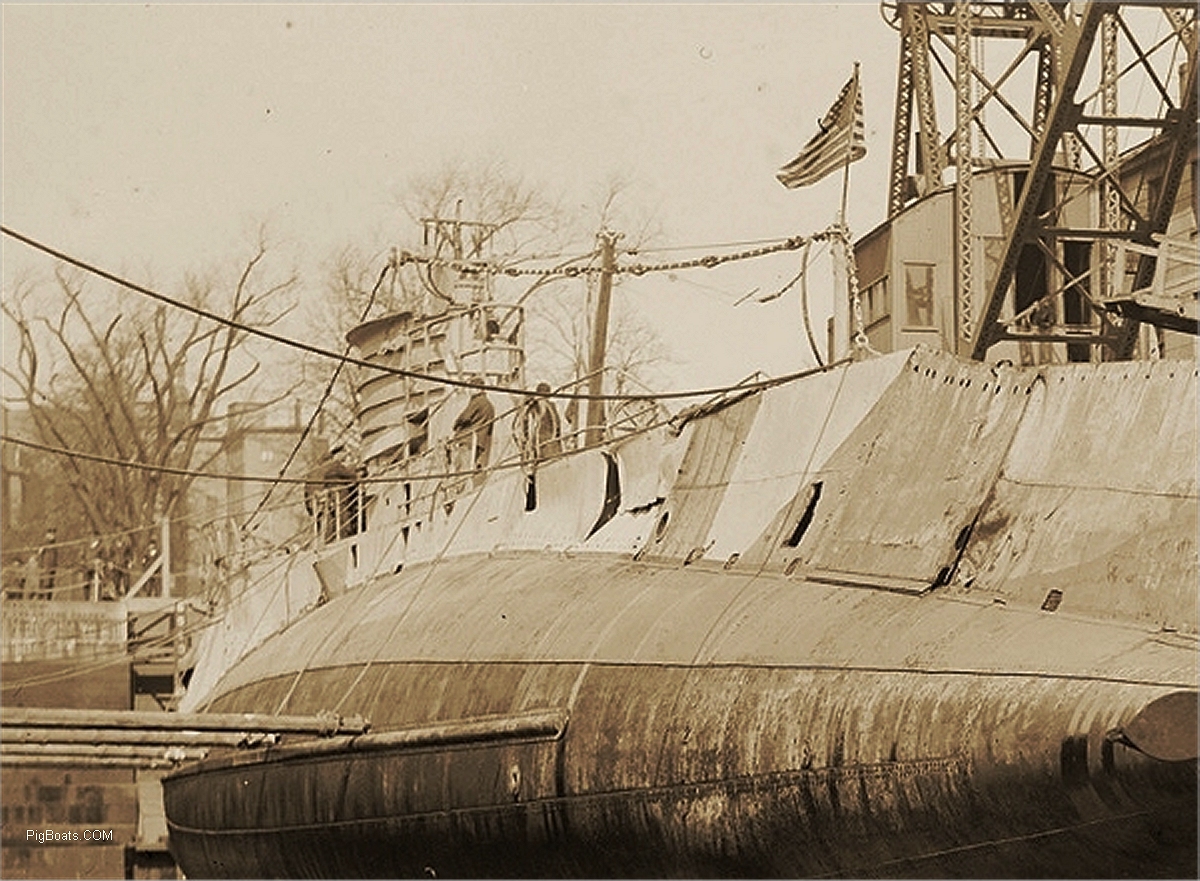
The repaired S-19 ready to hit the water once more. The stern plane has been repaired or replaced and the whole stern section returned to its original postition.
|
The repaired S-19 ready to hit the water once more. The stern plane has been repaired or replaced and the whole stern section returned to its original postition.
|
The repaired S-19 ready to hit the water once more. The stern plane has been repaired or replaced and the whole stern section returned to its original postition.
|

The repaired S-19 ready to hit the water once more. The stern plane has been repaired or replaced and the whole stern section returned to its original postition.
|
 |
 |
| Read / Sign our Deck Log |
The author is a Member of The HTML Writers Guild
